This has taken me a little longer to put together than some of the other reviews. Some of that has been life intruding into hobby time (kids tournaments spring break etc), but also these kits are quite a bit more complicated than the basic infantry and have taken longer to get put together, painted and based.
Today I’ll go through the Eisenkern Support Weapons
Set. This is the last of my DreamForge
reviews for now. I still have Ada, the feral
Shadokesh & handler and the mighty Leviathan Crusader. Ada and the Shadokesh are one of rewards and
are a low priority for me and the Leviathan will probably take me into the
summer to work through and report back on.

This box set provides three heavy weapons team kits spread
over three frames. There is an anti-tank
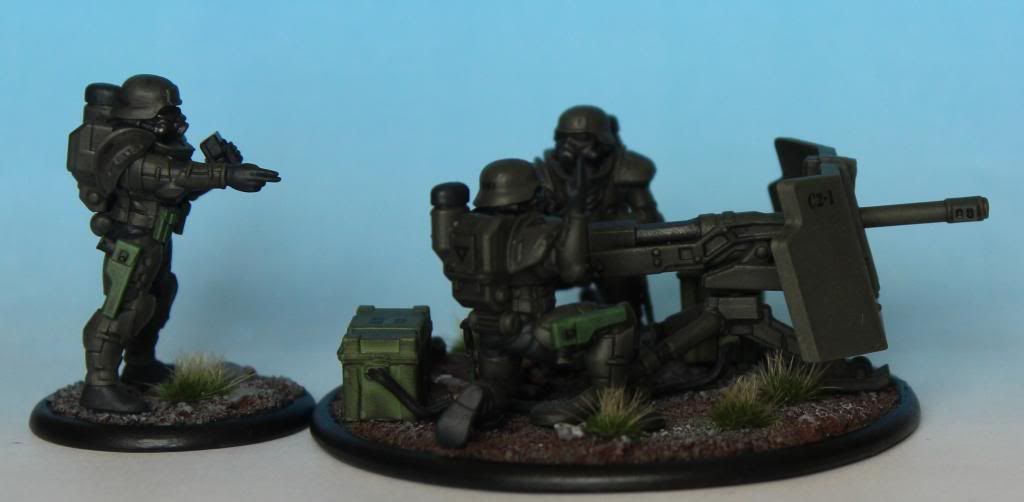
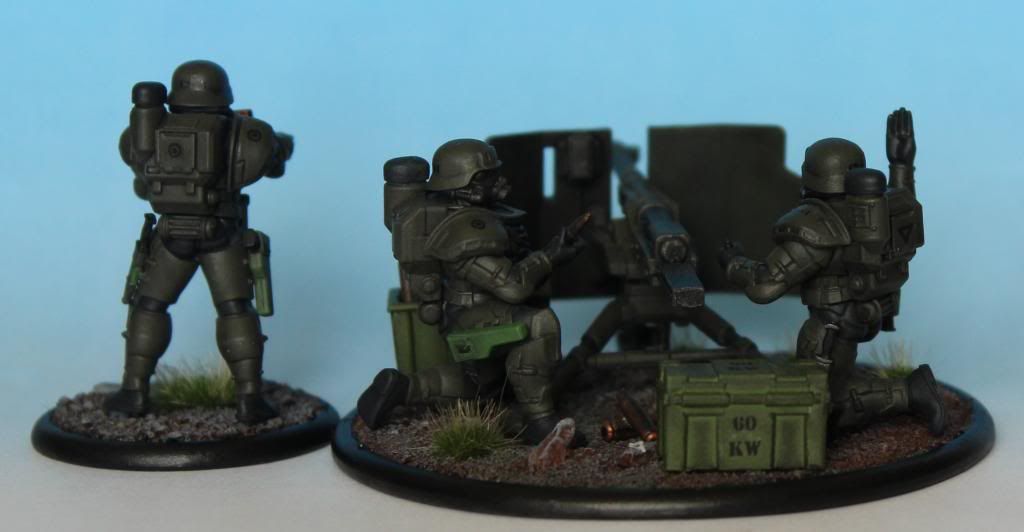
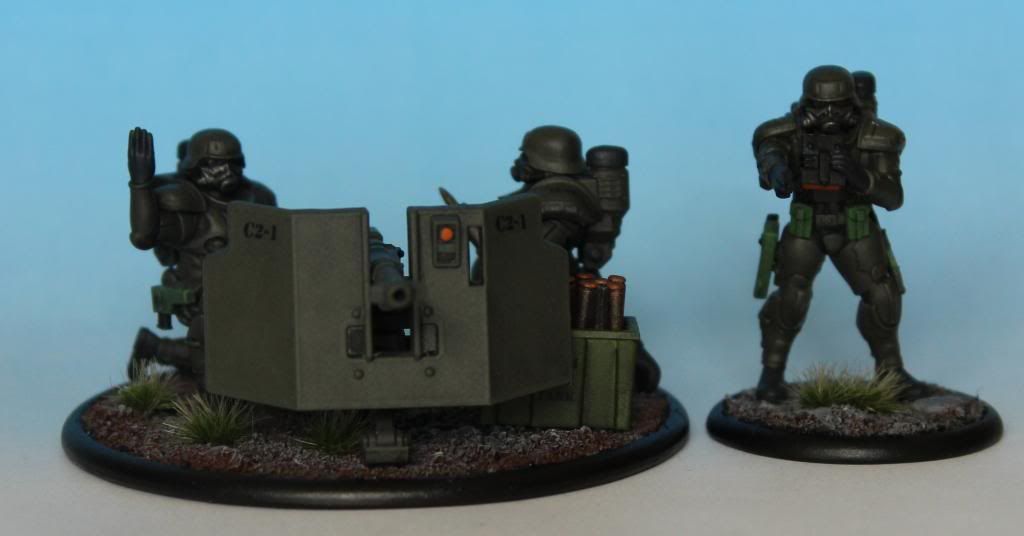
gun, a quad anti-aircraft gun and a mortar. Each team comes with the weapon system, three
crew members and a large base.
Frame #1 – Weapons Crew:
This frame contains all of the parts to build up the weapon crews
as well as a few accessory bits like the battlefield computer. The casting quality is high with no flash and
very little in the way of mold lines.
All of my comments on the original stormtrooper base box go for this frame as
well. A point to note is that almost all
of the body parts are a straight copy and paste from both the stormtrooper kit
and the accessory set. The only original
parts are a set of arms/hands for each weapons loader holding spare ammunition
and an arm/hand holding a firing switch.
Depending on your point of view it’s either a good thing or a bad
thing. It’s not optimal, in terms of customizing your crews,
but the parts were well designed and have enough variation that it shouldn't overlap too badly with your regular troops if you plan out the poses. On the plus side, all of the parts are
compatible with the other boxes, so mixing and matching parts is a snap.

There are six sets of kneeling legs (left and right) and
three sets of standing legs. The upper
torsos, heads, back packs and shoulder pads are all the same as the
stormtrooper box. There is a nice
variation of arms from both other sets as well as some new arms holding ammunition, or firing the AT gun. The frame
also has three battlefield computers and three sets of binoculars.

One thing I found lacking was any personal weapons. There are no rifles, SMGS, pistols or even combat knives for
the crew. This probably makes sense for game play purposes, but seems odd when
you look at them as just models. I rectified
this by giving my crews holstered pistols and combat knives from the accessory
set. If you have an accessory set, there are also plenty of spare weapons on there that could be placed on the base.
Frame #2 – Weapons Systems:
This Frame contains all of the parts for the heavy weapons
themselves as well as the attached support equipment and spare ammunition. It also contains one of the large bases. Each weapon system comes with one
crate (I assumed a power pack), cabling to the weapon mount and an open crate of
spare ammunition. The AT gun also comes
with individual live and spent shells and the mortar comes with some sort of
sensor or targeting mechanism similar to what’s on the mule head from the accessory set. The bases have the same thin profile and
rounded lip of the 30mm infantry bases with the DreamForge logo on the bottom. The bases don’t come with any holes for
mounting the infantry, so once you determine the positioning of the figures
you’ll want to drill your own.
The bases are one area that frustrated me somewhat. The outside of the bases measure 63mm and the inside of the lip measures 60mm. This means that aftermarket themed bases (typically 60mm) will be a little too small. As the bases are already crowded with crew and equipment, stepping down to a smaller base isn't an attractive option. A standard size base that matched other manufacturers would have been preferable to me.

This is the first DreamForge frame that I found to have some
real mold lines. There seems to have
been a small offset of the mold halves that has left mold lines on virtually
all the parts. They are not insurmountable but if you want the best looking result you’ll have to spend
more time cleaning up the parts than on the other kits. I don’t think this is enough that anyone
should avoid the kit, but it’s certainly something to keep in mind.

Frame #3 – Bases
The last frame contains two additional large bases, the
same as above.


Instructions
Like the other kits this one contains a single page, front
and back set of instructions. They are
much clearer than the stormtrooper set and are a good aid to the assembly of
the weapons. One mistake is the diagram
on the crew shoulder pads. They are
shown going on the model backwards.
Hopefully that will get fixed in future printings.
Construction
As with the stormtroopers, the weapons crew went together
easily and painlessly. One note of
caution would be to assemble the weapons first and then assemble the crew
around them. I put my crew together separately, and some of the heads are pointing off in odd directions. If you use all three crew
and all of the equipment, the bases will get quite crowded and you’ll want to
carefully plan your crew poses. I cheated somewhat and put the standing observer figures on separate 30mm bases which I stole out of one of the infantry boxes, however any generic 30mm lip base would work. As with my other infantry models, I added a few detail parts from the accessory sets (pistols, knives, pouches etc).
From a construction standpoint I found the weapons
themselves to be a little hit and miss
The AA gun is very fiddly to assemble while the mortar and AT gun are a
snap. I get the feeling that Mark did not
put quite as much time and effort into the parts breakdown of this kit as he
did with the stormtroopers or the Leviathan.
The AA gun is where the most issues lie. First, the assembly of the gun barrels, mount, and rear arm go together with posts and holes that are just a little too small. If you try to force them your are liable to
break something. The better solution is
to back scrape the posts with a hobby knife to slim down the diameter enough to
loosen the fit. Next, up are the drum
magazines. These have small tabs on both
the magazine and the gun instead of a male/female tab and slot. If you just glue them as is, the joint is not
strong enough. I ended up shaving off
both the tabs and gluing the drum straight to the gun.
Another issue is the mounting point for the gun shield to the
bottom of the guns. This is a but joint
that again does not seem to be strong enough.
After I had glued the parts together with solvent model glue I added
some gap filling super glue to the inside joint to try and strengthen the bond. The last issue I had with the AA gun were the legs to
the mount. There are four legs that fit
into slots on a center hub. The legs
are just a little too thick to fit into the hub and as with the guns I found
the best method was to back scrape the legs until they fit into the slots.
Similar to the mechanical mule in the accessory set, the
mortar has some thin and fragile parts that will require time and patience to
gain the best results. Also, you will
need to be careful during painting. I
got a little too vigorous with dry brushing and broke off the support legs and
had to repair them.
I strongly suggest leaving the weapons and cables separate
for painting. Otherwise there are some
areas that will be nearly impossible to paint.
I also left the gun shields off for painting as well.
As I stated above, I still haven’t based the figures. From what little information available on
the game rules, the spotter figure(standing with binoculars) will be an
option. As I want to keep the figures as
cannon as possible, I’m considering either magnetizing the spotter or just
putting him on a separate 30mm base of its own.
One change I made was to magnetize the mount on the AA
gun. From earlier posts I’m working on a
scout car conversion and I haven’t settled on the weapons. To keep my options open, I drilled a set of
1/8” magnets between the quad gun and the mount. The magnets fit width wise but there was not
quite enough room vertically. To solve
that I put in a 1/8” spacer made of tube styrene. The end result blends pretty well and gives
me the option of mounting the gun in the back of the Warthog.
Conclusions
This is another good kit.
It does have some in built challenges with mold lines and part design,
but I think they are outweighed by the end result.
Overall they go together well and result in some nice and convincing
weapons systems. With the AA gun, definitely
take your time, read through the instructions and think happy thoughts. Other than that I’d recommend these to anyone
that likes great plastic figures. While
they are not quite as fantastic as the stormtroopers, they are still a great
addition to expand the line.
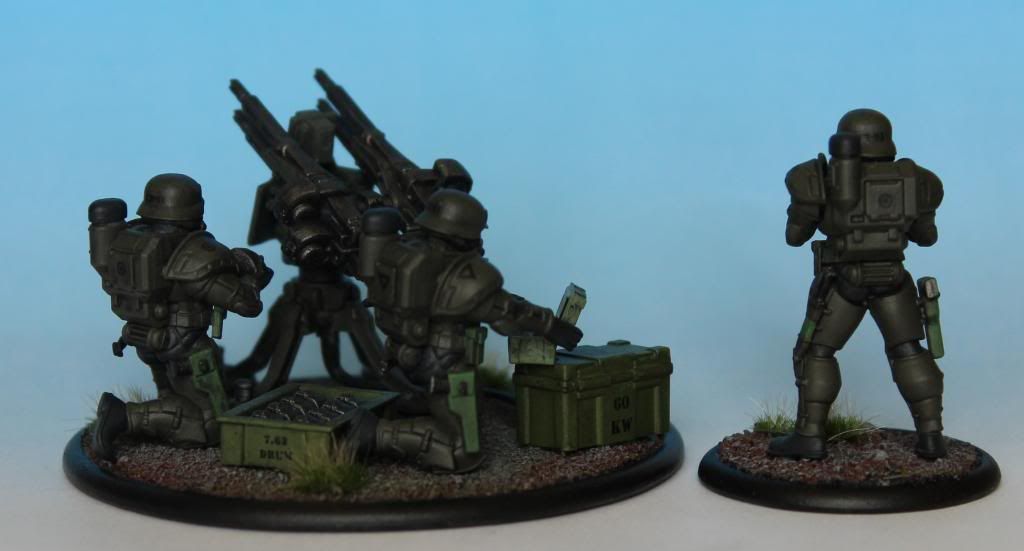
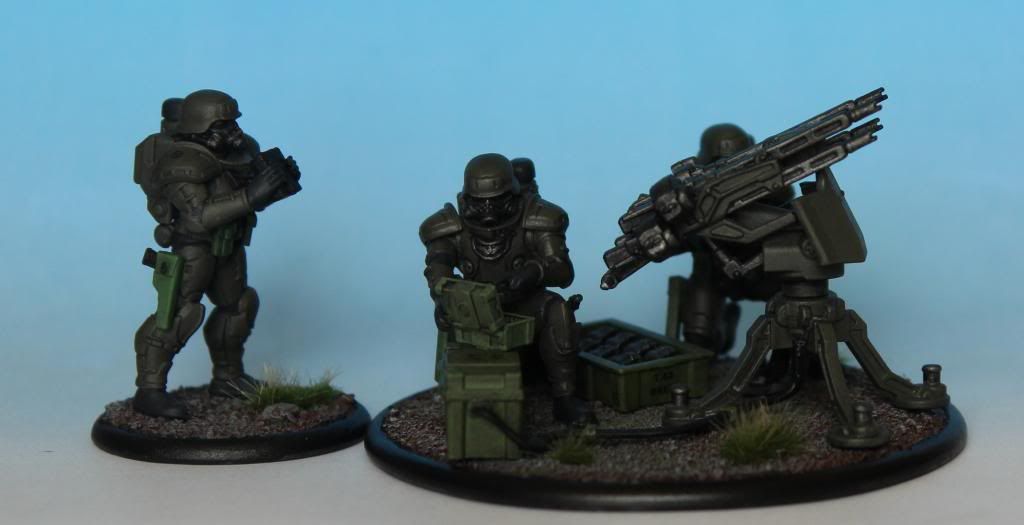
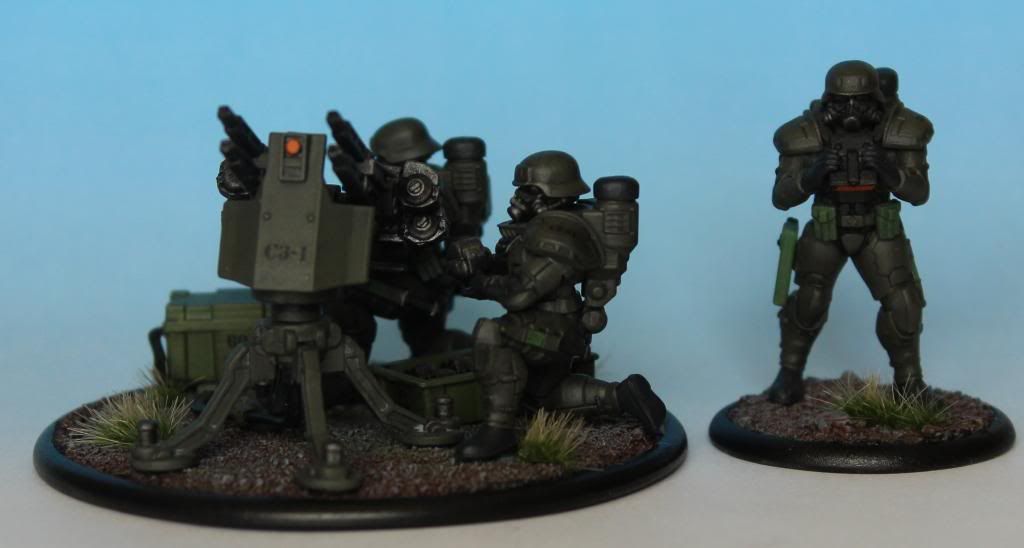
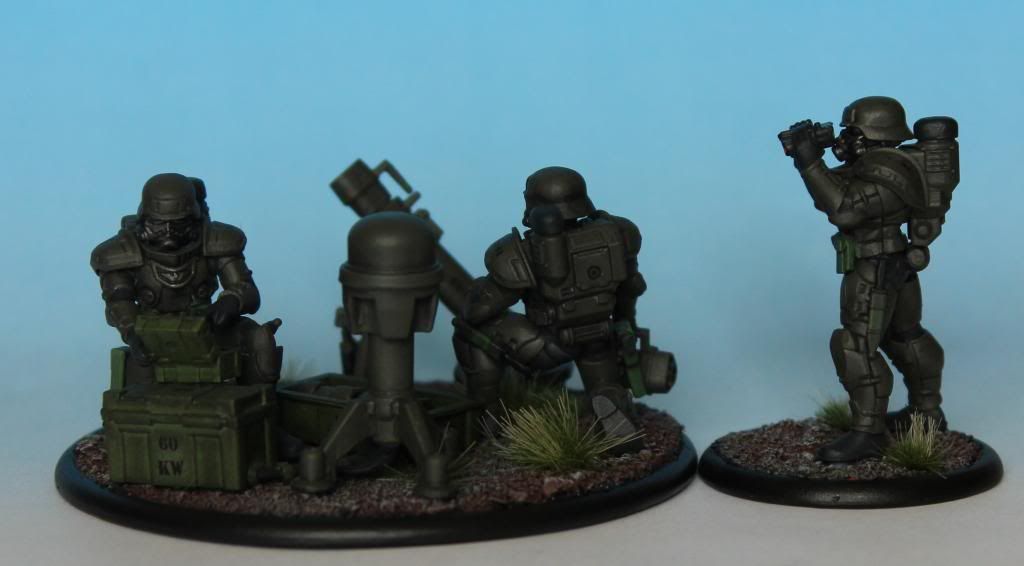
Now on to the finished figures. As mentioned above, I thought the bases were too crowded for all three crew and I put all of the forward observer figures onto a separate 30mm base. As these are optional figures in game terms, I'm not too worried about them in terms of future rules. I flocked the bases with the same combination of rocks and sand as my infantry figures, but felt they looked a little too sparse I added some tufts of Silfor grass to break them up a little. Lastly, when I as doing decals for the weapons systems I decided to add some home made rank and unit insignia for the troopers. I put a rank on the backpack and right pauldron and a unit marking on the back of the helmet and left pauldron. I like how it turned out and might go back and add them to my already completed troopers.
I didn't glue the hands close enough to the face so the binoculars are pointed down instead of out. Dang.


I really need to weather the gun shield of the AT gun, but I just don't have the time right now.
As I mentioned above, I added a set of magnets between the AA gun mount and the head. It sits about 1/8" higher than standard, but I can remove it and maybe use it on my warthog.