I started purchasing kits from Miniature Scenery back in
2006 when they were still milling MDF with a flatbed CNC machine. The kits were innovative for their time, but
the limitations of the cutting head (1/4”) greatly limited what they could do
in terms of design. Flash forward seven
years and they have jumped into laser cutting MDF with both feet and are
producing some ambitious kits that are pushing the design envelope for the
medium.
The biggest drawback of many laser cut MDF kits is the fact
that you can only make vertical cuts, leaving many kits looking flat and
uninspiring. The solution is to engrave
detail into the surface and to build detail up in layers. With the Heavy Multi-purpose Transport (HuMPT
1) kit, CNC Workshop is taking this idea to new levels by creating sub
assemblies that build up into interesting three dimensional shapes.
I saw the announcement for the kit in early July, and even
though I was on vacation, I ordered one right away. I had to read the description several times
to make sure that this really was an MDF kit.
I was intrigued and a little skeptical that you could get that kind of
effect out of MDF. CNC is an Australian
producer and I’m an American consumer, so there was a bit of sticker shock with
the shipping for the kit by itself. I
combined the order with a number of other kits to get a better shipping number
and the end result was only $29 total for the kit which was definitely more
palatable than ordering the kit by itself.
Shipping to the US took just under two weeks, which worked out just
right for the end of my vacation.
OUT OF THE BOX
The kit comes as a single 13” x 9” sheet of MDF. There are no printed instructions, but CNC
has posted them on their website (Link to instruction PDF). The instructions are a fourteen page
PDF. There are no part call out numbers,
so you will want to read the steps carefully and dry fit pieces before gluing
them. Some of the parts, especially the
axels and engine block have similar but different sizes. The electronic instructions were fine for me
as I just set my laptop up on the workbench and followed along.

CUTTING & PART
CLEAN UP
As far as tools are concerned, you won’t need much. A good hobby knife, 320 grit sand paper and
glue were all I needed. I ended up using
two hobby knives. The parts are attached to the frame with
small bits that will have to be cut through and then there are a fair amount of
burs on the back side of parts that will need to be cleaned up. Cutting through the attachment on the frame
tended to dull my blade fairly quickly, so I used one blade for cutting and
kept a sharp blade handy to clean up the burs.
If you try to clean up burs with a dull blade you can end up tearing or
delaminating the MDF.
The cutting laser leaves a slightly rounded edge on the top
of the cut but a sharp edge at the bottom.
For parts where you see that bottom of the cut such as the rear view
mirror bar you want to spend a minute or two rounding over the bottom of the
part with sand paper to match the top.
ASSEMBLY AND PAINTING
After reading through the instructions, I was a little
hesitant to jump right into the frame, so I started off with the wheels to get
a better feel for the material. This is
when I first noticed issues with the actual laser cutting. The quality of the cutting is a little lower
than I am used to on laser cut kits.
This manifests itself in three ways:
1.
When the laser starts a cut, it has a small
amount of “over-burn”. The beam must
stay still for a fraction of a second too long because it will burn a dimple
that is larger than the rest of the line.
2.
Next, the cut lines themselves are a little imprecise
on tight curves with a radius under about a quarter of an inch.
3.
Last, the cutting depth of the laser is
imprecise as well. In parts such as the
tires, this leads to spots where the laser hasn’t cut all the way through,
leaving many burs that need to be cut and cleaned up. On some of the detail engraving parts like
the foot pedals, the laser cuts too far and there are numerous small burn holes
in the back of the part.
None of these issues was a big problem in and of themselves,
but put together, they were a little disappointing, especially compared with
some other laser cutting examples I’ve built from Sarissa Precession and Micro
Arts Studio.
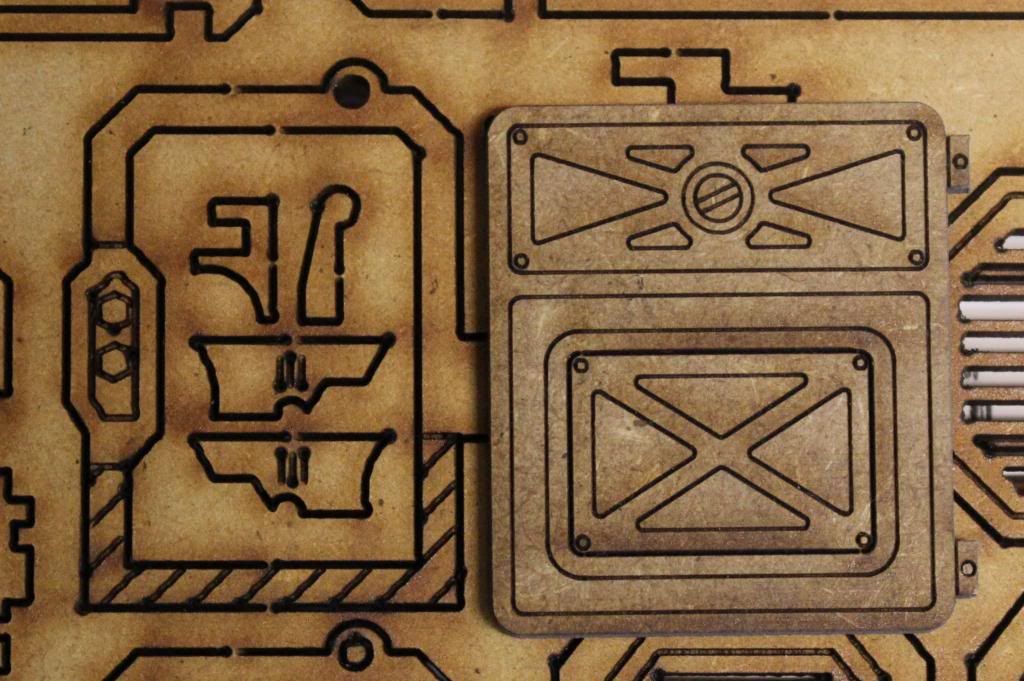 |
| This is a picture of a different CNC kit (background) versus a door from a Sarissa Precission hab kit (in front). The laser cutting on the Sarissa part is significantly finer and more preciese. |
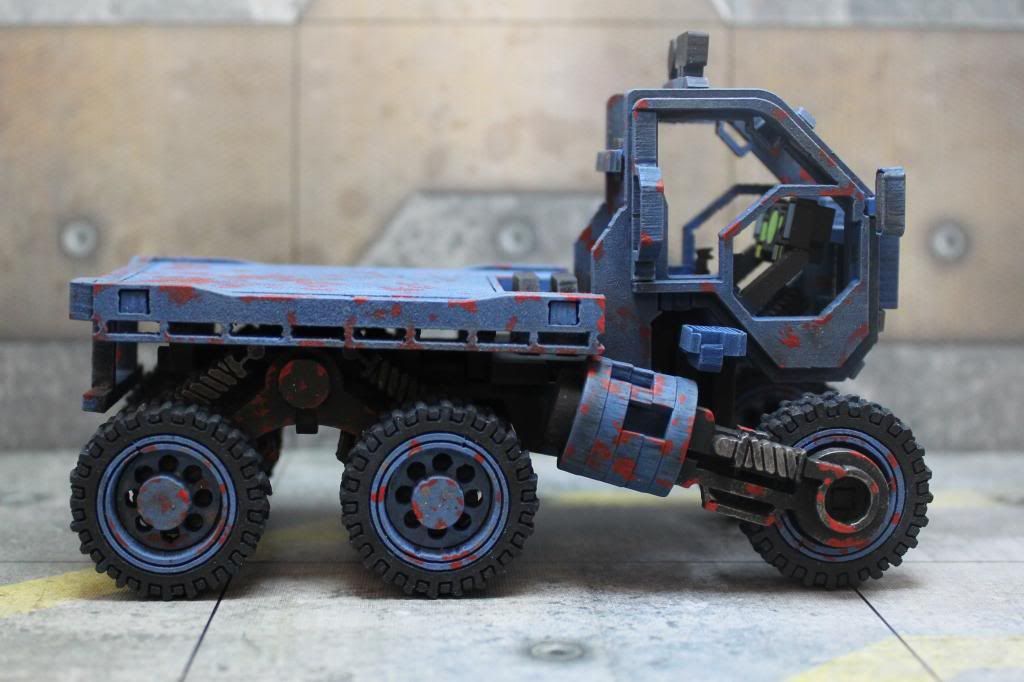
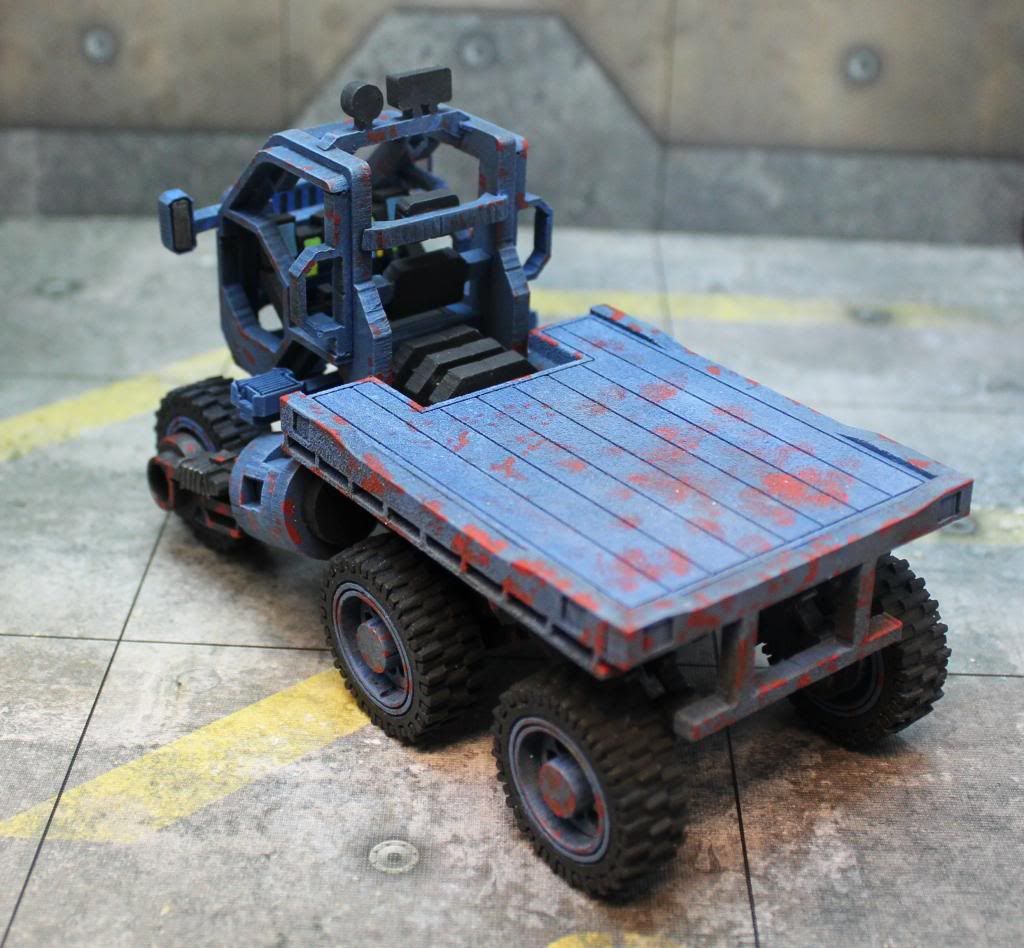
On this kit I’m
not too concerned. The HuMPT1 kit represents a
rough and ready utility vehicle that I can imagine making deliveries in some
third world slum or hauling slag on some frontier mining colony. I can imagine that the frame was hand cut by
someone with a plasma torch. In that
perspective the laser quality still works.
My big worry is that this will look shabby on a kit that is not intended
to look “rough”.
I started the assembly with water based wood glue, which worked fine on the wheels and parts with a larger surface area. However when I got to parts with a smaller surface area like the hubs I switched to a cyanoacrylate glue (Instacure Plus). I used a 5 second gel that wouldn’t run everywhere but still gave me a few seconds to get the part positioned correctly before it started to bond. I found that for the smaller parts, the wood glue just didn’t give a sufficient bond.
I built and painted the sub-assemblies as I went. I started with a black spray primer. The cut edges can absorb the spray medium
before it dries, leaving a dusty feel, so it’s best to follow up with a brush
on primer to get everything covered and sealed.
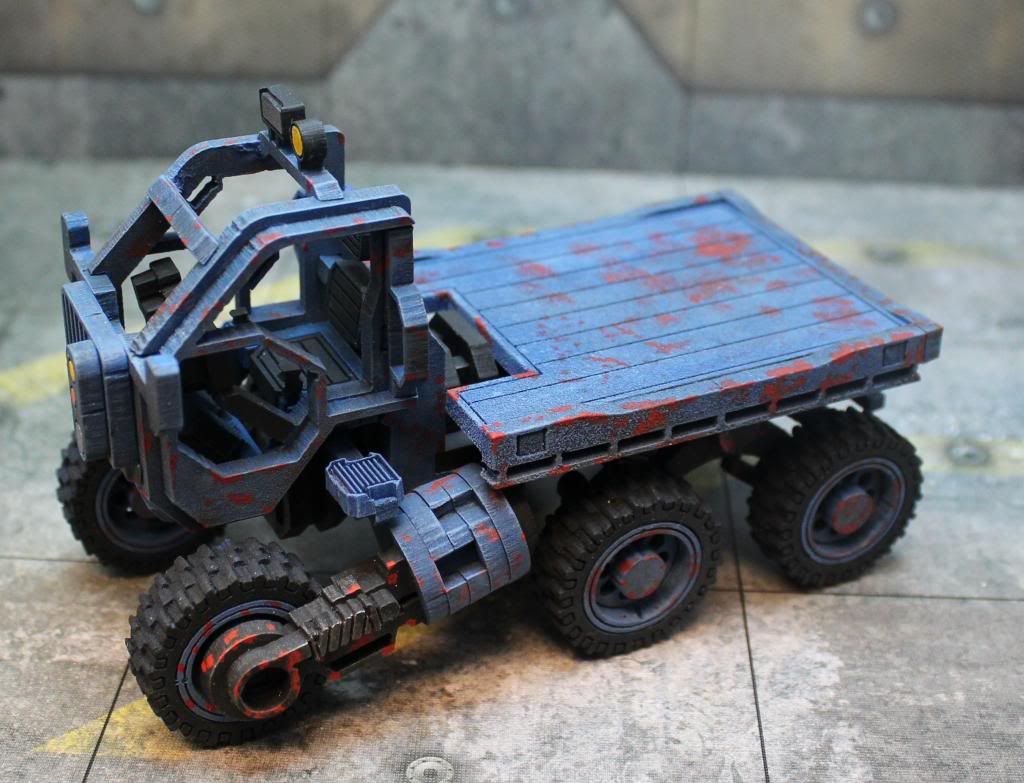
I then went for a rusted and weathered blue paint scheme on the body and
rims and a black frame.
Next I moved on to the rear and front bogies. The rear bogies are pretty straight forward,
but the front bogies require paying close attention to the instructions. Assuming theses are large pistons, the outer
“casing” is made of five stacked rings.
Be careful as the order and facing is very important in this step. For the pistons I switched back to the wood
glue which gave me more time to get the stacked disks lined up correctly. The center post running through the part
isn’t very tight, so you can’t really use it as a guide to keep everything
lined up straight. Even with taking care
I didn’t get them lined up exactly right and there is a little offset on the
steps up to the cab.
I now moved on to the frame, bed and cab. I concluded that attempting to paint the inside of the cab after assembly was going to be a royal pain and decided to toss out the instructions and work in sub assemblies. The bed and frame were simple and went together per the instructions. For the cab, I decided to assemble it off the frame and in two parts. From dry fitting, I figured out that I could assemble the two halves to the frame after painting. I assembled the cab and glued all the left and side of the parts and left the right hand free. After the glue had set up I could pull out the right hand side of the frame for painting. I left off detail bits like the grill and rear axle for assembly later. The cab halves were a little fragile, but as long as I was delicate with my dry brushing nothing popped off.
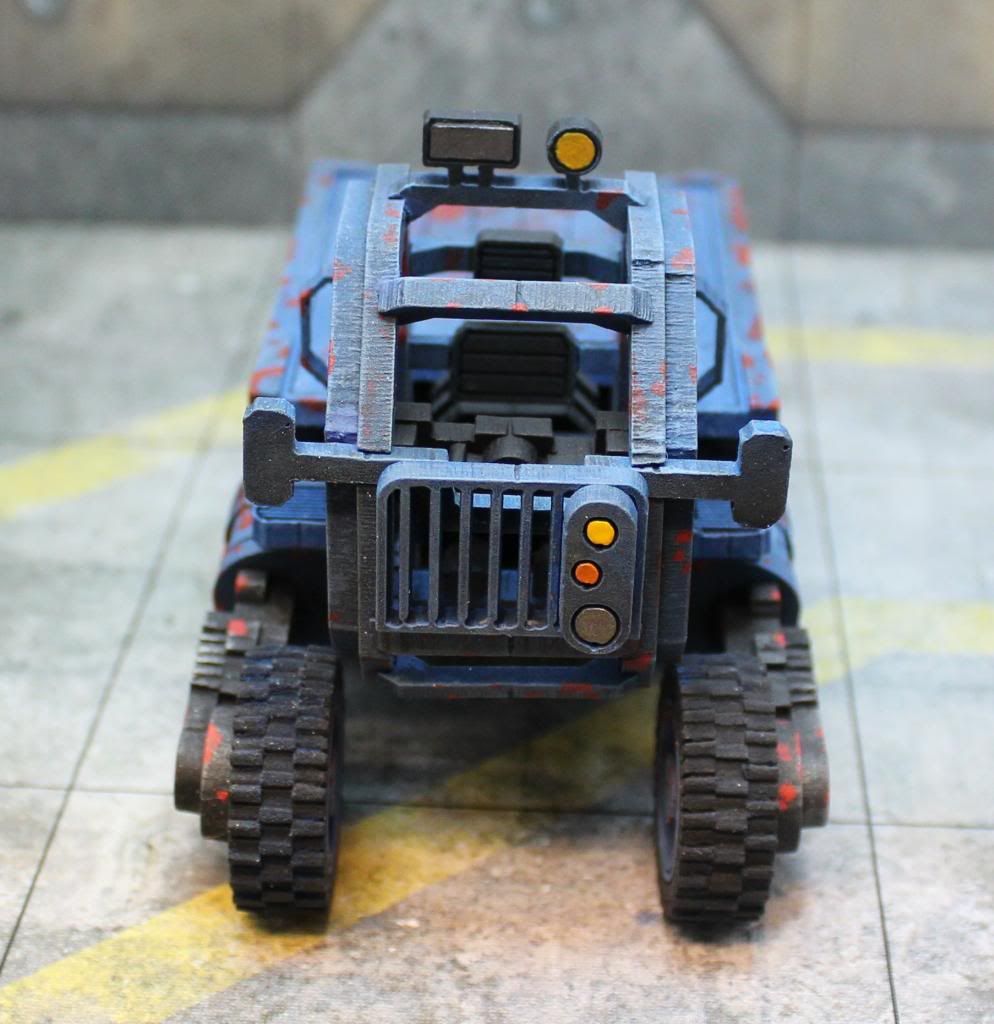
One issue to be careful with are some very fragile detail
bits. This includes there bogie springs,
rear view mirror bar, control panel, foot pedals and cab steps. I think the CNC got over ambitious with the
design and left the walls of these parts just too thin. The instructions warn you about this (in red
letters no less), but I can’t stress
enough how fragile these parts are. Even
being careful I damaged several parts such as the foot pedals just cutting them
from the frame. If you crack one of the
part walls but don’t knock it all the way off you can repair it with a little
super glue applied with a needle point, but once it’s off, it’s gone.
If the walls had been about twice as thick I think they
still would have looked good while being strong enough to at least make it on
to the model in one piece.
After painting and weathering were complete I very carefully
put together all the sub-assemblies.
Be warned that the final model is a little on the fragile
side. It should stand up to tabletop use
if you’re careful not to pick it up by the delicate parts like the rear view
mirrors, but a trip from the table to the floor and your HUMPT 1 is going to
have a really bad day.
Unfortunately, the model is quite a bit bigger than
anticipated. While there is no listed
scale, at 3 1/4 inches tall I suspect the kit falls closer to 1/43 die cast
cars than it does the 1/50-ish scale of 28mm miniatures. It is still usable but will look a bit out of
place next to infinity or Warhammer 40,000 figures. Even with my larger figures (Wizkids
Heroclix) it looks big. It also dwarfs
my other sci-fi vehicles from Old Crow.
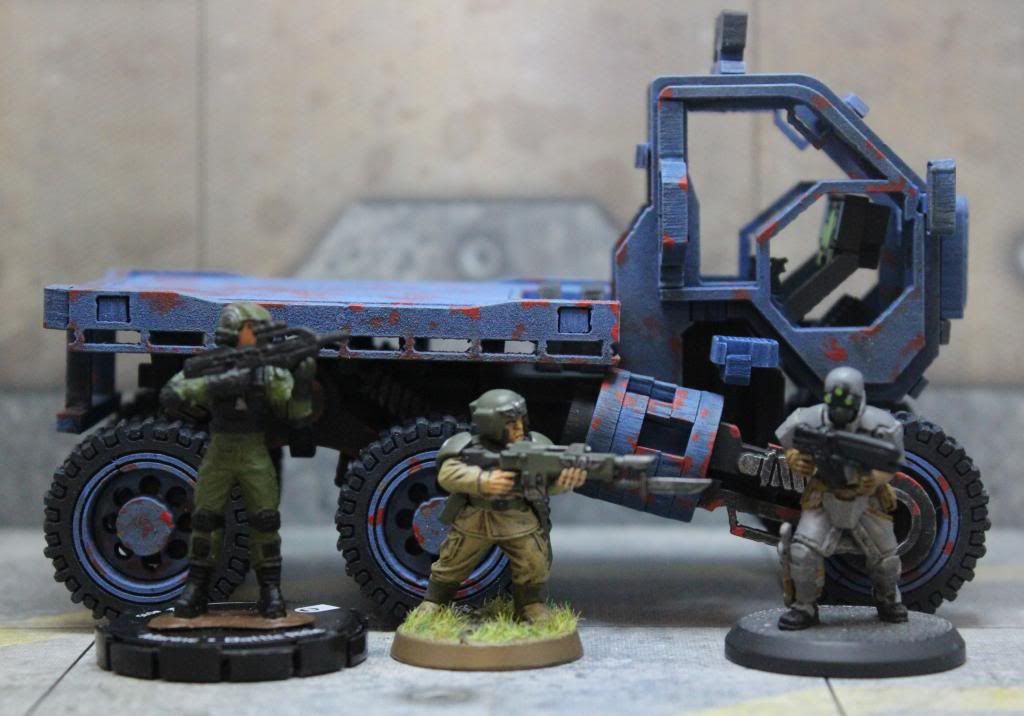 |
| Scale Shot with (from Left to Right): Wizkids Halo Actionclix, GW 40K, Rackham AT-43 |
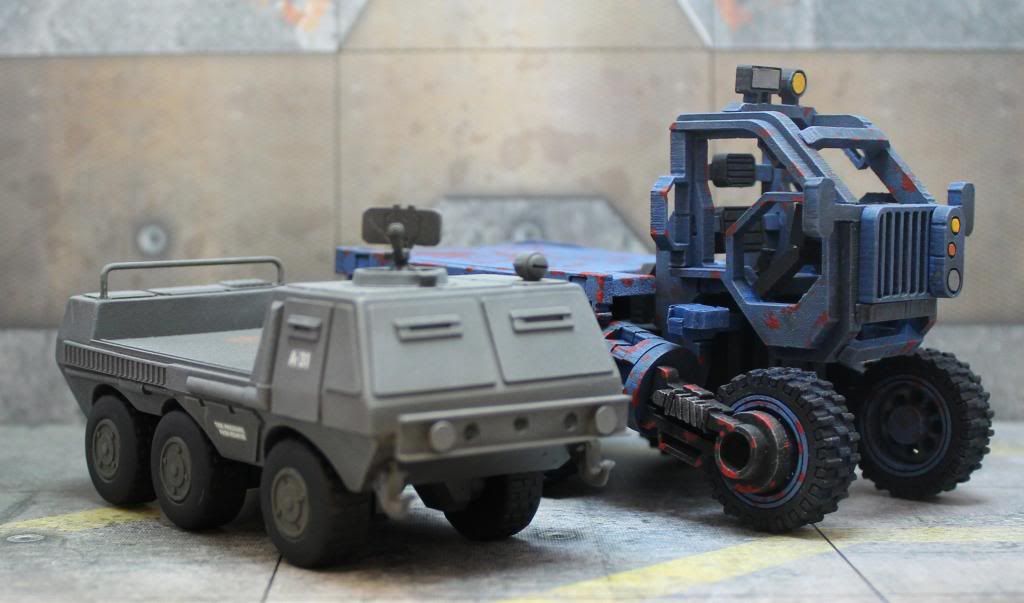 |
| Scale Shot with a "Provider Transport" from Old Crow Miniatures |
CONCLUSION
OK, if you skipped all the boring stuff and just want to
know the bottom line, here is what I think you should know before you buy:
Overall this is a neat kit that can deliver a unique looking
cargo truck that should be a good looking addition to any near-future or hard
sci-fi tabletop.
This is a complicated kit and I would recommend it only for
modelers with a moderate or better amount of experience.
The completed model is somewhat fragile and won’t stand up
to abuse like plastic or die-cast metal vehicles. I’d put it slightly better than resin though.
The completed model is a little on the large side if you are
picky about scale.
The laser quality is a little sub-par in my opinion and
while it isn’t a deal breaker for me it might be for some.
That's an exotic looking machine all right - very nice. But it surely does seem complicated to make!
ReplyDeleteThanks! It really wasn't that tough. It took me back to those old mdf dinosour bones kits I made when I was a kid.
DeleteI like your post. Very impressive way of writing
ReplyDeleteReally Good info about auto transport.
ReplyDeleteThanks for the detailed blog. It gives a better understanding and smooth reading experience about the topic. You may also visit Tractors to explore detailed specifications and useful information related to this tractor model.
ReplyDelete