Sunday, October 20, 2013
Zombtober Week Three - Survivor and Zombie Conversions
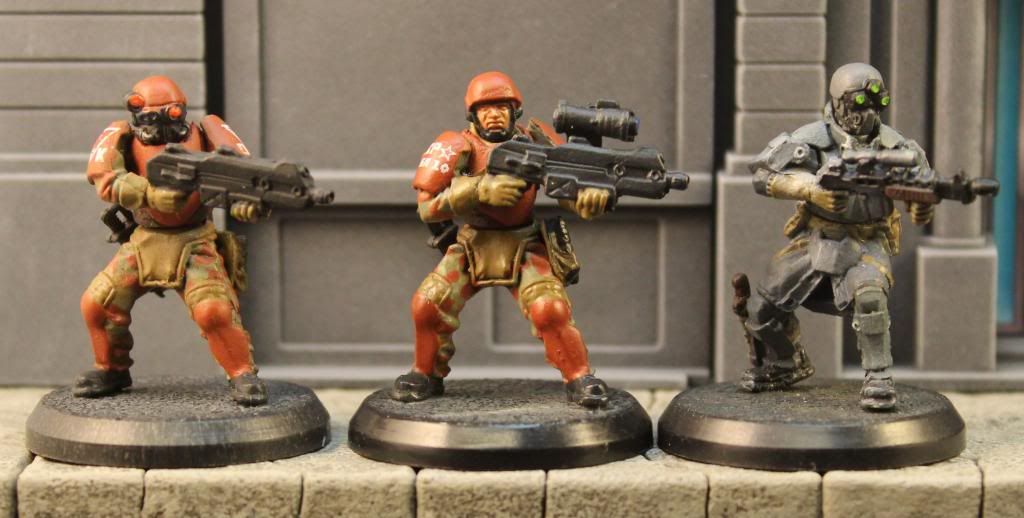
It's another October and time for my third installment of the Zombtober Challenge. This week is a little bit of a cheat for me. I've painted up some zombie and survivor models I converted back in September. You can see the original posts here with descriptions of the conversions and some work in progress shots. I now have them painted and based and here are the finished figures:
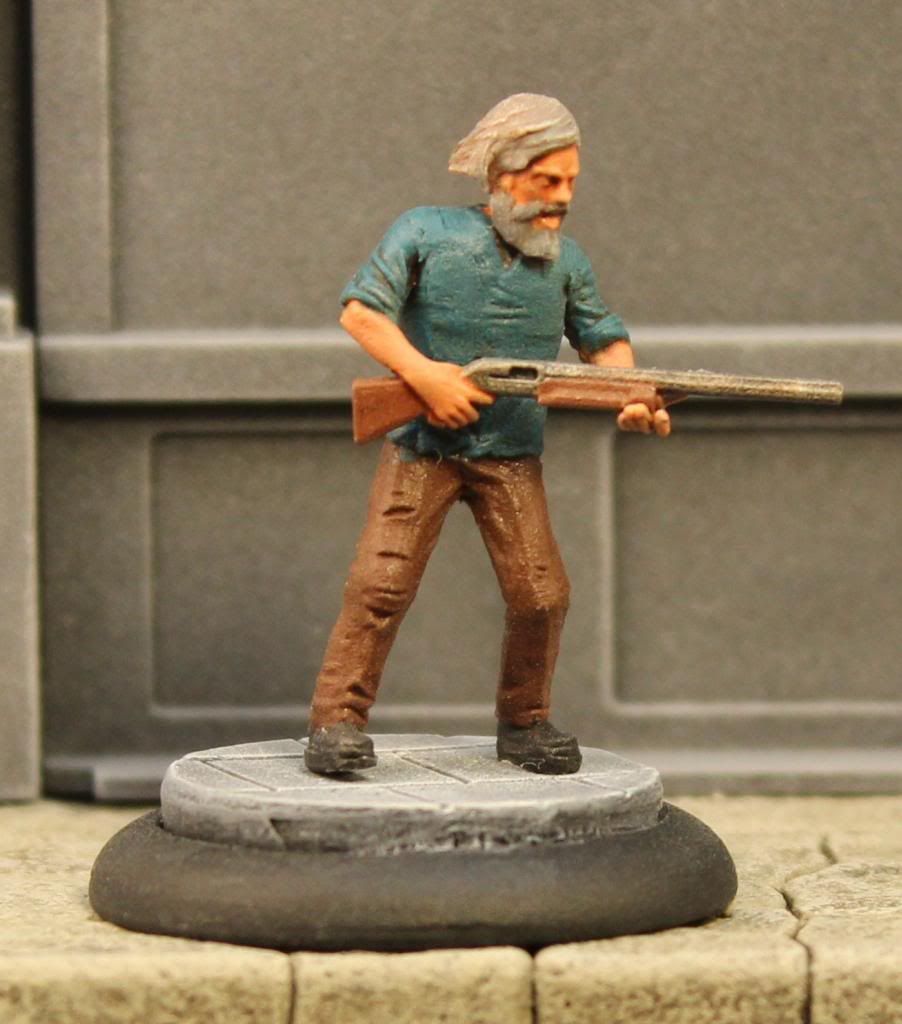
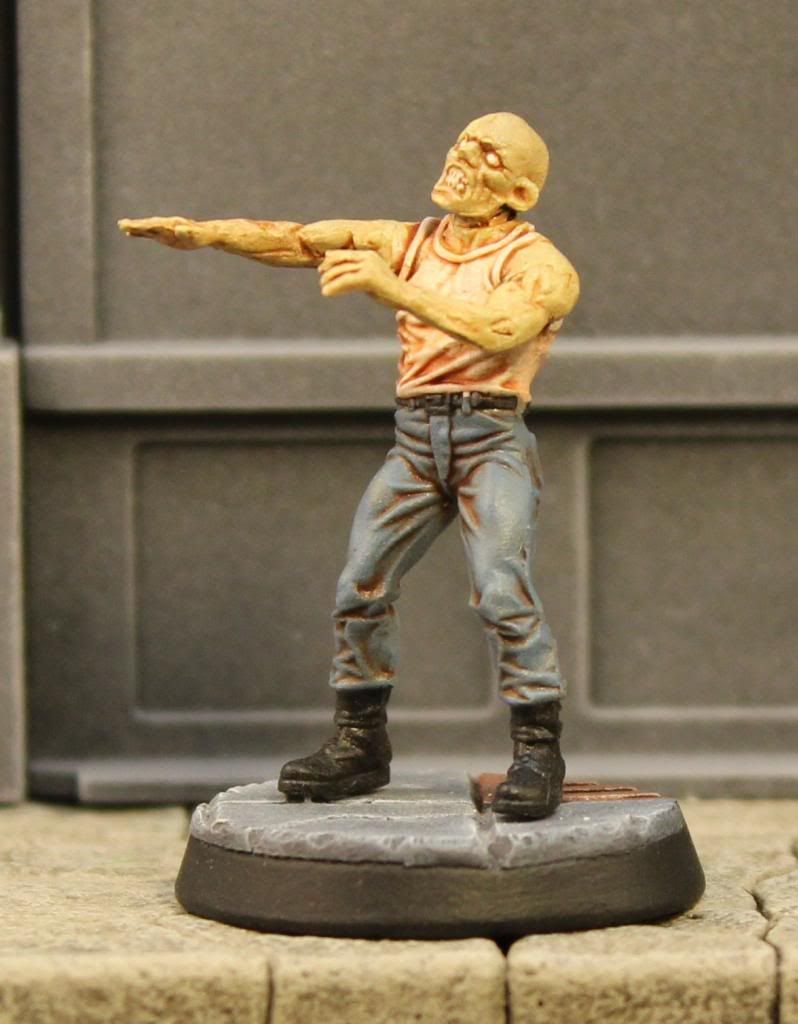
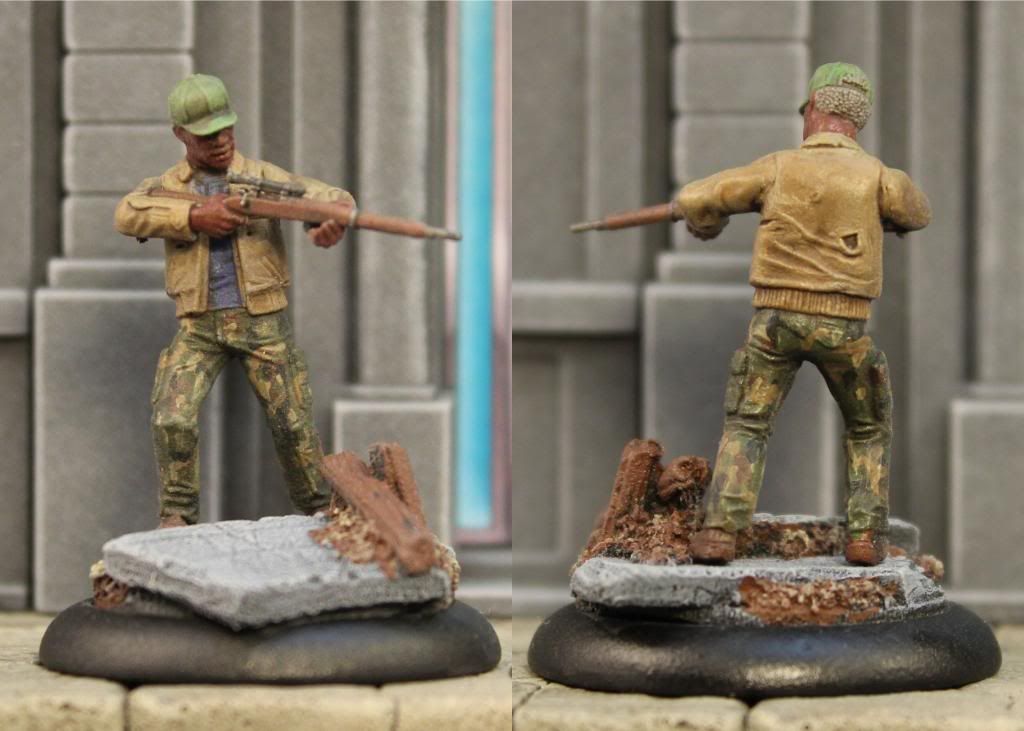
First up is a figure using a Studio Miniatures zombie body with head and arms from Wargames Factory. The figure turned out pretty well. I was a little worried that the head and arms were too big for the body, but the pose and paint did a good job minimizing the differences.
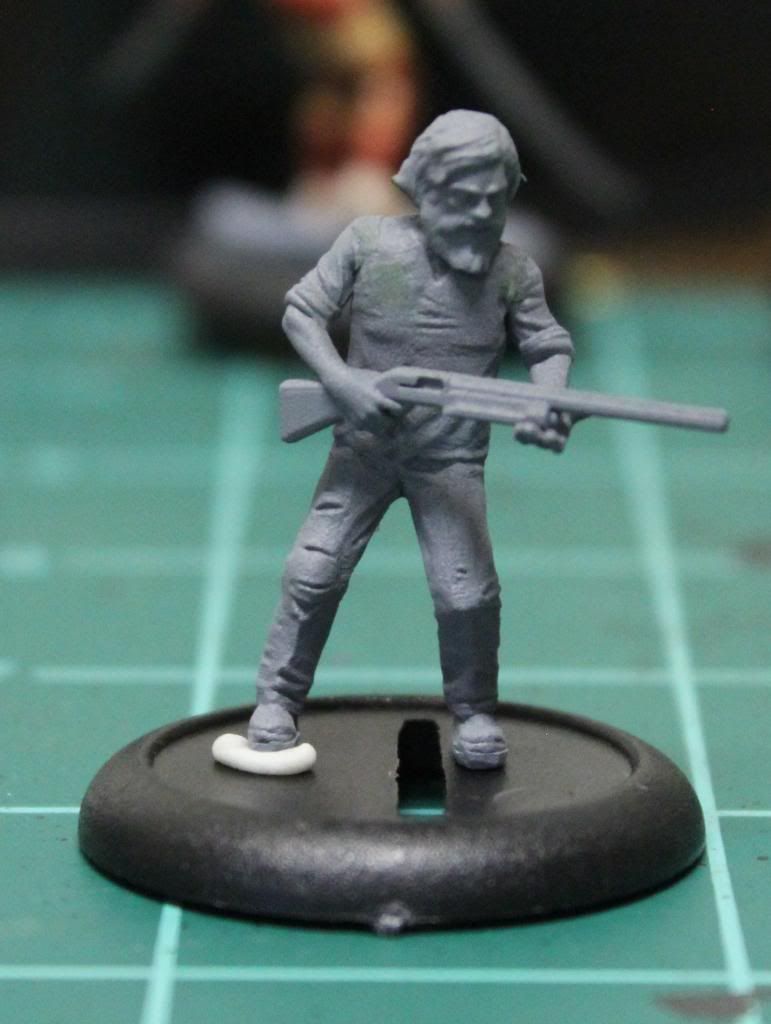
Again here's another Studio Miniatures body worked up as an old coot. This time though I went with a set of WGF arms from the female set, which are slightly smaller. The head is from a much older WGF set. It might have been some celts but I can't remember.
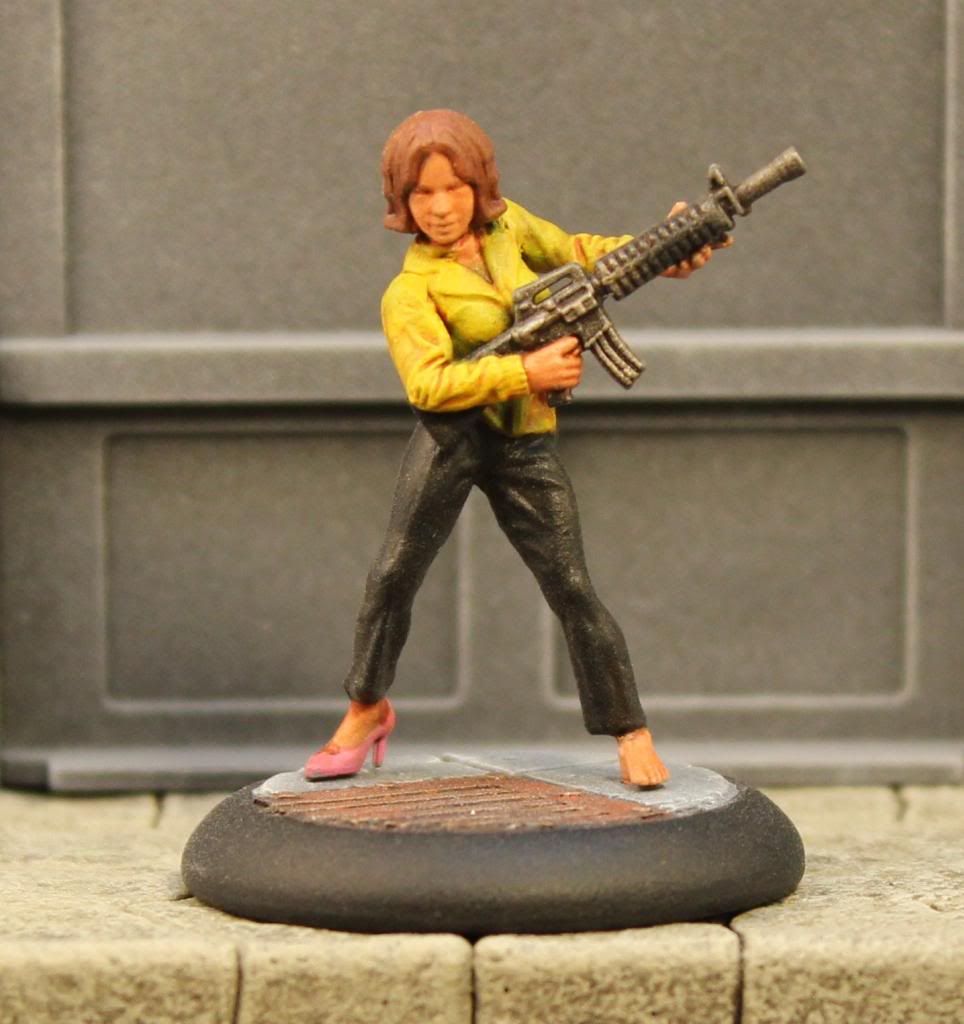
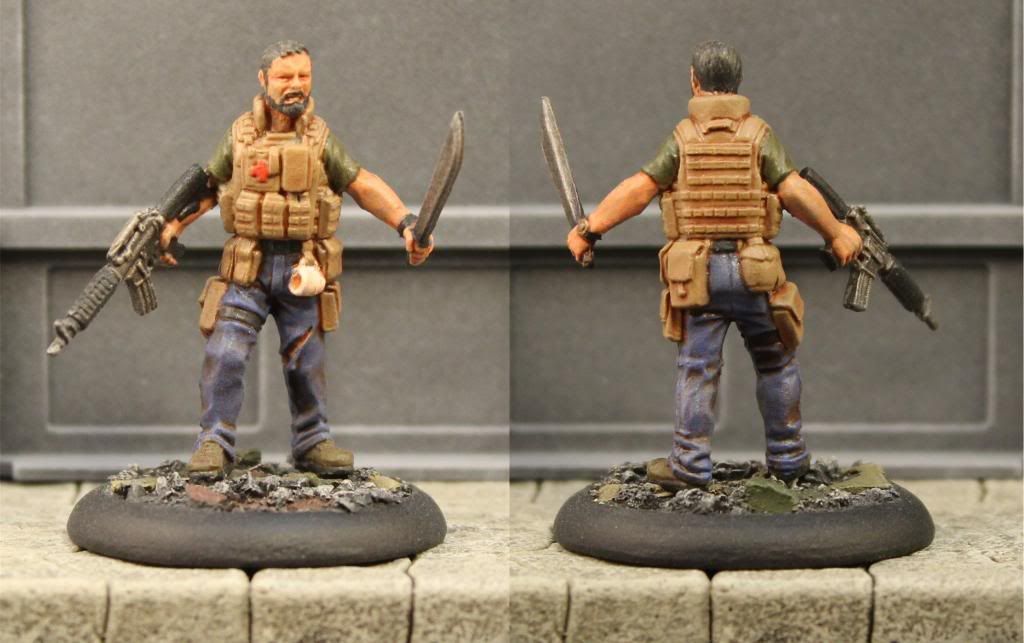
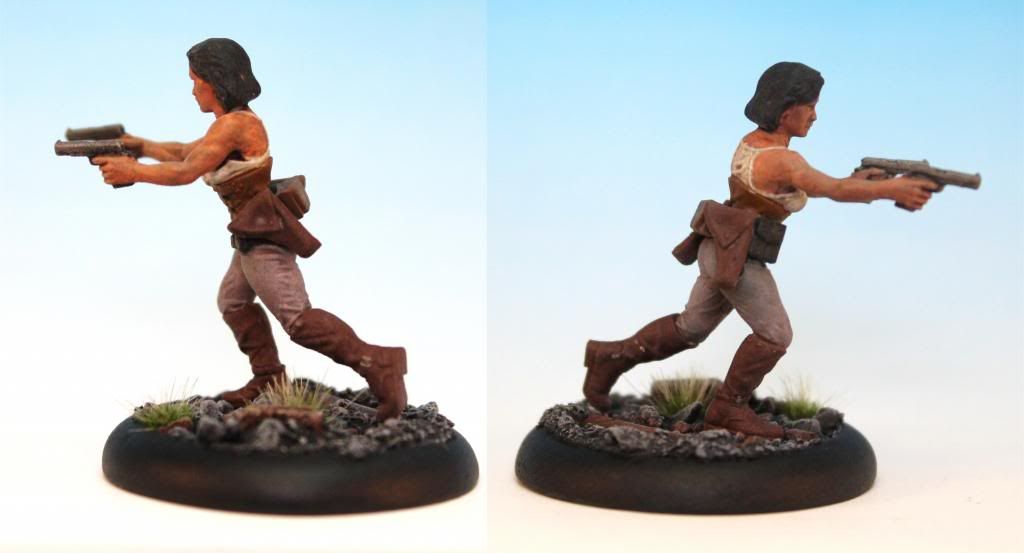
This figure turned out much better than I thought it would with just primer. It's a WGF zombie vixen body and head and arms from the WGF female survivors. I really like the final figure. I rushed the job though, which didn't see until I took the picture, but I forgot to add a spare high heel to the base and forgot to go over the rifle hand grips with black. Dang it. One thing that rally struck me working on the figure is how much sharper the 3D sculpting is on the survivors over the vixens. With only a year between them it's impressive to see how much Wargames Factory keeps improving their game.
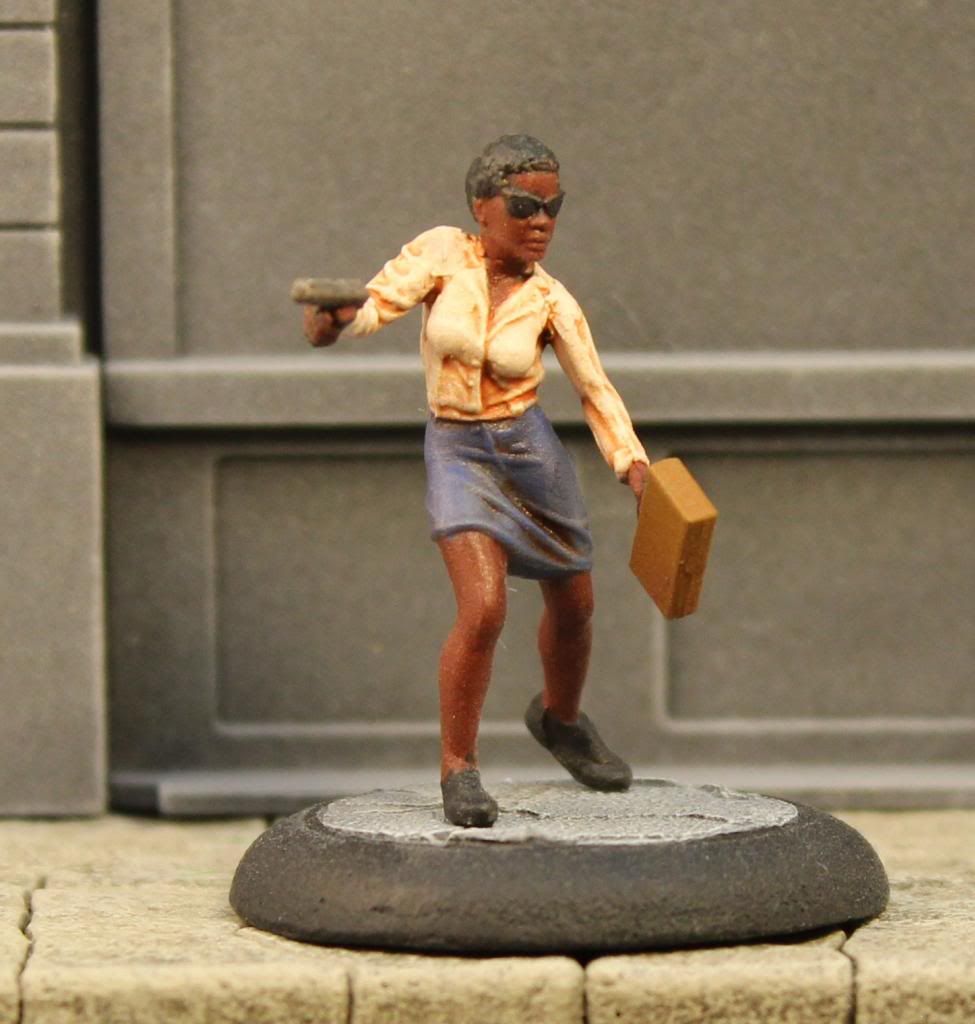
Last up for the survivors is another Vixen body and left arm with a right arm and head from the female survivor set. The set of the shoulders is a little awkward and the zombie arm is a little thinner than the normal arm, but overall the figure still hangs together.
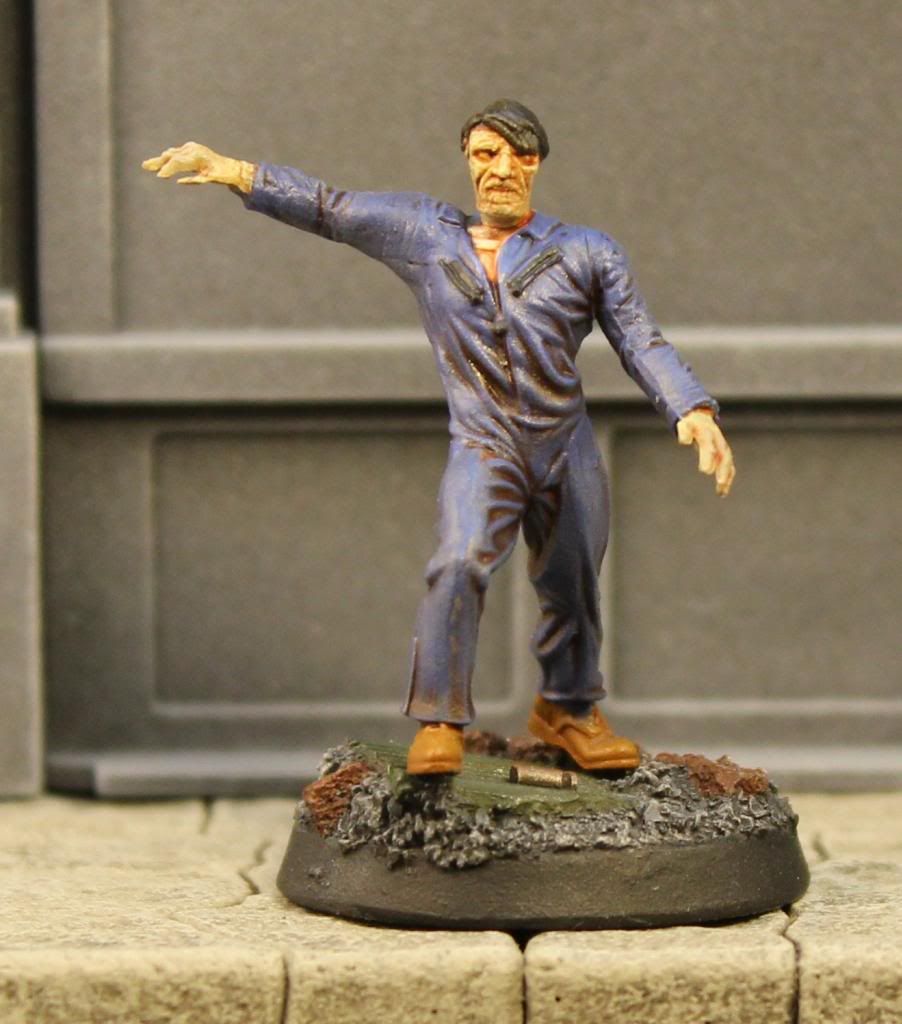
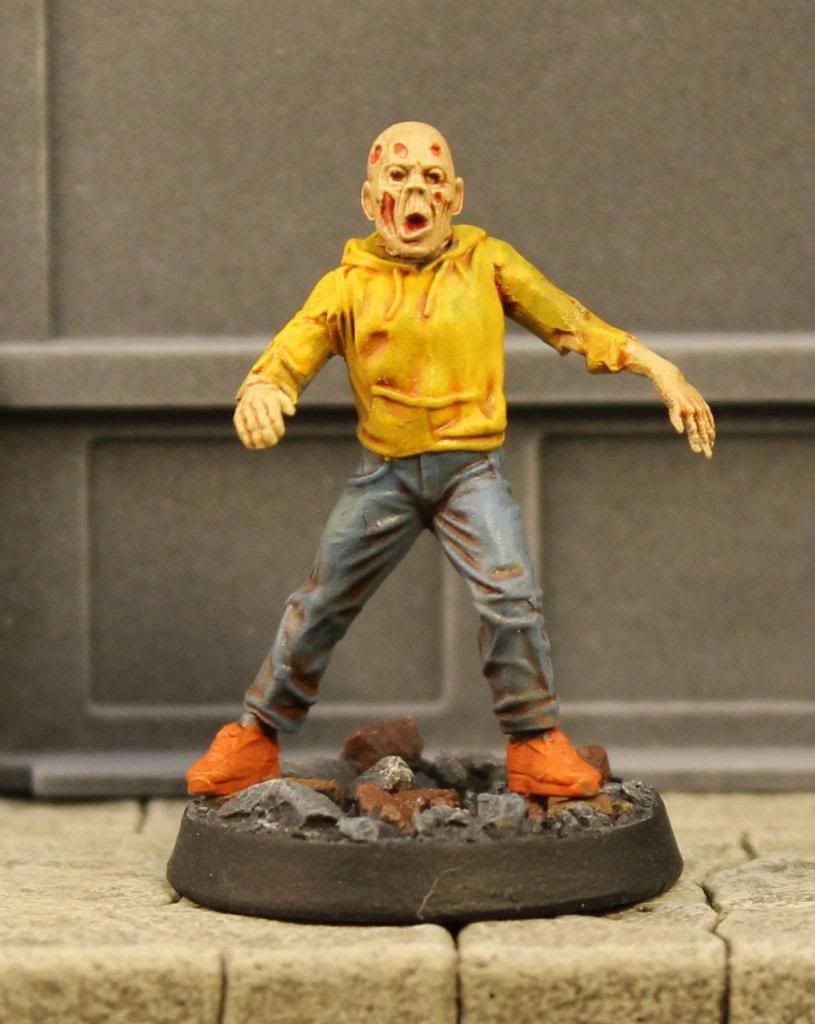
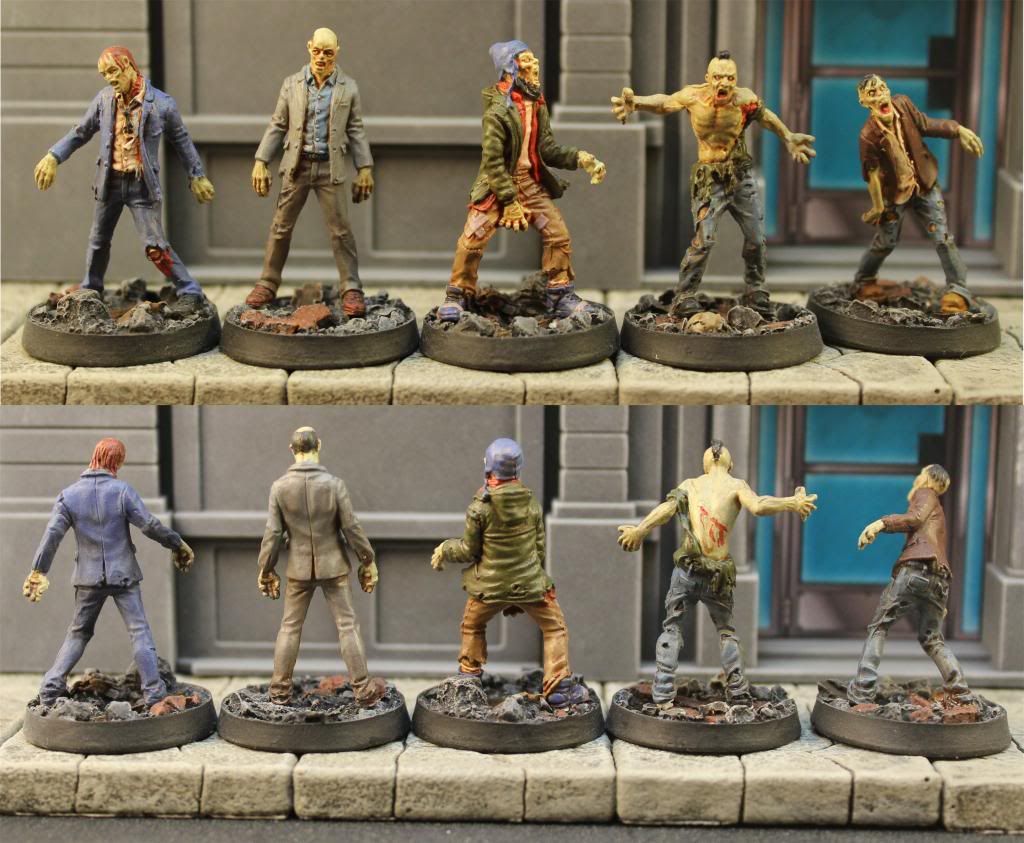
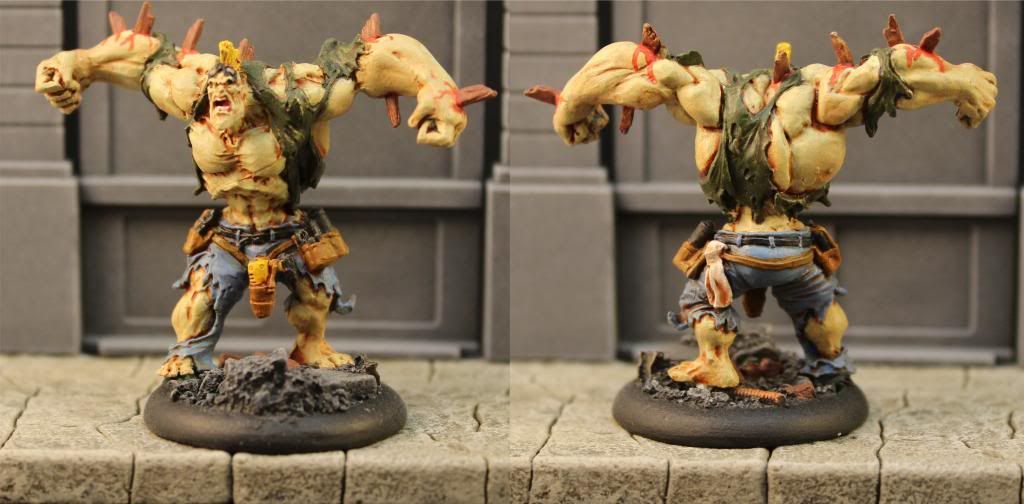
Up first for the zombies is a WGF male survivor body with head and arms from Studio Miniatures zombies. it took quite a bit of green stuff to get the arms right, but the end result is still ok. I was a little worried about the size of the head but I think it works.
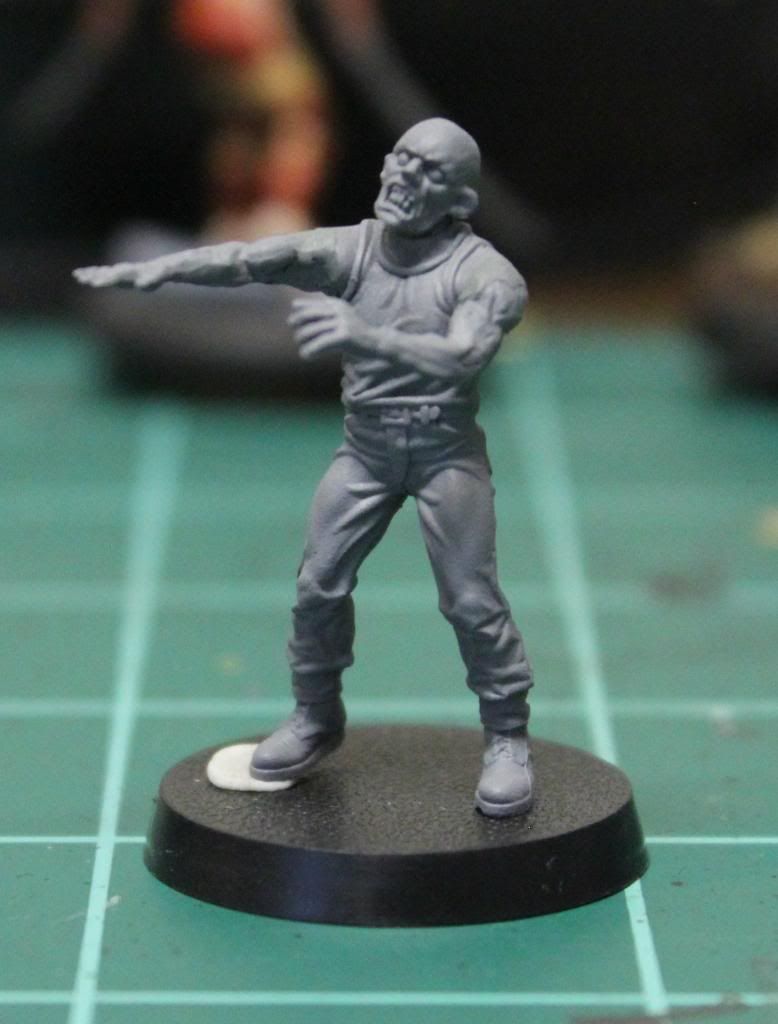
For these last three zombies, they all have WGF male survivor bodies, Studio Miniatures zombie arms and heads from Mantic zombies and ghouls. Generally they work, but the heads came out a little bigger than I wanted. In hindsight all four zombies could have benefited from using putty and a hobby knife to add rents in clothing and wounds.
All in all the figures all tourned out well enough for the tabletop and I learned quite a bit to help make some better conversions in the future. Best of all, I was able to use quite a few parts I didn't need to create some new and unique figures.
Next up is the big finally of the month with all six of the survivors from the Zombicide: Prison Outbreak box.
Sunday, October 13, 2013
Zombtober Week II - Zombicide Toxic City Mall Survivors
For my second week of the Zombtober challenge (Eclectic Gentleman Tabletop Gamer) I'm continuing with the new Zombicide Season II release. This time it is from the Toxic City Mall (TCM) expansion for the original Zombicide board game.
I decided to tackle the four new survivors from the box. Out of the box the figures are generally well sculpted and as with the Prison Outbreak zombies from last week, they are cast with the same semi-rigid PVC plastic that holds decent detail while not being too flexible. Flash was non existent on the models and while there were a couple of mold lines they were light and easy to remove. The biggest difference between the zombies and the survivors is that the zombies are all monochrome casts while the survivors come in a rainbow of different colors. The multicolored survivors are an advantage for identifying figures on the board, but the florescent colors used for TCM really obscure some nice detail on the figures.
Again like the zombies I've clipped the figures from their intragral bases and put them on some 30mm resin replacements. I did the same thing to my original Zombicide survivors and the bigger bases did not cause any problems with crowding unless all six survivors try to cram into the same room.
Neema The Executive
Neema is a nice figure with a torn shirt an Uzi and a big honkin' revolver. I'm never a fan of figures toting two hand guns, but at least she's only aiming with one of them. The only down side is that the realistically proportioned heels are small and tough to pin to the base.
Raoul The Contractor
Finally we have a figure in this game that looks like they are ready to face the apocalypse. Sculpted with a molle vest, an M-14 and machete, Raoul is looking bad ass.
Elsa The Cat-Burglar
Elsa was a bit of a disappointment and points to some of the limits of the single part casts. The arm sculpted across the body and the revolver are a little soft and the face looking right is split across the mold line so is also too soft in my opinion. My painting technique of solid colors with washes doesn't help to bring out what color there is on the figure either.
Derek the locator
Derek's another cool figure with his surveyor's vest and bag of lath slung over his shoulder. I think he is nicely sculpted in a good pose.
Overall so far I'm very pleased with the components of the expanded Zombicide items. I haven't had time to play any games with the new rules, but the figures are top notch in board game terms.
Tuesday, October 8, 2013
Search For Post Apocalyptic Private Security Spooks
I’m switching gears a bit with this post and taking a detour
from the normal zombies and survivors while still sticking with the post
apocalyptic theme. Two Hour Wargames
recently released the “High Rise To Hell” supplement for the “All Things
Zombie” game. This supplement introduces
the Pro-Corp private security NPC characters to the game. Reading the description, they remind me of
the Umbrella Corporation troops from the Resident Evil universe.
First up are the UAMC Marines from Defiance Games (Defiance Marines). Although they meet my criteria, they are generally lackluster models. I own a box of them, put one together and couldn’t even bring myself to finish painting it. Also, the defiance marines are shorter and have the exaggerated “heroic” proportions closer to Games Workshop than my taller and slimmer PA figures. They might work, but I’ll save them as a last resort.
I wanted to create some troops that would fit the bill of
spec ops pros but be easily differentiated from standard military troops. The items on my mental checklist are combat
armor, enclosed helmet with NVG/gas mask, and modern firearms (no lasers or
plasma here). Looking around, nothing
direct exists in plastic. I know, I know
there are plenty of metal models out there, especially from Wargames Foundry
and Hasslefree, but I’m making a concerted effort to stick with plastic these
days, or even restic if I have to.
I decided to start with out of the box solutions and rooted
through my figure collection to see what I could come up with.
First up are the UAMC Marines from Defiance Games (Defiance Marines). Although they meet my criteria, they are generally lackluster models. I own a box of them, put one together and couldn’t even bring myself to finish painting it. Also, the defiance marines are shorter and have the exaggerated “heroic” proportions closer to Games Workshop than my taller and slimmer PA figures. They might work, but I’ll save them as a last resort.
Next up are the Corporation Marines from Mantic Games. These models are a step up in quality from
Defiance, and they are slimmer in proportions, but again they are a couple of millimeters
shorter than my PA figures. They would
also need a weapon swap away from the laser rifles they come with. These are viable candidates, but not really
ideal. Let’s see what else I can come up
with.
I also looked at some out of print Halo Actionclix Figures
from Wizkids. I looked at the UNSC
Marines and ODST Troopers. In contrast
to the Mantic and Defiance figures, these ones are a little on the tall side
and the soft plastic is a little on the soft side in details. They come pre-painted and the ODST dark paint
scheme would work, but the green marine would need to be re-painted.
| Left to Right: Halo ODST, Halo Marine, Corporation Marine |
Looking farther to the back of my figure boxes are some
troops from the now out of production AT-43 from the equally defunct
Rackham. I’ve got a UNA Star Trooper, a
Red Blok Spetznatz Kommando and a Red Blok Dragonov Kommando. All three have similar pros and cons. They are all on par scale wise with most of
my PA figures. They all have armor and
modern-ish weapons. The Dragonov and
the Star Trooper have enclosed helmets with night vision. They came pre-painted to at least a passable
table top standard, but I’d probably want to do a re-paint with a darker paint
job. I’m not really a fan of any of the
lower bodies though. Also, as with the
Halo figures, the soft plastic makes the details, especially the weapons, soft
and a little cartoony. As with the
others, they might work, but are still not exactly what I’m looking for.
| Left to Right: Dragonov Kommando, Spetsnatz Kommando, Star Trooper |
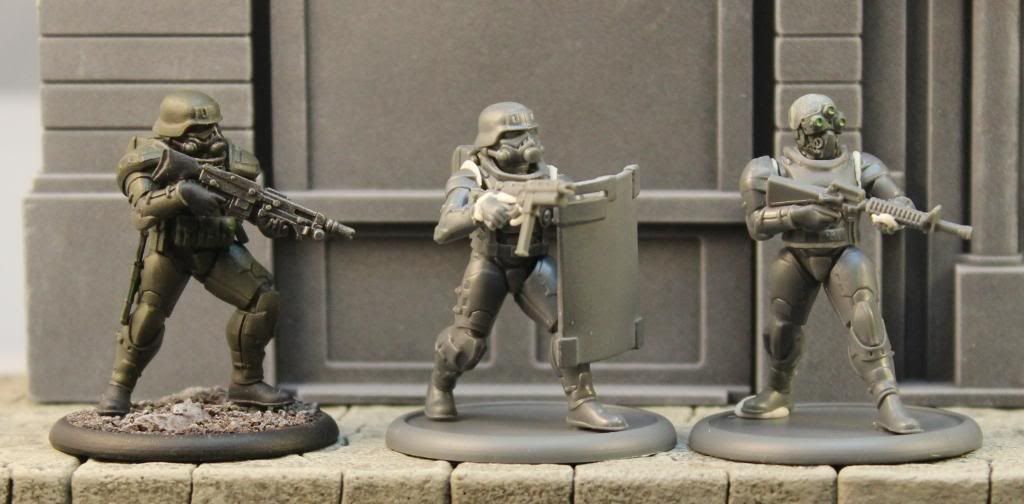
The last out of the box figures are the Dream
Forge Eisenkern troopers. They’ve got
armor, projectile weapons, a fully enclosed helmet and they scale up great with
my PA figures. They are also very well
sculpted hard plastic figures. On the
downside though, the armor is a little too sci-fi for me. Also, the upper torso has too much of a
medieval feel with the big shoulder pads, gorget and pointed neck collar.
Last up I figured I’d give it a try to do some conversions
from the Eisenkern troops. Forgive the
WIP look but the figures are just held together with blue-tac for now. First I used a stock body and head and fitted
the arm with a riot shield from an old Void 1.1 kit. On the next figure I ditched the back pack,
shaved off the faux gorget and trimmed down the collar. The conversion is a little rough and will need
to be cleaned up and the collar trimmed up with green stuff. This doesn’t change the sci-fi feel, but it
at least it makes the armor look more generalized. The MG-43 look alike was a little to iconic
as was the helmet, so I swapped out with an M-16 from the Wargames Factory
survivor kit (men or woman) and a helmet from and AT-43 trooper. I ditched the shoulder pads on both
figures. They might work too, but still
not perfect.
| Left to Right: Stock Eisenkern, Eisenkern with shield, Eisenkern conversion |
Well that’s all I could find in my collection. Let me know what you think. Will any of these work? What do you think is best? Are there any I missed? Feedback is appreciated.
Sunday, October 6, 2013
Zombicide Season II Prison Outbreak Zombie Review
Today I’ve got my first post ready to join the “Zombtober”
challenge posted by (ZOMTOBER Challenge!). The rules
are pretty simple in that you complete and display at least one zombie or
apocalypse survivor every Sunday in October.
With thirty three bloggers participating the results should be
interesting. I don’t fly the flag of the
ZBA (zombie bloggers association), but zombies are a big part of my building
and painting these days so I thought I would give the challenge a shot.
This week, I’ve focused on the zombies from the second
season of the Zombicide board game franchise.
The kickstarter delivery has been a bit fragmented and disorganized, so
some backers received the entire first wave delivery a month ago, while others
still haven’t received anything. I’m somewhere
in the middle. Two weeks ago I received
the two big ticket items with Zombicide: Toxic City Mall and Zombicide: Prison Outbreak. Hopefully the first wave of Kickstarter
extras will ship in the next month or so.
In the meantime I’ve been having a great time rooting through the two
boxes.
Prison Outbreak is a standalone game in its own right but it
is backwards compatible with both the core Zombicide game and the Toxic City
Mall supplement. It has six new
survivors and zombivors (zombie versions of the survivors), introduces
“berserker” zombies and best of all, it includes almost 50 traditional zombies from
the core game with all new sculpts.
Fast forward to this year and we get nine new sculpts that
in most cases raise the bar on quality.
First up are the walkers.
In the Prison Outbreak box you get six copies of five unique sculpts of
good old fashioned “shufflers”. These
models are much nicer than the first season.
The arms and legs have been sculpted thicker, which should help the
large flex that the first season figures had.
Flex isn’t a problem if you are using the figures straight out of the
box, but for painting, too much flex in the thin arms can lead to paint
cracking and falling off. Also, the new
figures have much greater detail, especially in the faces. For someone that paints in the style I do,
using washes to gain definition, deeper cuts on the details is much
appreciated. Like the original figures,
the hands may tend to look like webbed flippers, but I think that’s a function
of the medium, which would not support well sculpted fingers.
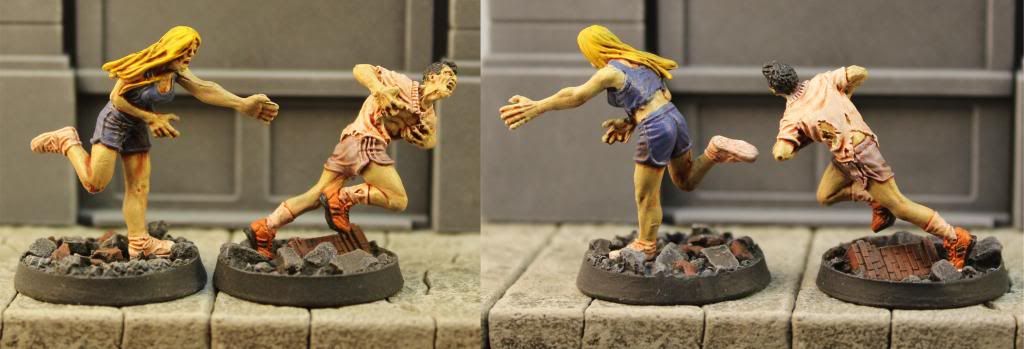
Next up are the two runner zombies and the only real stinker
in the whole box. The female runner on the
left is in a very awkward pose and has the oddly oversized gorilla arms
reaching out. Worse, out of the box she
comes with a large peg attaching her back leg to the base.
Not a great figure in my opinion especially compared to her concept art (PO Runner Concept). On the plus side at least we get a little diversity to the runner ranks now. The male runner on the right looks nice, although why he’s pulling a superman and ripping off his shirt is a mystery to me.
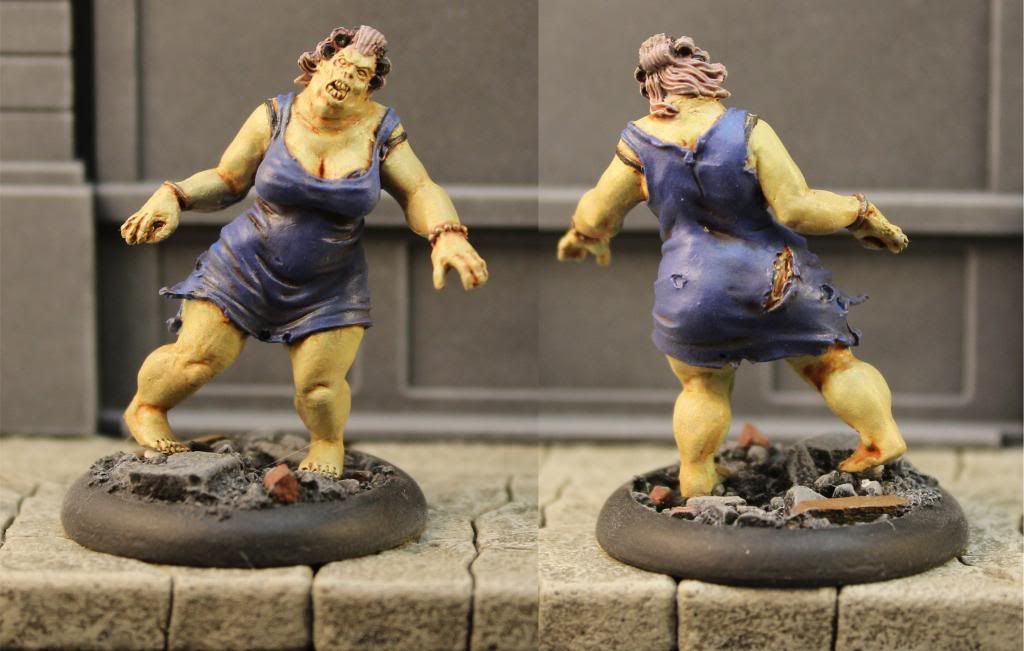
Now we come to the “fatty” zombie. She’s a big lady in curlers and a too small
dress. I think the figure is a little
over the top, but I think it matches up ok with the first season fatty pretty
well. Nice detailing compared to some of
the softer features of the original fatty as well. Unfortunately I messed up on the basing. I thought she would look good shambling over
some rubble on the base, but I don’t think it came out as well as it could
have. At some point I think I’ll pull her
off and rebase her.
The last figure is the Abomination Zombie. In game terms, he’s a walking tank that can
only be killed by rare weapons, and if he appears early in a game you end up
spending most of the game running away until you search through the deck to
find something powerful enough to take him down. While this guy’s the same height as the
original abomination, his “hulking out” pose with arms raised makes him look
that much more intimidating. All in all
another good figure.
CONCLUSION
For single part board gaming figures these are good sculpts
that I think exceed the quality of the originals. I plan on mixing them up with the original
set to give games of original Zombicide a greater variety. Now it’s on to the survivors.
Thursday, September 26, 2013
Plastic Figure Mash Ups
This post is for Colgar6.
Great minds must think alike I guess.
Like him I’ve also been working on some mash up figure conversions using various
parts from my bits box covering a range of different kits and companies. If you haven’t seen Colgar6's conversions, I recommend them as
a good read and good inspiration.
(here and here)
I need more projects like I need a hole in the head (I’ve got at least 50 figures still new in the box just waiting for their turn on the work bench), but this is one of those ideas that gets stuck in your head and just won’t go away until you give it a try. So to use up some of those extra figures I've been trying out some parts swaps to create both survivors and zombies.
| Get off my lawn! |
Up first is a figure I actually have finished. I put him together earlier this summer after
the Wargames Factory male survivors came out.
The Studio Miniatures zombies only come with four unique bodies and I
ran through most of the obvious combinations within the first twenty
zeds. With lots of sprues left over, using these
bodies was my first priority. Old Zeek
has a body from Studio Miniatures zombies, arms and a scoped rifle from
Wargames Factory Late WWII Americans, and a head from the Wargames Factory male
survivors.
Overall the figure turned out nicely, although the head is
just a little too large for the body.
Thankfully the pose seems to hide this for the most part. The arms fit so closely with the body that I
did not even need to fill the joints.
With the success of the first figure I moved on to
another. Here is another body from
Studio Miniatures, this time with both the head and the arms from the WGF male
survivor kit. This one didn’t turn out
quite so well. This time, the oversized
head is much more apparent and the arms are also a little oversized as
well. Overall the figure still
works, but I figured I could do better.
| Ned Rabinski was living in his remote cabin writing anti-goverment tirades before the apocalypse spoiled his seclusion. |
For the next figure I used another SM zombie body this time
I used a set of arms from the WGF female sprue, which are much better
fitting. In effort to solve the bobble
head issue, I pulled out a head from an old kit. To the best of my recollection this is a head
from the WGF Celts sprue, but I can’t be sure.
The size of the head is a little closer, but I think I left the neck a
little long. Overall though, I still
think the figure hangs together just fine. With this figure I actually took the time to fill in the rips in the shirt. Not a big deal but it helps differentiate him from the zeds with the same body.
Next up I wanted to raid the WGF Zombie Vixen sprues. As with the SM figures, the bodies are fairly
unique and I didn’t need three copies per box as zeds. Here I’ve used a Vixen body and left arm with
the brief case. The head comes from the
WGF female survivor kit. For the right
arm, I can’t remember if this was from the WGF male or female survivor
kit. Overall the figure works but the
thickness of the survivor arm is substantially thicker than the zombie arm and
the sleeve cuffs are different. Hopefully
the differences will fade somewhat with a coat of paint.
Last up for the survivors is another WFG vixen body, this
time the one in the pant suit. She has
arms and an assault rifle from the WFG female survivors. The head is also from the Vixen set and is
just about the only head on the set without visible wounds. She’s missing a high heel, so this will be a
great instance to use one of the spare high heels from the WGF female survivor
set. Again, I think the figure came out
well and should be even better painted.
I also wanted to reverse the process as well. I have three copies of each survivor body from the
WGF kits. For most I probably won’t be building all three into live survivors. I used some of the extra arms and a head from a Studio Miniatures zombie to
come up with my first mash up zed. I
think the arms worked out well (with a copious amount of green stuff) but I
thought the head wasn’t quite large enough.
On the whole though I think he came out ok.
For the next zed, I again used a WGF male survivor and SM
zed arms. But this time I went for a
head from the Mantic zombie kit. This
head is just a little too large, but I think the more expressive sculpting more
than make up for it. The only downside
of the mantic heads is that they come with no neck (it’s sculpted to the body)
so I had to initially pin the head on a brass rod and then build up the neck
with green stuff. I really like the end
of the result on this one, he's certainly no shuffler.
| 'Cause this is thriller, thriller night! |
Next up I used parts from the same kit breakdown (WFG body,
SM arms and Mantic head). Although I
think this head may have been from the ghoul set, not the zombies (it was a
loose part in my bits box). With the
choice of body and the set of the shoulders, this zed didn’t turn out quite so
well. He looks more like an extra from
Michael Jackson's Thriller rather than an actual threat.
I continued with the same breakdown for the last figure
(body, SM arms and Mantic head) as well.
On this one I think the oversized head really stands out, but again I
think the expressive sculpting make it work better than the smaller, but more boring SM heads.
Overall I ended up with a couple of duds but a few really good figures as well and they are certainly more unique than what I could make out of the box. I haven’t even come close to mining all the possibilities by
mixing and matching parts. I still have
plenty of zombies I should be able to put together from the WFG female
survivors as well. Hopefully they match
up with the Vixen parts as well as the survivor figures I made.
Monday, September 23, 2013
Review of the Wargame's Factory Apocalyptic Survivors: The Women
I’ve just finished painting my first batch of female
survivors from the new Wargames Factory kit and I thought I would do up a
review similar to the male set as the boxes have quite a bit of similarity and
a certain amount of crossover possibilities.
The female survivor kit is very
similar to the male set. In fact they are near mirror images of one anther in many aspects, so I won't go into quite as much detail. Here is a link to my review of the male set: The Males
The kit “Apocalyptic Survivors: The Women”
follows the release earlier this spring of the male set and represents
female civilians in modern dress ranging from lightly armed with melee weapons
up to heavily armed with assault rifles and even an RPG.
| Box photo courtesy of Wargames Factory |
Even more so than the men, plastic female civilians have been tough to come by and for me this kit is a welcome addition to my collection of ATZ figures. Also, if you are a fan of the Zombicide games and missed out on some of the promotional figures, you could put together some reasonable proxies from this kit as well.
FRAME 1 – BODIES AND
BASES
Each kit comes with three frames containing ten sets of
bodies, bases and arms. There are also
fifteen sets of heads as well as a couple of pouches and even a spare set of
high heels. | Sprue Photo Courtesy of WGF |
The casting is generally good, however I did notice that on
some of the bodies there is a distinct mold offset line that will need to be
taken care of. It’s not serious enough
that you’ll lose detail, but given the large amounts of cloth and flesh, I did need longer to clean the figures up
than on the male set. Be wary, there
are numerous small parts such as the arrow, golf club, compound bow and finger tips that will need to
be handled very carefully during cleanup lest they bend or break. Also, I had a casting defect on the golf club
shaft. This would have been a delicate
part regardless, but the way the plastic flowed through the mold, it met in the
middle of the shaft and didn’t bond. The
part fell apart for me just cutting it from the frame. I solved the problem by replacing the entire
shaft with a straight pin which might have had to be done just for strength anyway.
| Sprue Photo Courtesy of WGF |
As with all recent kits the top and bottoms of the frame
come with a set of pegs and holes so you can stack them with space in
between. This is nice as it prevents
delicate parts from rubbing and potential breaking as you slide the frames in
and out of the box. Also, the frames
match the dimensions of the male set so they can be stacked together. The bases are the same 25mm, round bases with straight sides and the WGF logo on the bottom. They are perfectly serviceable but I chose to go with 30mm round lip bases to match my other survivors.
There are no instructions, but the body and arm combinations
are labeled. Unlike the male set which
had letters and numbers, the female parts are only labeled by letters. That means for body “A” all of the arms are
also lettered simply “A” as well. There
are at least four arms for most sets between the body sprue and the weapon
sprue, so you will need to be careful and dry fit parts to make sure you still
have the right combinations of left and right arms.
FRAME2 – SPARE WEAPONS AND ARMS
ASSEMBLY
Once the clean up of the parts was complete, the figures
went together well from the neck down. Once you get to the head, things got came to be a
bit of a challenge. I found that
few of the neck joints lined up very well with the heads. That coupled with the fact that
many of the heads had hair below the collar line meant that you need to dry fit
the heads before any gluing. I would estimate that I had to either trim the collar or the hair on at least half of the
heads. Even then, I couldn’t get the
joints to look quite right and there were gaps that needed filling.
You will also end up with gaps on the bare armed figures at
the shoulder as well, so I had to come back and use green stuff on many of the
shoulders and all of the neck joints.
Unfortunately the spaces are smaller than my sculpting tool and the shapes awkward so many of my
neck joints look a little wonky even after filling.
With the male set I just dove into construction right away
without any planning. I ended up using
a lot of the arms from the spare weapons sprue.
This ended up being a mistake as there is usually one or two copies of
the arms on the weapons sprue versus three copies from the body sprue. With my first set of male figures I ended up coming up with combinations I
wanted to retry but didn’t have the arms.
For the females I played it safe and I started out my first batch of ten figures using just
the arms off of the body sprue, so I can better plan out how to use the rarer arms
from the weapons sprue on future figures.
ASSEMBLED FIGURES
Here are the first ten figures I’ve put together with some
thoughts on each body:
| FOUR! |
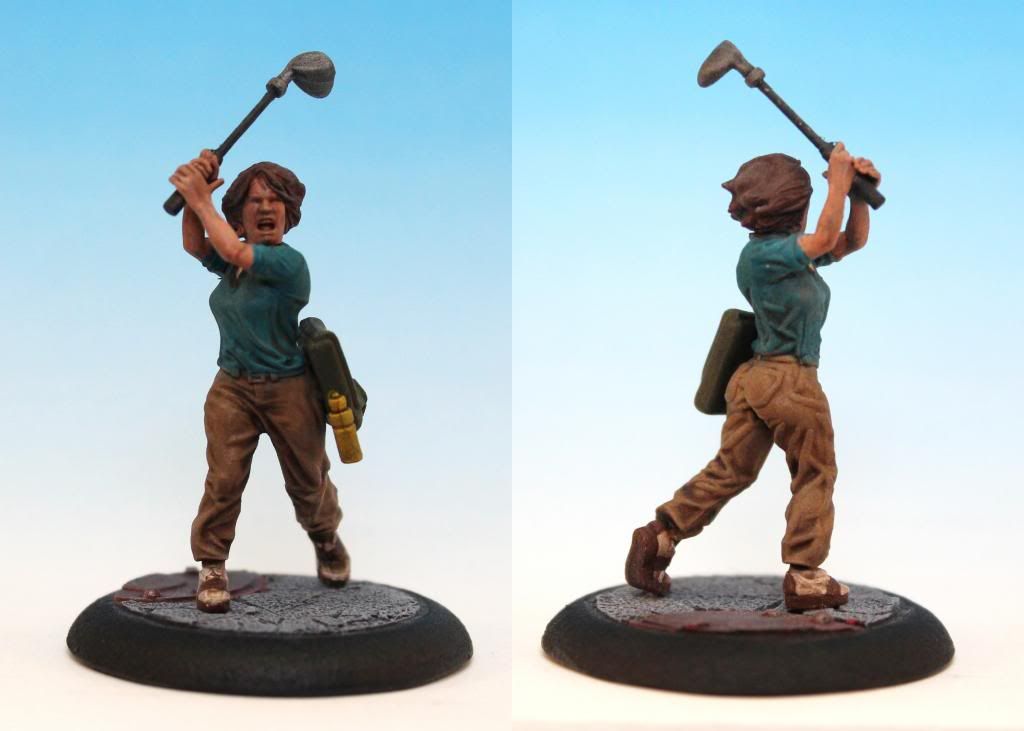
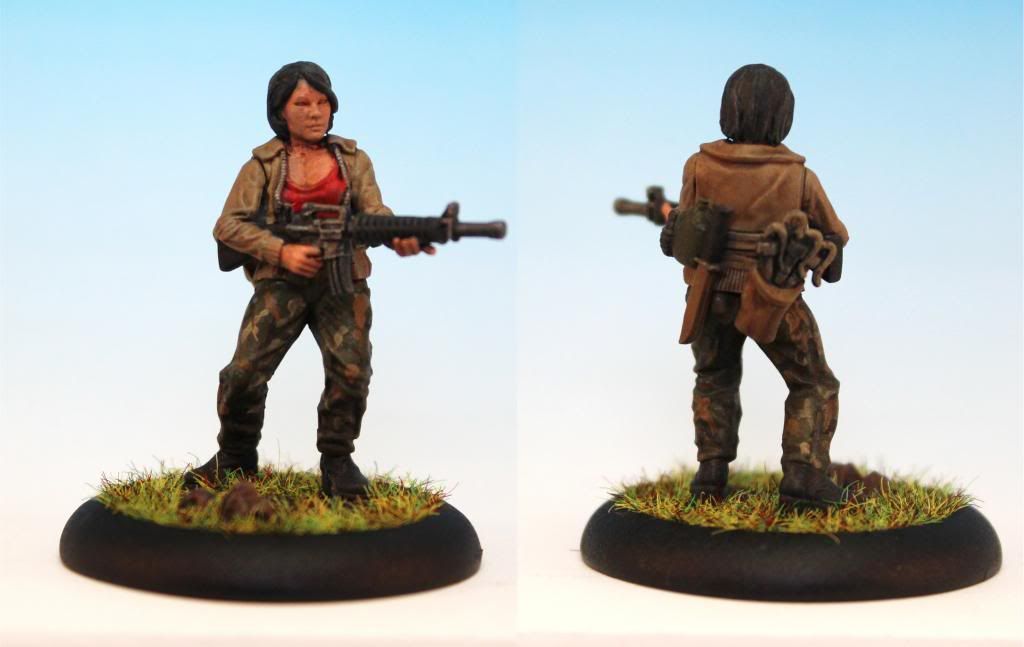
The next figure is one of my favorite bodies in the kit. She’s got cargo pants, combat boots and a
loose jacket. She’s got a nice neutral
stance so almost all of the arms with sleeves will fit her. For the first figure I used the M-16 and gave
her a satchel of pipe bombs a canteen and a combat knife. This gal looks like she’s ready to face the
apocalypse.
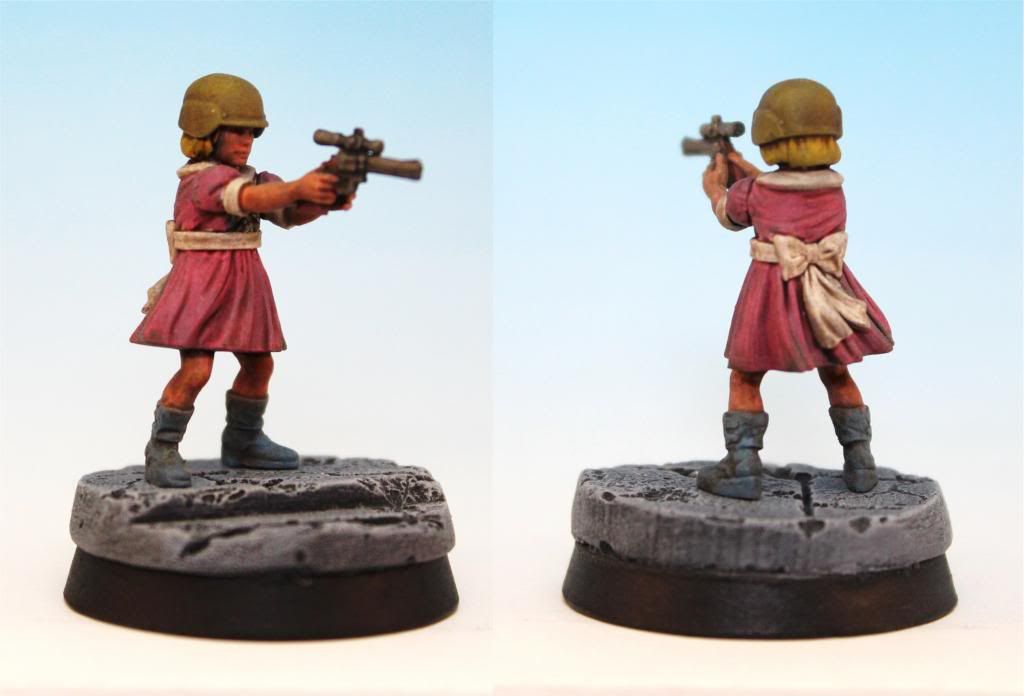
This is the “kid” figure for the kit and represents a little
girl in a frilly dress. I would have
preferred a more casual dress like the boy from the other set, but this is well
sculpted for what it is. The head in the
Kevlar helmet is a nice touch, but it would have worked better if it was more
obviously over sized. This one looks like
it fits too well. The scoped revolver is
a nice weapon and I will probably use the other copies as weapon swaps on other
figures. Also, I’ve dry fit the head on
other bodies and it should work to make an adult as well.
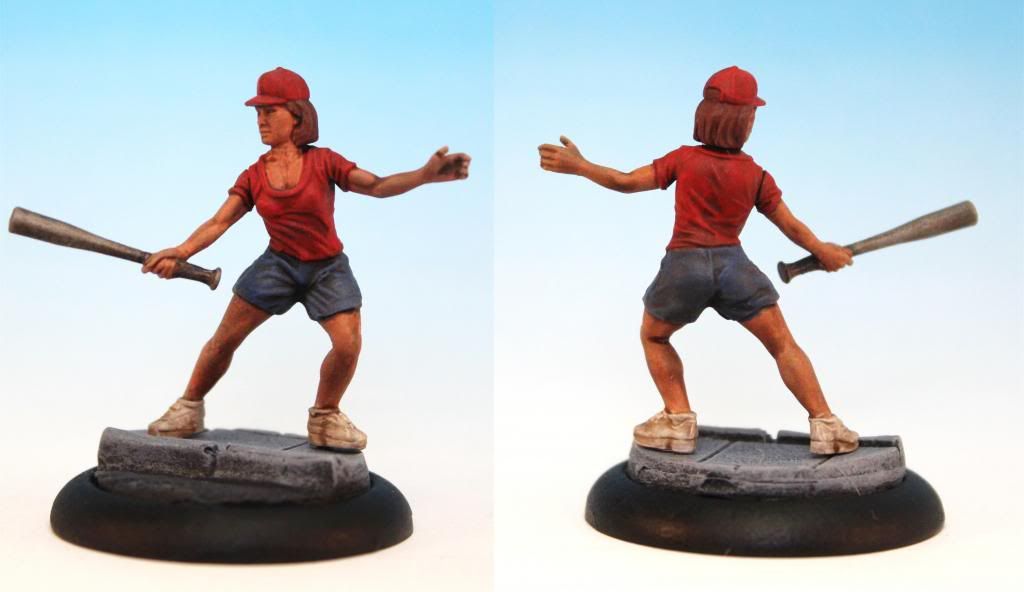
This figure is another sports fan wearing shorts and a
t-shirt. This is the one figure where I
cheated and used a part from anther kit.
The intended weapon was a tennis raquet. I really didn’t like the look so I nipped a baseball bat I had left over from the male kit. I gave her a head with a ball cap so she must
have been at softball practice when the apocalypse came. I’m not a big fan of the pose of the left
arm as it makes it look like she’s fencing instead of whacking zombies
though. On the plus side, the figure is
versatile enough to take most of the sleeved arms from the kit.
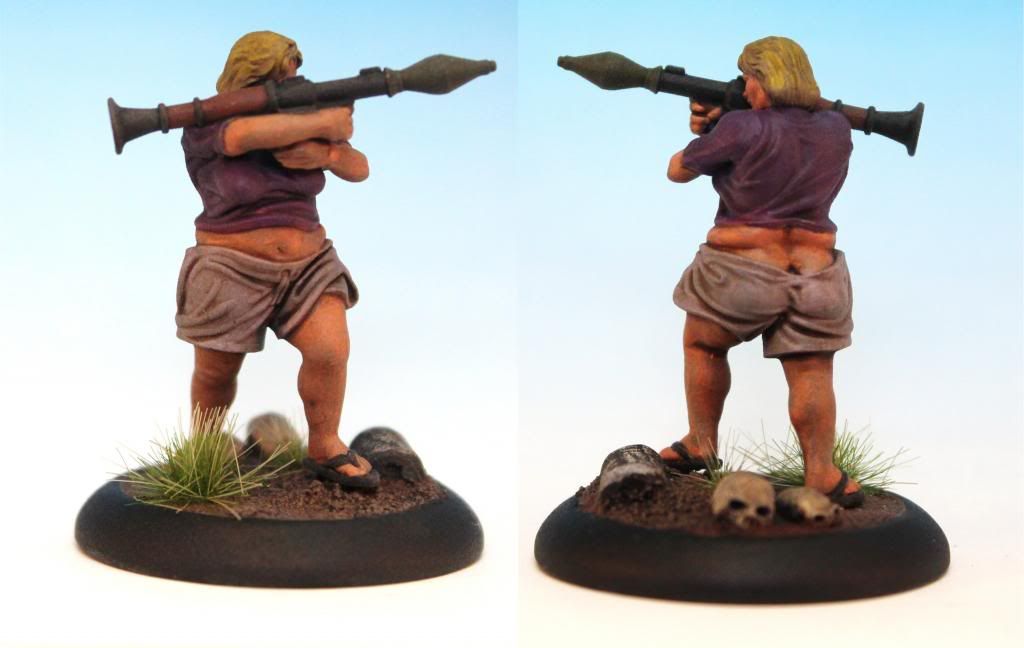
Now we get to the controversial bit. This figure is obviously overweight and she
looks a bit sloppy to boot with sagging shorts and visible butt crack. I’m kind of late to this review, so I’ve seen
a number of reactions to this figure ranging from some wishing for more figures
that reflect “real world” people to one being truly offended by it (link),
stating that it was an attack on overweight people.
I suppose there was no “right” answer for
this but WGF making nine “fit” figures and one token overweight one certainly
highlighted the difference. Interestingly I didn't read any such reaction pro or con from the overweight male figure. From a
practical matter though I don’t like it because there is really only one set of
arms in the kit that fit the figure. The
large attachment point at the shoulder and wide shoulders mean that the RPG is
the only set of arms that fit and I really don’t need three of these. As a consolation though, the arms for the fat
male figure fit well so I can give her an AK-47 (or pistol & machete) and give one of the RPGs to the
one of the overweight male bodies. At
least she’s not wearing a muumuu.
Another issue for me is that while there are spare RPG’s on the
weapon frame, there are no spare warheads or the carrying satchel, so this gal
is now carrying a one shot weapon. If I
were less lazy I’d try to throw one together with some green stuff, but life is
too full right now as it is, so I just let it go. Also, in hindsight I should have given her a holstered weapon or a rifle slung over her shoulder, but that would have taken more effort and greenstuff than I had time for.
Another reaction I’ve found interesting is that a number of
people have scoffed at the way the sculptor has chosen to show the figure
holding the RPG. Assuming the model is an RPG
7, this is indeed the wrong way to hold it, but the idea that anyone who has
not used one before would intuitively know the correct way is overestimating
the ergonomics of the weapon and underestimating the ability of people to get
things wrong. During a tour in Iraq with
the US army I had the chance to both fire an RPG and train some Iraqi recruits
in firing them. During that mission I saw people
holding and RPG just about every wrong way you can imagine, so the idea that a
civilian with no experience could pick up and hold an RPG wrong is perfectly
believable to me.
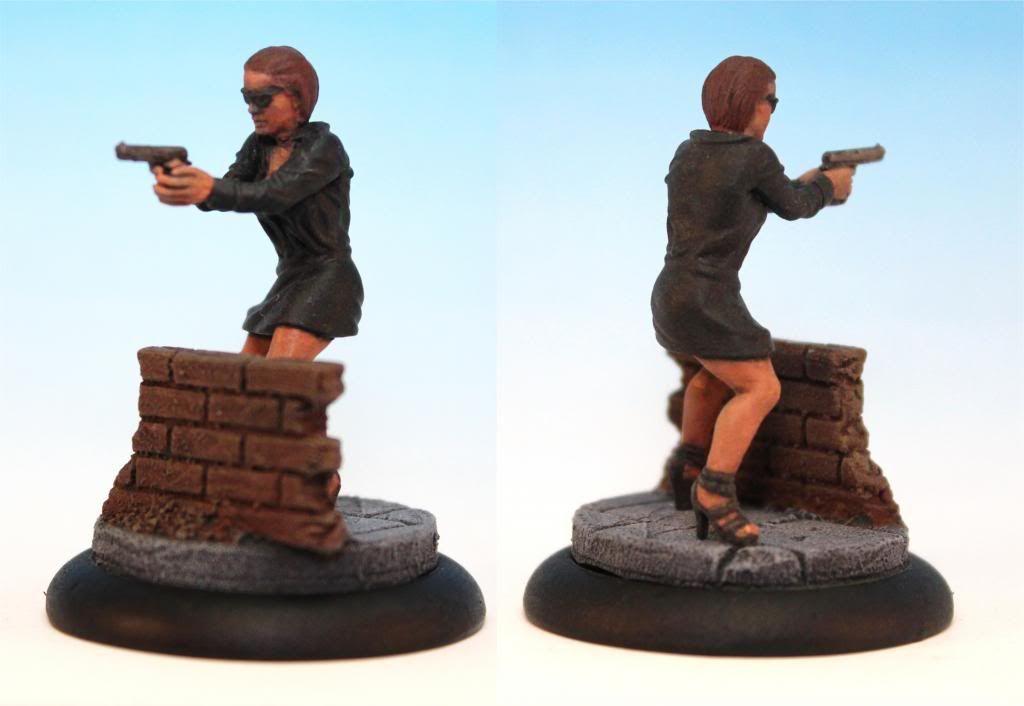
Here’s a figure in a suit coat and short skirt. She’s at least sporting a two handed grip on
a pistol and might actually be able to hit something.
I gave her a head with sunglasses and painted her up in black. I’ll team her up with the suit figure from
the male set and they can be Mulder and Scully FBI types. This body is also a little tough as the neck
joint is a little wonky and as you can see that I’ve goofed up the joint a bit. On the plus side this is another versatile
figure that can take a number of different sleeved arm combinations.
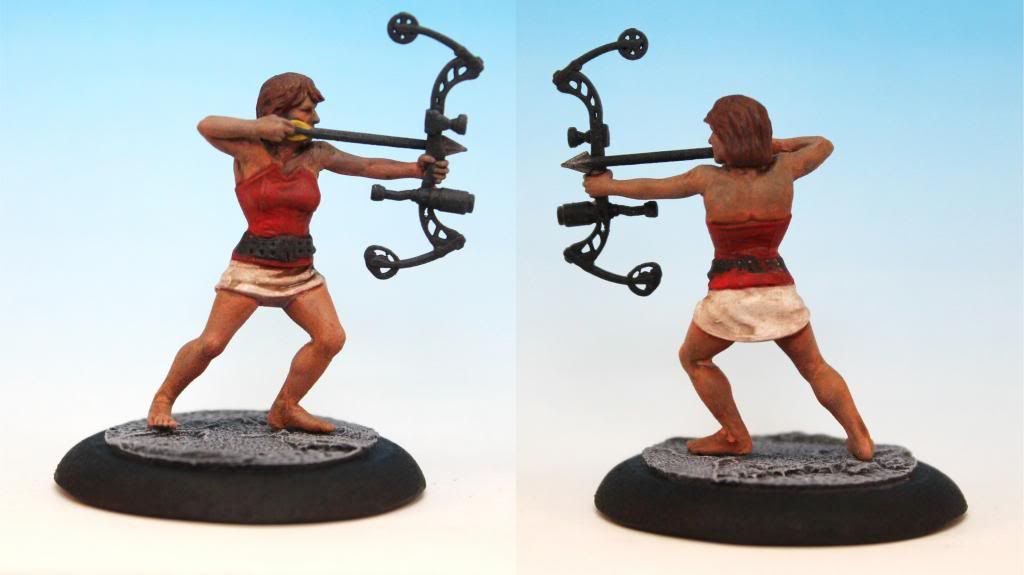
This figure is an interesting juxtaposition. You’ve got a girl in bustier and miniskirt
sporting a fancy schmancy compound bow with all the bells and whistles. She’s also bare foot, which is no way to face
the end of the world as I imagine there will be plenty of broken glass. Unfortunately, the bear shoulders and the stance
don’t leave much in the way of other good arm options for her.
Here is another bear shouldered figure this time sporting
double pistols. I know that WGF needs to
sculpt a certain amount cinematic flare to their figures, but I’m always bothered
by the pose. On top of that, she’s
running too. In fact this pose is the surest
way to not hit anything more than five feet away. The only other arm choice is a chain saw,
which with the running pose is even sillier. I tried out some of the smaller pouches on her and they work, but are a little too over sized to really work in my opinion.
| Git along zombies! |
Here’s another dual gun toting chic, this time it is a
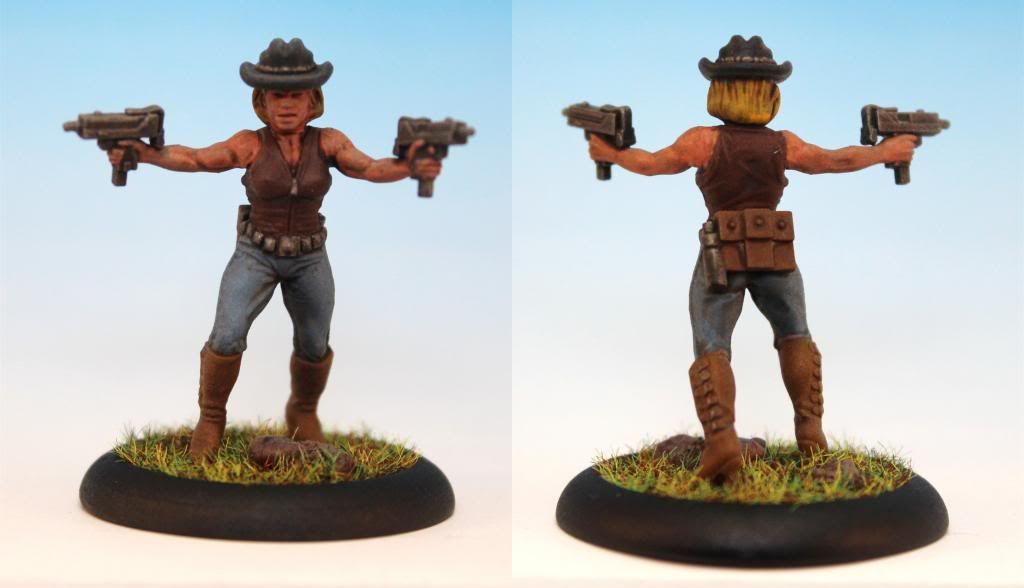
cowgirl type. Yeeha! She’s sporting a pair of
Uzis, so she might have a better chance of hitting something than the last
figure. Another figure with bare arms, so
swap options are limited. I went with the smaller pouches on her back which looks more natural than the large satchel on the golfer.
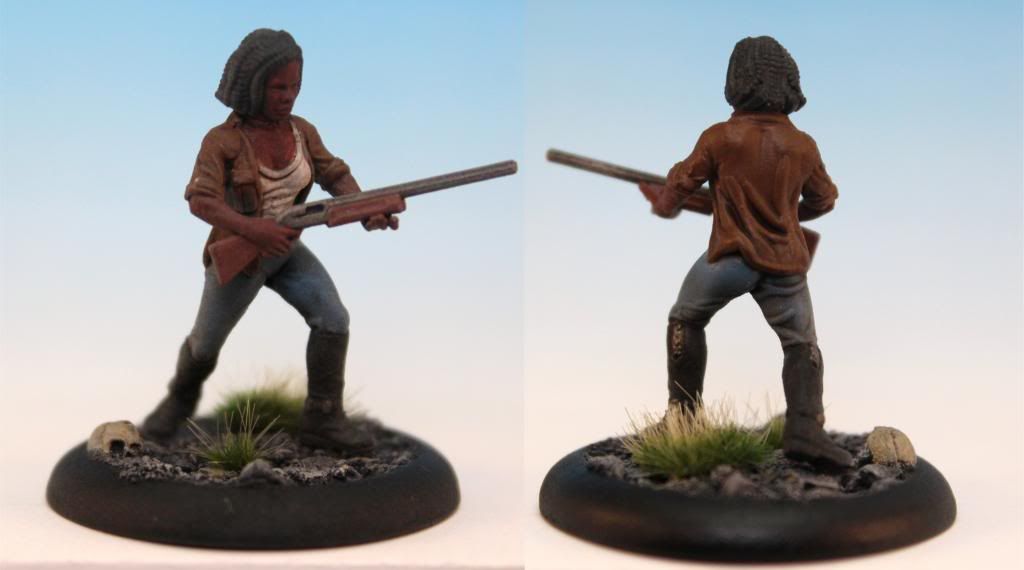
Last up is another figure with lots of options. The intended set is a semi-automatic shotgun, but again the neutral set of the shoulders means that most of the other sleeved arms will fit. This is also another figure where the neck shape and high collar interfere with most of the heads, so the joint is a little off of what it should be.
CONCLUSION
As I said above, this set is almost a mirror image of the male set with mostly the genders changed up, so If you liked the male set, you'll most likely enjoy this set as well. However, most of the flaws from the male set show up here as well including mono-pose bodies, limited options as to arms and weapons and too many copies of the same weapons on the accessory sprue.
That being said, the price is still right. Assuming that you pay full retail price and only build ten of the figures, you are still only paying two dollars a figure and getting a ton of useful extras for other conversions.
Me, I like the set and think they'll make excellent additions to may growing hoard of survivors.
Wednesday, September 11, 2013
A Reivew of the Heavy Multi-purpose Transport: HuMPT 1 Kit From CNC Workshop
Over the summer I purchased the Heavy Multi-Purpose
Transport (HuMPT1) kit from CNC Workshop.
This is a laser, cut MDF model of a science fiction style transport
vehicle. I built up the kit and have
written a review of the pros and cons of the kit.
I started the assembly with water based wood glue, which worked fine on the wheels and parts with a larger surface area. However when I got to parts with a smaller surface area like the hubs I switched to a cyanoacrylate glue (Instacure Plus). I used a 5 second gel that wouldn’t run everywhere but still gave me a few seconds to get the part positioned correctly before it started to bond. I found that for the smaller parts, the wood glue just didn’t give a sufficient bond.
I now moved on to the frame, bed and cab. I concluded that attempting to paint the inside of the cab after assembly was going to be a royal pain and decided to toss out the instructions and work in sub assemblies. The bed and frame were simple and went together per the instructions. For the cab, I decided to assemble it off the frame and in two parts. From dry fitting, I figured out that I could assemble the two halves to the frame after painting. I assembled the cab and glued all the left and side of the parts and left the right hand free. After the glue had set up I could pull out the right hand side of the frame for painting. I left off detail bits like the grill and rear axle for assembly later. The cab halves were a little fragile, but as long as I was delicate with my dry brushing nothing popped off.

MODEL SCALE
I started purchasing kits from Miniature Scenery back in
2006 when they were still milling MDF with a flatbed CNC machine. The kits were innovative for their time, but
the limitations of the cutting head (1/4”) greatly limited what they could do
in terms of design. Flash forward seven
years and they have jumped into laser cutting MDF with both feet and are
producing some ambitious kits that are pushing the design envelope for the
medium.
The biggest drawback of many laser cut MDF kits is the fact
that you can only make vertical cuts, leaving many kits looking flat and
uninspiring. The solution is to engrave
detail into the surface and to build detail up in layers. With the Heavy Multi-purpose Transport (HuMPT
1) kit, CNC Workshop is taking this idea to new levels by creating sub
assemblies that build up into interesting three dimensional shapes.
I saw the announcement for the kit in early July, and even
though I was on vacation, I ordered one right away. I had to read the description several times
to make sure that this really was an MDF kit.
I was intrigued and a little skeptical that you could get that kind of
effect out of MDF. CNC is an Australian
producer and I’m an American consumer, so there was a bit of sticker shock with
the shipping for the kit by itself. I
combined the order with a number of other kits to get a better shipping number
and the end result was only $29 total for the kit which was definitely more
palatable than ordering the kit by itself.
Shipping to the US took just under two weeks, which worked out just
right for the end of my vacation.
OUT OF THE BOX
The kit comes as a single 13” x 9” sheet of MDF. There are no printed instructions, but CNC
has posted them on their website (Link to instruction PDF). The instructions are a fourteen page
PDF. There are no part call out numbers,
so you will want to read the steps carefully and dry fit pieces before gluing
them. Some of the parts, especially the
axels and engine block have similar but different sizes. The electronic instructions were fine for me
as I just set my laptop up on the workbench and followed along.
CUTTING & PART
CLEAN UP
As far as tools are concerned, you won’t need much. A good hobby knife, 320 grit sand paper and
glue were all I needed. I ended up using
two hobby knives. The parts are attached to the frame with
small bits that will have to be cut through and then there are a fair amount of
burs on the back side of parts that will need to be cleaned up. Cutting through the attachment on the frame
tended to dull my blade fairly quickly, so I used one blade for cutting and
kept a sharp blade handy to clean up the burs.
If you try to clean up burs with a dull blade you can end up tearing or
delaminating the MDF.
The cutting laser leaves a slightly rounded edge on the top
of the cut but a sharp edge at the bottom.
For parts where you see that bottom of the cut such as the rear view
mirror bar you want to spend a minute or two rounding over the bottom of the
part with sand paper to match the top.
ASSEMBLY AND PAINTING
After reading through the instructions, I was a little
hesitant to jump right into the frame, so I started off with the wheels to get
a better feel for the material. This is
when I first noticed issues with the actual laser cutting. The quality of the cutting is a little lower
than I am used to on laser cut kits.
This manifests itself in three ways:
1.
When the laser starts a cut, it has a small
amount of “over-burn”. The beam must
stay still for a fraction of a second too long because it will burn a dimple
that is larger than the rest of the line.
2.
Next, the cut lines themselves are a little imprecise
on tight curves with a radius under about a quarter of an inch.
3.
Last, the cutting depth of the laser is
imprecise as well. In parts such as the
tires, this leads to spots where the laser hasn’t cut all the way through,
leaving many burs that need to be cut and cleaned up. On some of the detail engraving parts like
the foot pedals, the laser cuts too far and there are numerous small burn holes
in the back of the part.
None of these issues was a big problem in and of themselves,
but put together, they were a little disappointing, especially compared with
some other laser cutting examples I’ve built from Sarissa Precession and Micro
Arts Studio.
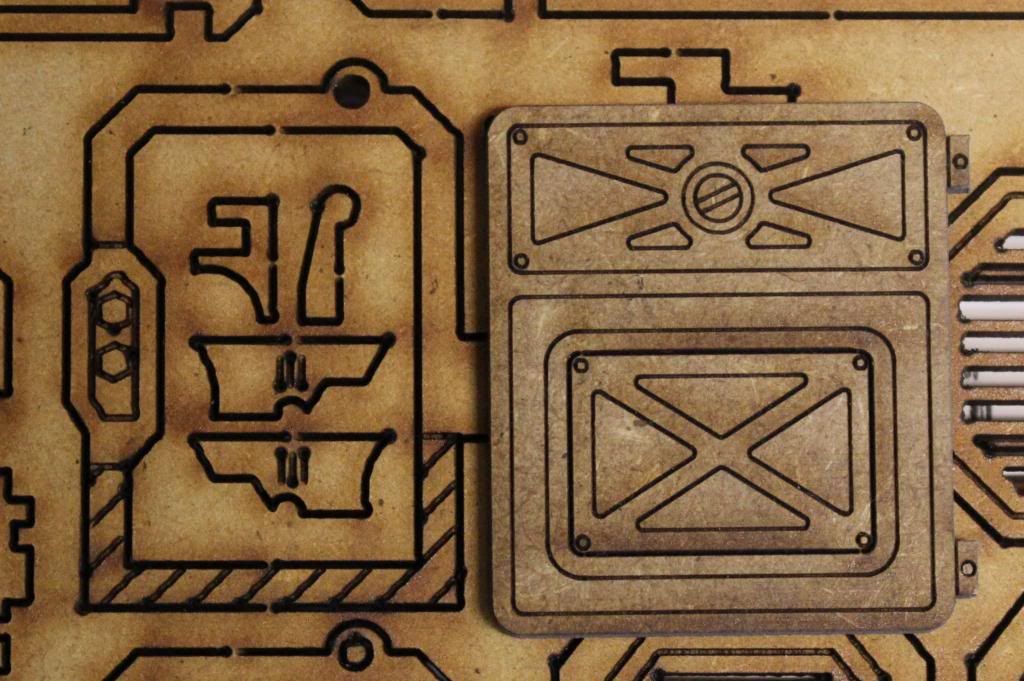
| This is a picture of a different CNC kit (background) versus a door from a Sarissa Precission hab kit (in front). The laser cutting on the Sarissa part is significantly finer and more preciese. |
On this kit I’m
not too concerned. The HuMPT1 kit represents a
rough and ready utility vehicle that I can imagine making deliveries in some
third world slum or hauling slag on some frontier mining colony. I can imagine that the frame was hand cut by
someone with a plasma torch. In that
perspective the laser quality still works.
My big worry is that this will look shabby on a kit that is not intended
to look “rough”.
I started the assembly with water based wood glue, which worked fine on the wheels and parts with a larger surface area. However when I got to parts with a smaller surface area like the hubs I switched to a cyanoacrylate glue (Instacure Plus). I used a 5 second gel that wouldn’t run everywhere but still gave me a few seconds to get the part positioned correctly before it started to bond. I found that for the smaller parts, the wood glue just didn’t give a sufficient bond.
I built and painted the sub-assemblies as I went. I started with a black spray primer. The cut edges can absorb the spray medium
before it dries, leaving a dusty feel, so it’s best to follow up with a brush
on primer to get everything covered and sealed.
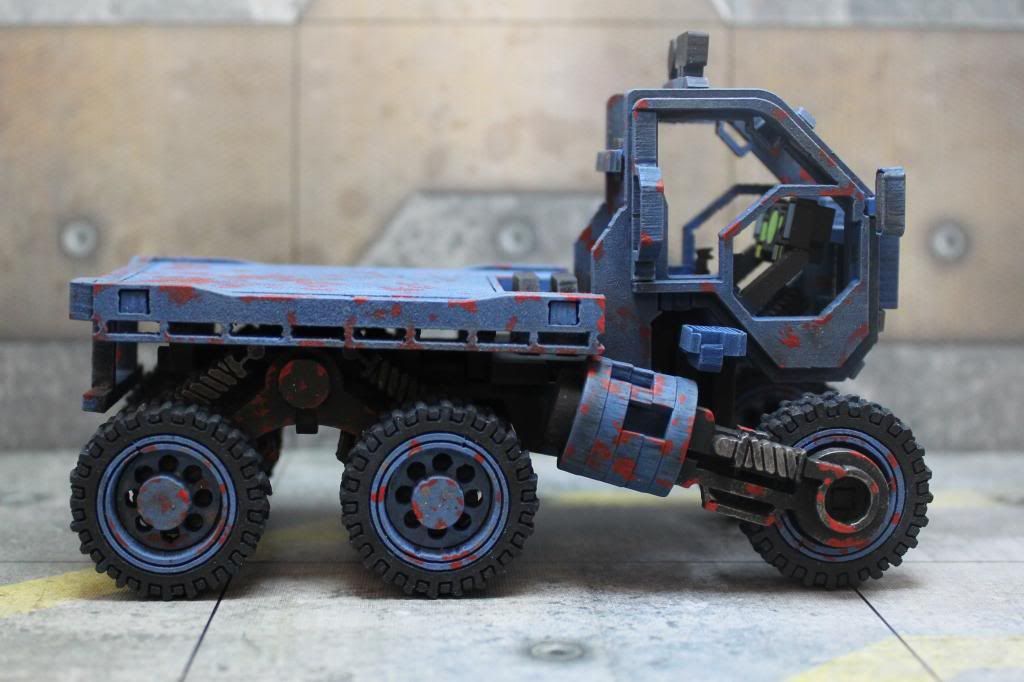
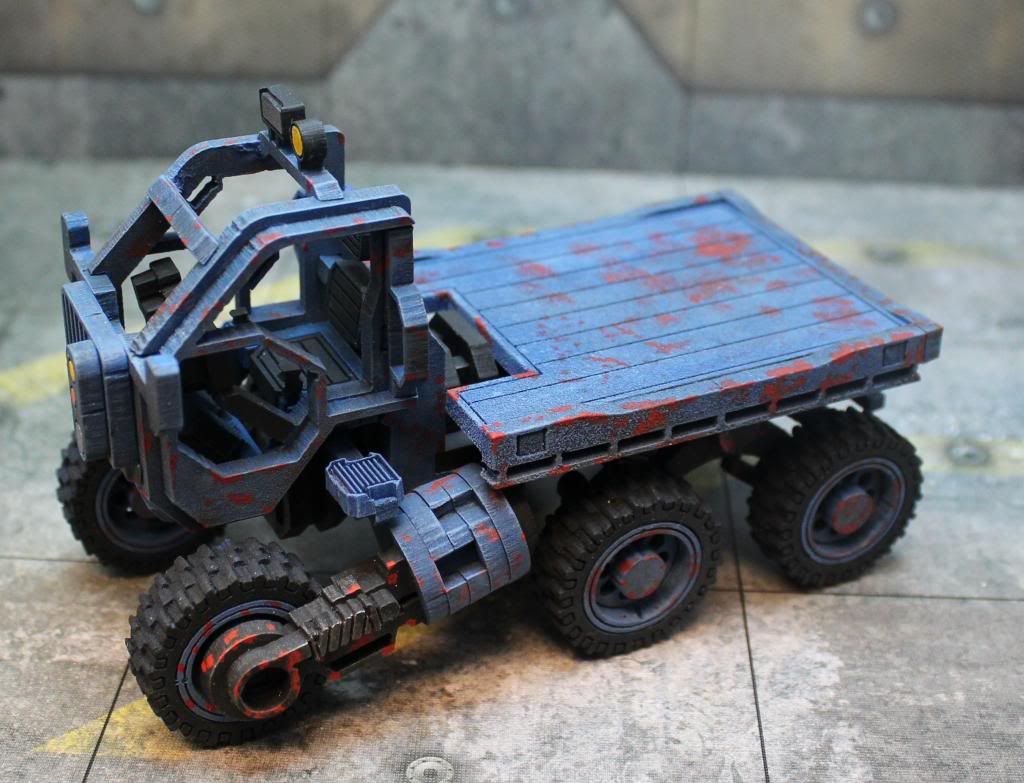
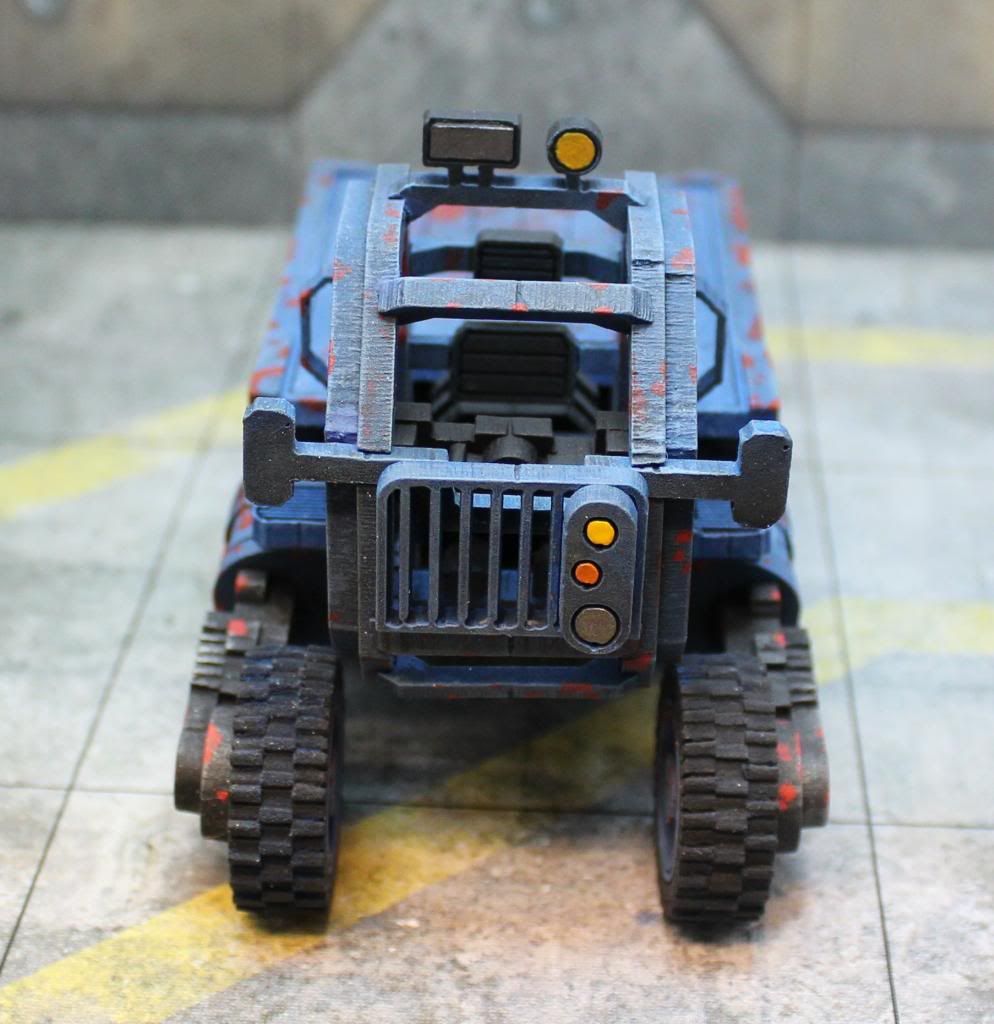
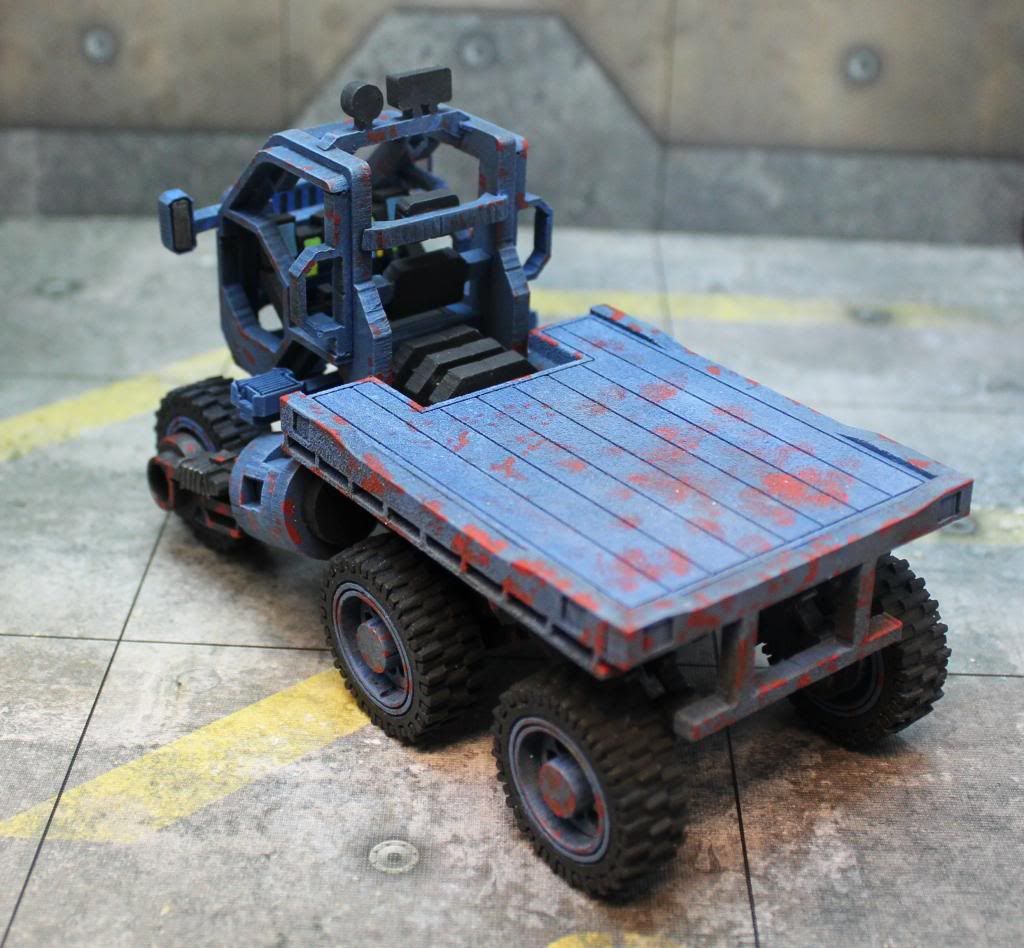
I then went for a rusted and weathered blue paint scheme on the body and
rims and a black frame.
Next I moved on to the rear and front bogies. The rear bogies are pretty straight forward,
but the front bogies require paying close attention to the instructions. Assuming theses are large pistons, the outer
“casing” is made of five stacked rings.
Be careful as the order and facing is very important in this step. For the pistons I switched back to the wood
glue which gave me more time to get the stacked disks lined up correctly. The center post running through the part
isn’t very tight, so you can’t really use it as a guide to keep everything
lined up straight. Even with taking care
I didn’t get them lined up exactly right and there is a little offset on the
steps up to the cab.
I now moved on to the frame, bed and cab. I concluded that attempting to paint the inside of the cab after assembly was going to be a royal pain and decided to toss out the instructions and work in sub assemblies. The bed and frame were simple and went together per the instructions. For the cab, I decided to assemble it off the frame and in two parts. From dry fitting, I figured out that I could assemble the two halves to the frame after painting. I assembled the cab and glued all the left and side of the parts and left the right hand free. After the glue had set up I could pull out the right hand side of the frame for painting. I left off detail bits like the grill and rear axle for assembly later. The cab halves were a little fragile, but as long as I was delicate with my dry brushing nothing popped off.
One issue to be careful with are some very fragile detail
bits. This includes there bogie springs,
rear view mirror bar, control panel, foot pedals and cab steps. I think the CNC got over ambitious with the
design and left the walls of these parts just too thin. The instructions warn you about this (in red
letters no less), but I can’t stress
enough how fragile these parts are. Even
being careful I damaged several parts such as the foot pedals just cutting them
from the frame. If you crack one of the
part walls but don’t knock it all the way off you can repair it with a little
super glue applied with a needle point, but once it’s off, it’s gone.
If the walls had been about twice as thick I think they
still would have looked good while being strong enough to at least make it on
to the model in one piece.
After painting and weathering were complete I very carefully
put together all the sub-assemblies.
Be warned that the final model is a little on the fragile
side. It should stand up to tabletop use
if you’re careful not to pick it up by the delicate parts like the rear view
mirrors, but a trip from the table to the floor and your HUMPT 1 is going to
have a really bad day.
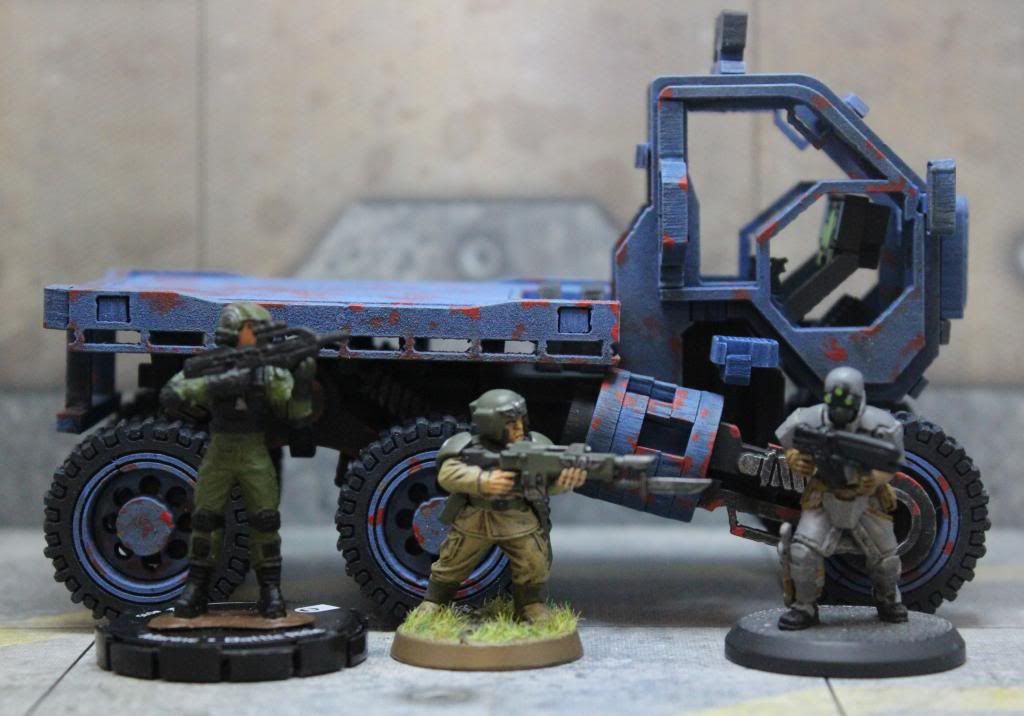
Unfortunately, the model is quite a bit bigger than
anticipated. While there is no listed
scale, at 3 1/4 inches tall I suspect the kit falls closer to 1/43 die cast
cars than it does the 1/50-ish scale of 28mm miniatures. It is still usable but will look a bit out of
place next to infinity or Warhammer 40,000 figures. Even with my larger figures (Wizkids
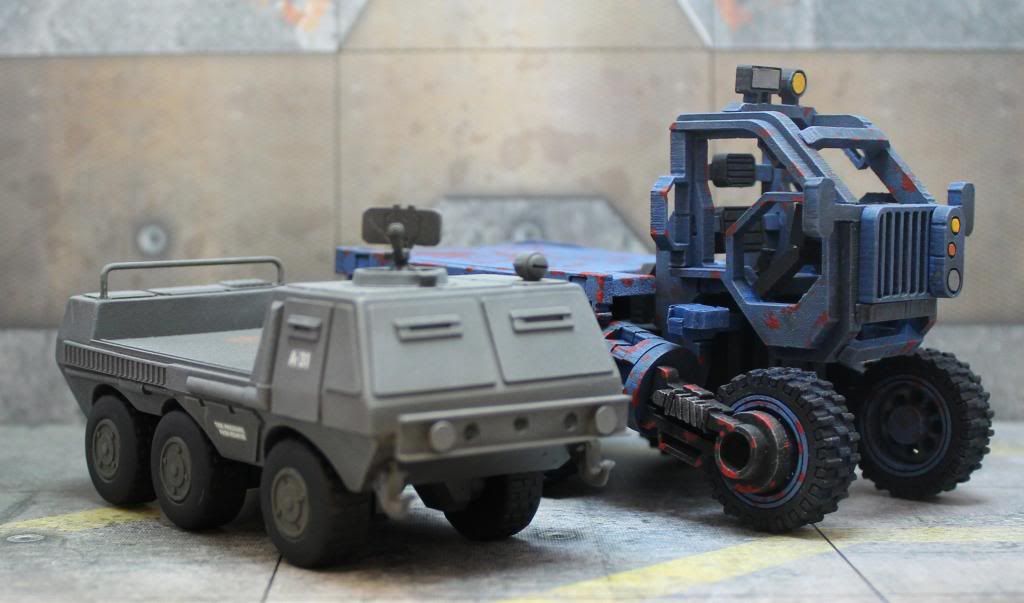
Heroclix) it looks big. It also dwarfs
my other sci-fi vehicles from Old Crow.
| Scale Shot with (from Left to Right): Wizkids Halo Actionclix, GW 40K, Rackham AT-43 |
| Scale Shot with a "Provider Transport" from Old Crow Miniatures |
CONCLUSION
OK, if you skipped all the boring stuff and just want to
know the bottom line, here is what I think you should know before you buy:
Overall this is a neat kit that can deliver a unique looking
cargo truck that should be a good looking addition to any near-future or hard
sci-fi tabletop.
This is a complicated kit and I would recommend it only for
modelers with a moderate or better amount of experience.
The completed model is somewhat fragile and won’t stand up
to abuse like plastic or die-cast metal vehicles. I’d put it slightly better than resin though.
The completed model is a little on the large side if you are
picky about scale.
The laser quality is a little sub-par in my opinion and
while it isn’t a deal breaker for me it might be for some.
Subscribe to:
Posts (Atom)