Monday, May 20, 2013

Building Some Upper Body Strength

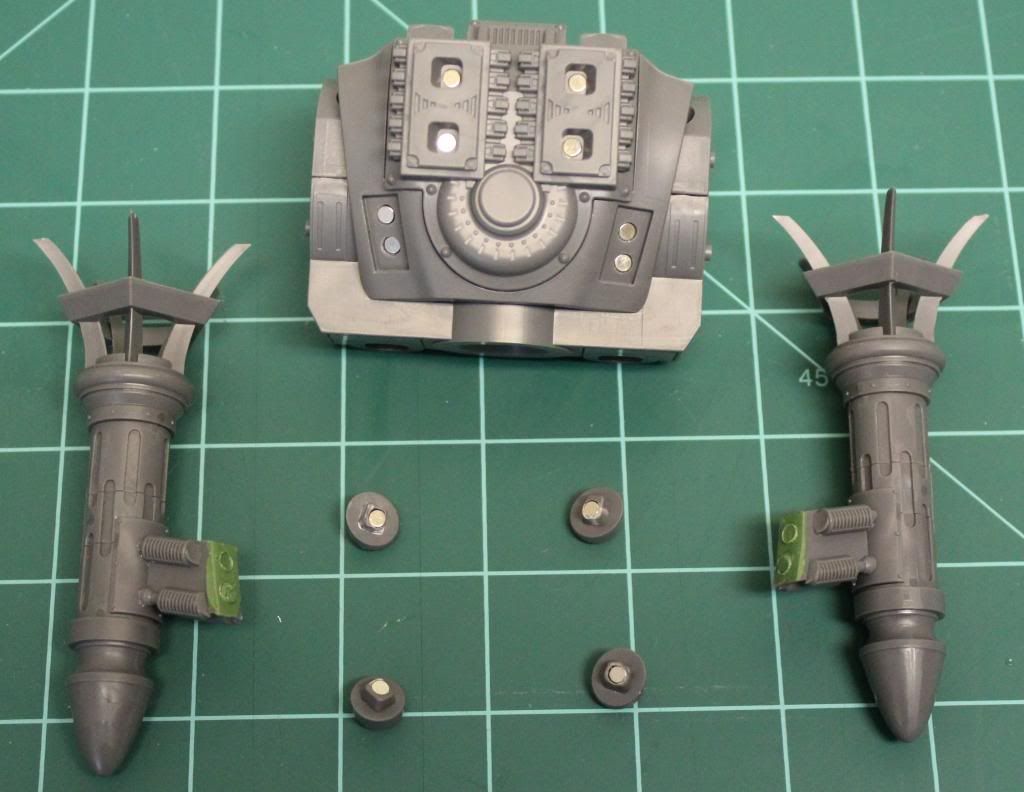
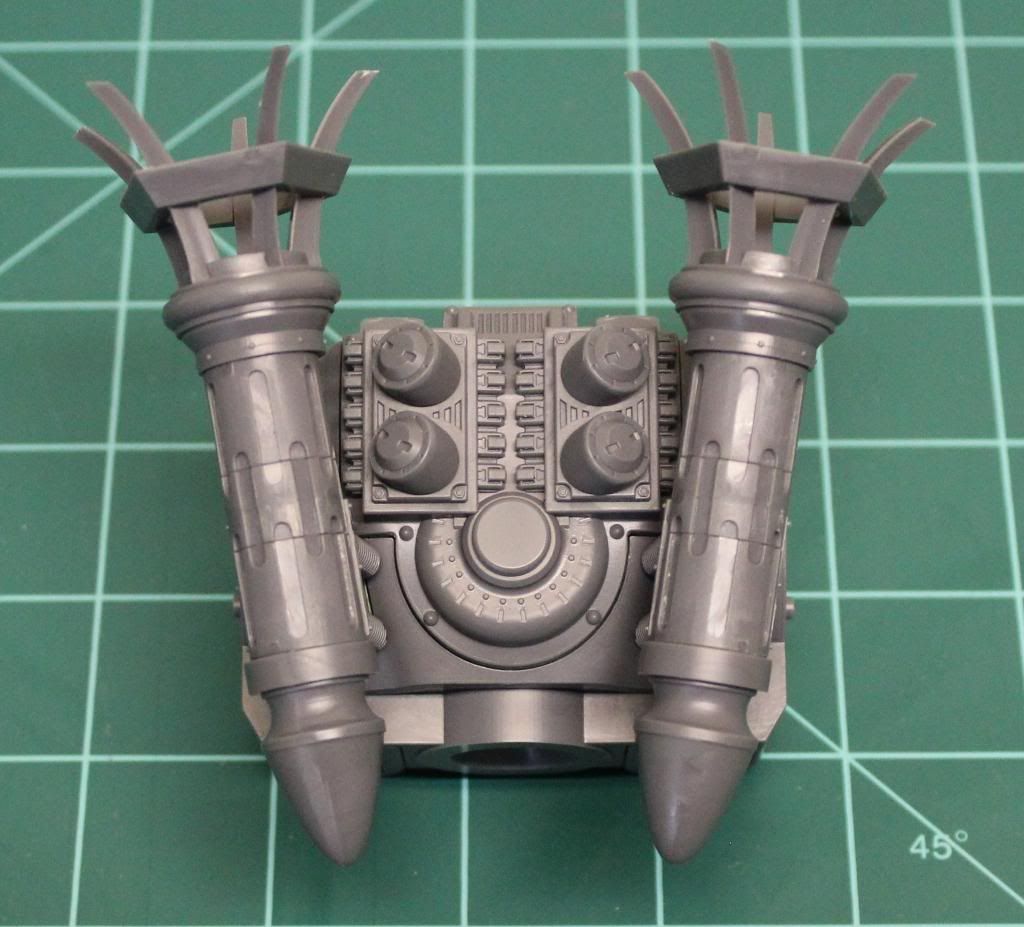
I'm still plugging away at the Leviathan Crusader.  This is a bit of a surprise to me as this tends to be the point in a project when I get distracted by life, work, or just some new shiny project that comes along.  This weekend I got the upper torso together and managed to magnetize the vent stacks.

During the Kickstarter campaign for the Leviathan, DreamForge offered up a free set of alternative exhaust parts for anyone pledging for the Leviathan itself.  The original parts were a little too gothic In my opinion, looking like giant braziers straight out of the Warhammer milieu.  The alternative parts on the other hand have a sleeker and more stream-lined look to them.

After mulling over the situation for a while I decided to use both, with a set of magnets for swapping back and forth.  The original kit parts are rather beefy so it took two magnets in the slot before I felt that it would hold fast, and then two opposing magnets in the exhaust part itself.  I am using 1/8" long and 1/8" diameter cylindrical, rare earth magnets on the parts.  Unfortunately I was off on my drilling slightly and the magnets didn't quite line up true.  As you can see by the photos I had to add a little green epoxy stuff putty to get everything to fit right.


There are also four small parts that fit on the back of the engine that would have been in the way of the alternate parts.  I had to magnetize them as well.


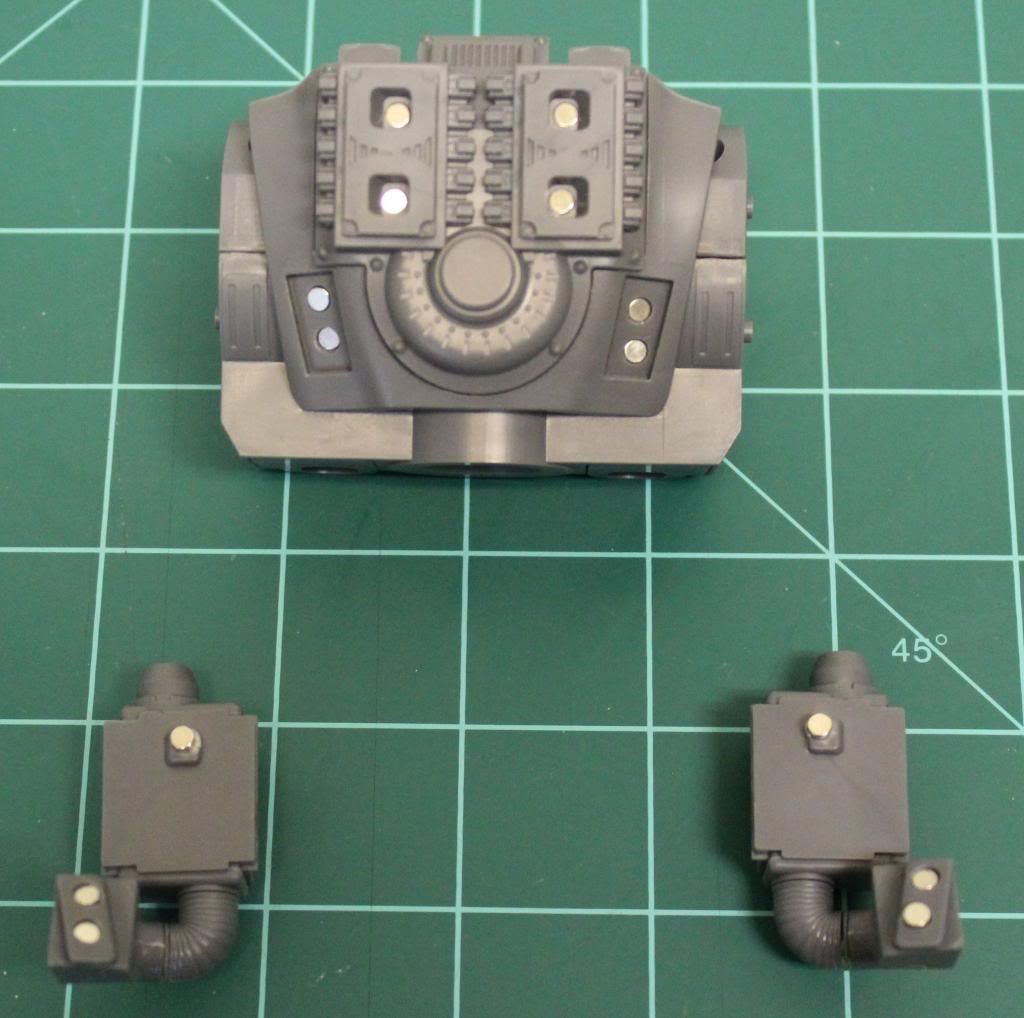
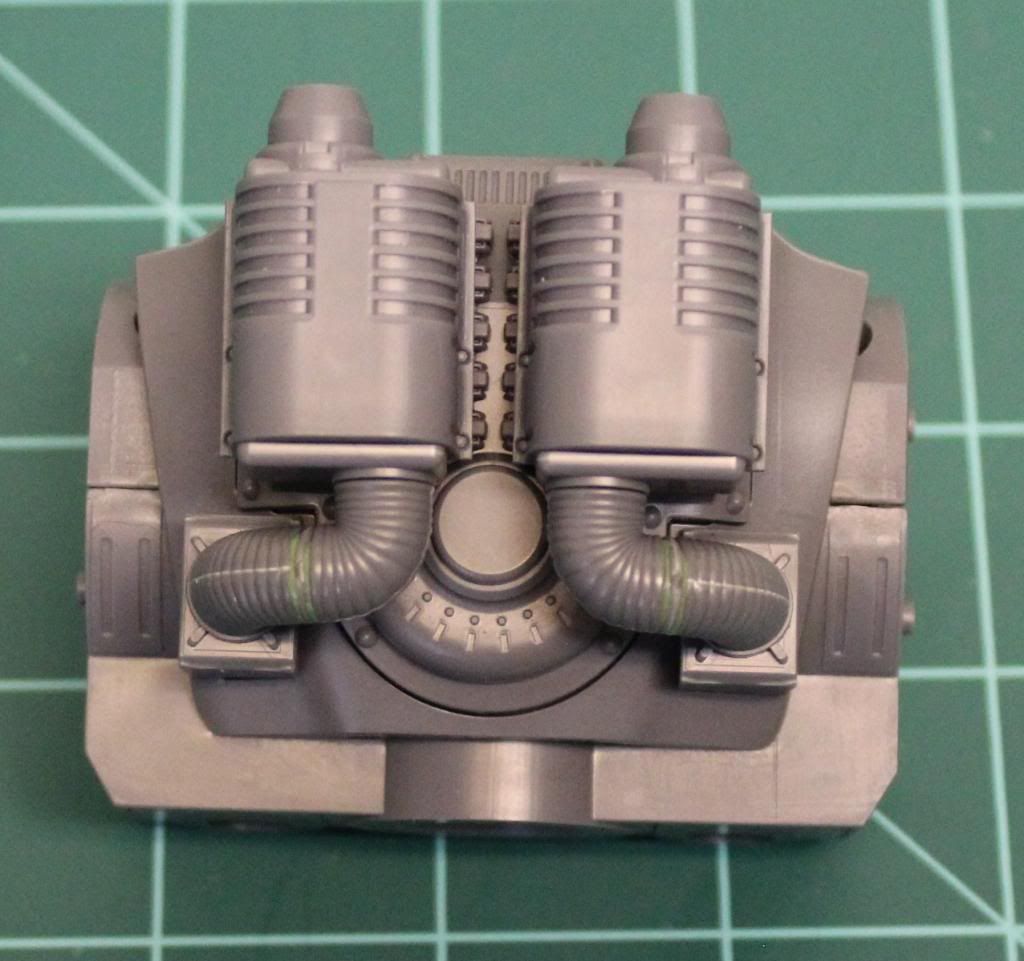
Next up were the alternate parts, listed from DreamForge as "Leviathan Capacitor Cooler".  What I gather from the small amount of Iron Core background that has surfaced is that the exhaust stacks are intended, to vent excess heat when the Leviathan makes extended attacks or hard maneuvers, similar to the heat sinks in Battletech.  The alternative parts are supposedly more efficient at venting that heat.  Either way, I like the look of the alternative set much more.  As you can see, I've magnetized these as well utilizing the same sized magnets in the most of the same locations.  These parts are lighter and fit closer to the torso, so I didn't need all four.

I was a little more careful with my drilling this time and the opposing magnets lined up much better this time.  The hoses that connected the coolers to the torso did not fit quite right, so I needed to green stuff the joints a little bit as well.


  One dissapointing thing that working on the torso has shown me is that I will have to give up the idea of adding a cockpit.  The way the chest, face and roof parts all fit together, it will be nearly impossible to make the face part removable to see the cockpit without some major surgery.  Oh well, that will cut some time off the schedule and keep the project rolling.  I probably would have spent a week or two scratch-building a cockpit and converting a pilot to fit.

Thursday, May 16, 2013

Leviathan Progress Continues


I have had quite a productive week on a couple of projects and have some good progress shots to share of the Leviathan.  I have managed to get the legs complete and make a good start on the body.  I haveve deviated from the instructions a bit and have split the torso into lower and upper assemblies.  This also splits the front pistons into upper and lower parts, but as they are designed to be free to move, they should be alright.  I've done some dry fitting with the chest piece and it will be tricky to mate the pistons but it should be doable.


As far as assembly goes, it was pretty straight forward.  This kit continues to amaze me.  The fit on the upper leg armor was so good that it doesn't need to be glued.  


I continued the weathering up the legs, but toned it down somewhat.  I think when I get to the chest and higher I'll tone it down even further.  I didn't notice it until I started taking pictures, but I missed the back, bottom side of the codpiece with my last wash so it's a little lighter than it should be.  I'll get that remedied before I take any more photos.


After this stage, the project might slow down for a while.  So far the assembly has been straightforward and I haven't deviated much from the instructions.  However as I look at the chest and the arms, I'm seeing a few speed bumps and detours.  First, I want to magnetize the extra kits that came with the kickstarter (optional sword and exhaust stacks, so I'll have to work out a plan for those.  Second, I want to see if I can make the face part hinged so that I can open it up and detail a pilot and cockpit.  I'm not sure it's feasible  but I want to give it a try.  If that doesn't work out I can just throw an LED light in there as I have seen other modelers attempt.  Last, looking at the gun arm assembly it seems like it will be a bitch.  The center barrel assembly rotates, but it will have to be sandwiched in the main housing halves.  I see a number of long seams that will have to be filled and sanded while avoiding damage to the barrel.

Tuesday, May 14, 2013

I'll take the green in size 256

I've now completed the feet and ankle armor for my DreamForge Leviathan Crusader.  I cruised around the net to find what other paint schemes people had done and looked back at the initial background that was written for the Iron Core universe for inspiration on my paint scheme.

I came away with a couple of firm opinions.  First,  I won't be using camouflage or over the top Gothic style heraldry.  On the camouflage, it seems like a waste of time to camouflage a fifty foot tall robot.  On the heraldry, I found some very lovely painted examples, but they strayed too close to the Warhammer 40K aesthetic for me.  I'm not looking for a titan proxy.  I want the Crusader to stand on it's own merits.

In the end I opted for a dirty green color for the armor plates and I'll let the exposed mechanical bits remain dry-brushed metal.  I'm using a black primer, with a base coat of Army Painter "Army Green" spray.  To that I apply a couple of black washes and then I weather with some dark grey, metalics and some rust effects.


The weathering was a little ham-handed, as I haven't weathered anything this big in a while, but at tabletop distance, it holds together.  My plan is to have the most wear on the feet and then get cleaner as I work farther up the model.


I'm not really in love with the design style of the feet.  They are a little more pointy and Gothic than I'd like to see, but I'll get over it.  Any fear I had that the joints were too loose disappeared when I got the armor on.  With all of the fully painted parts put together, the feet and ankle joints are quite stiff.  I can still move them, but it is significantly harder now.  When complete this certainly won't be an action figure.


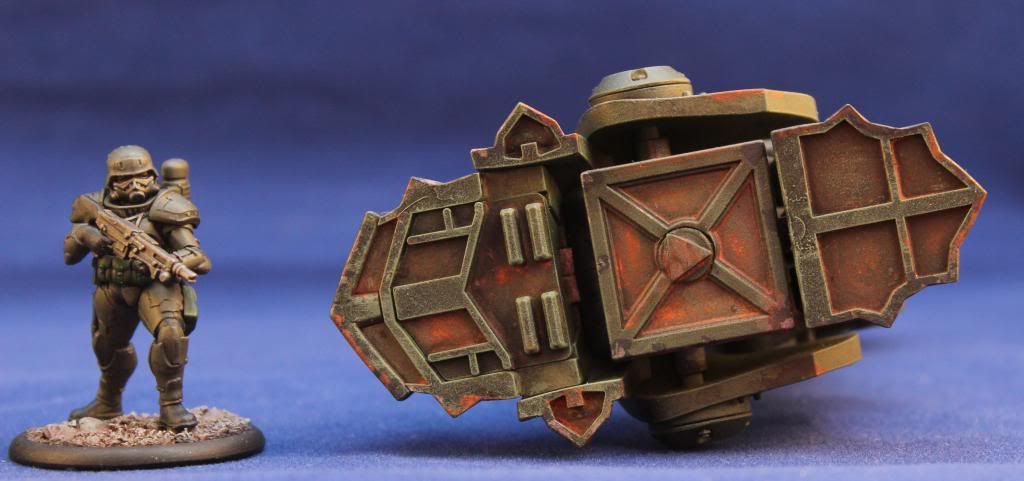
Here's a shot of the bottom of the foot and the first deviation to the instructions I've made.  The kit comes with a plastic base, but assuming that I ever use this guy on the tabletop, I'll want to make it removable.  The solution to that, as always is magnets.  The central foot pad had a circle at the center of the "x" just about  1/4" across.  It was easy to drill out this area and insert a 14" diameter, 1/8" tall rare earth magnet in each foot pad.  I plan to place an opposite pair into the model's base.  It will not be a terribly strong joint, but it should suffice for a static display model.  I've found in the past that when using magnets, the paint tends to chip out rather easily.  To prevent that, I used a triangular hole punch to create a thin spacer from .01" sheet styrene.

Things are actually progressing a little faster than I had imagined and I should have the leg and knee armor done this week.  Famous last words I know, but this project might finish up faster than I planned.

Wednesday, May 8, 2013

And So It Begins! - Starting A DreamForge Leviathan Crusader


I have finally cleaned off my workbench (at least of recent projects) and have gotten enough space cleared off that I can start on my Leviathan kit!  This plastic kit was the main showcase for the 2012 Kickstarter Campaign by DreamForge Games.  They added many other kits along the way, but this was always the centerpiece.  Leviathan’s are a bipedal, manned, fighting robot that constitute the elite weapons of the Iron Core Universe.  The written descriptions to date sort of reflect the Mechwarrior Dark Ages where these large machines are rare and greatly treasured.  DreamForge has stated that the Iron Core game (if and when it is released) will be built around using these models (and other leviathan kits) on the tabletop.  I’m a little dubious that DreamForge can pull that off, but even if it never comes to be, this will still be a pretty cool model.

I received my kit this March and while I have been marveling at it, I waited until now so I could really devote the time and attention it deserves.  There have been other very nice un-boxing reviews and video build-ups of the leviathan posted around the net.  I can’t add a whole lot to those so I’ll go down a different road and just walk through my progress as it happens.

One important note is that the printed instructions provided in the box are incorrect in a number of places and DreamForge have released an electronic version with the correction for wrong part numbers.  This is very important as you’ll end up scratching your head when parts don’t fit if you are using the old instructions.

Here's a link to the updated instructions:


Another important note is on the screwdriver.  Parts of this model are held together with small Philips head screws.  The kit provides a small screwdriver, but I found it to be severely inadequate.  First, the provided screwdriver is too small for the screws.  If you use it, you will start to strip out the inside of the screw head as it slips around.  Secondly, you need to apply a fair amount of torque to the screws to get them to tighten up.  The screwdriver provided is so small that it’s hard to get a good grip.  I just ditched it and used a larger screwdriver from my tool box.  It is also a little hard to find the point where the screws are tight enough to hold the joint stiff, but not so much that you strip out the plastic.  It takes quite a bit more force than you might think.  Luckily I managed to get all of the screws in the leg joints without problem.

CONSTRUCTION PLAN
The kit is designed in a very similar way to some of the fancier Gundam “Perfect Grade” kits that Bandai produces, in which there is an internal frame that articulates and an outer shell of armor parts.  I built one of those kits years back and I figure that assembling the leviathan the same way will work best.  To that end I have started with just the internal leg pieces.  From there I’ll work on the armor plates from the bottom up.  After I get the legs in good shape I’ll re-evaluate and see where to go next.


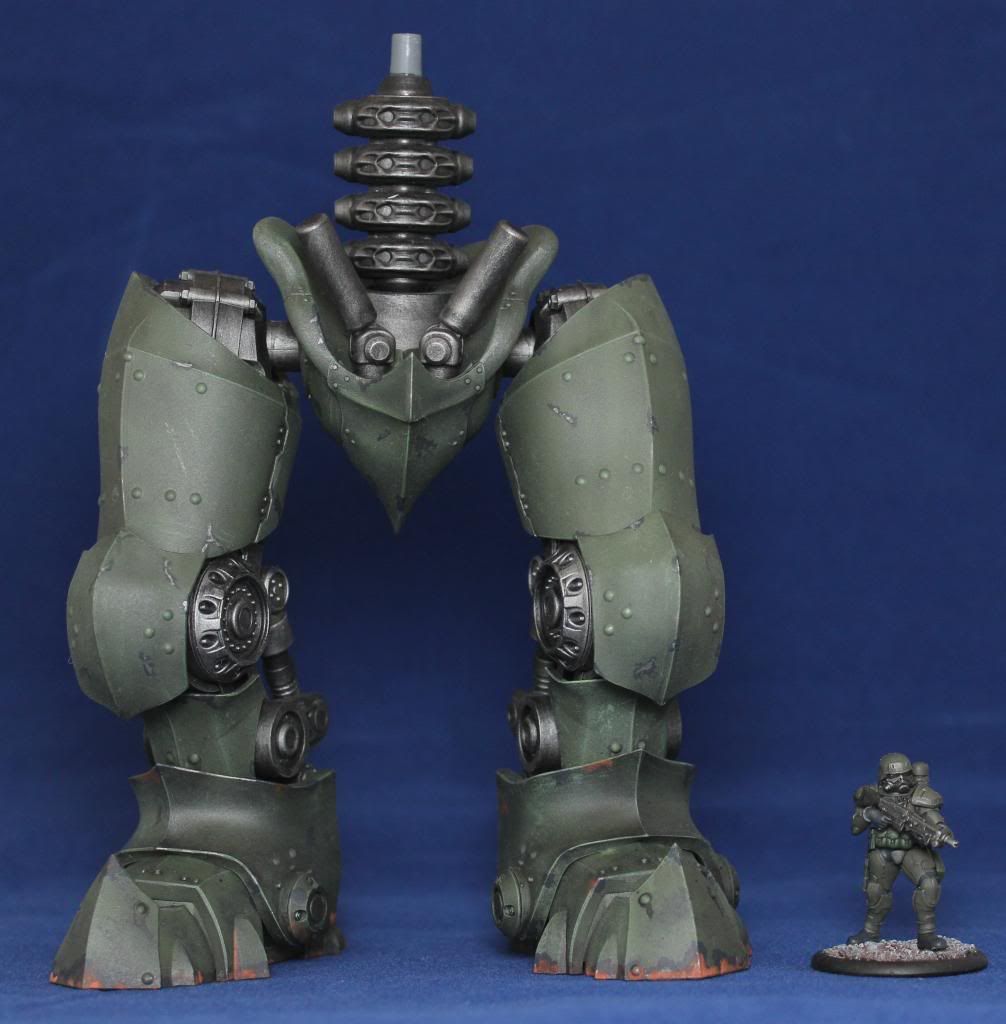
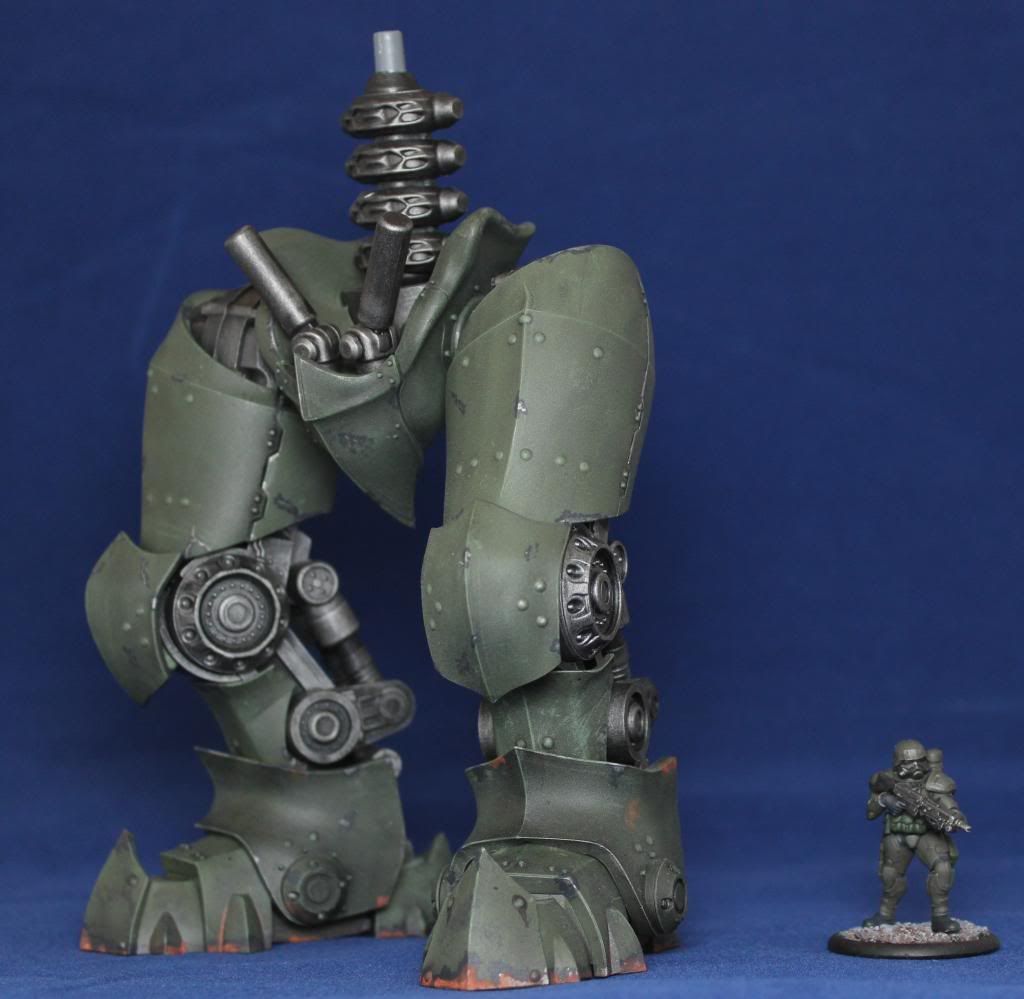
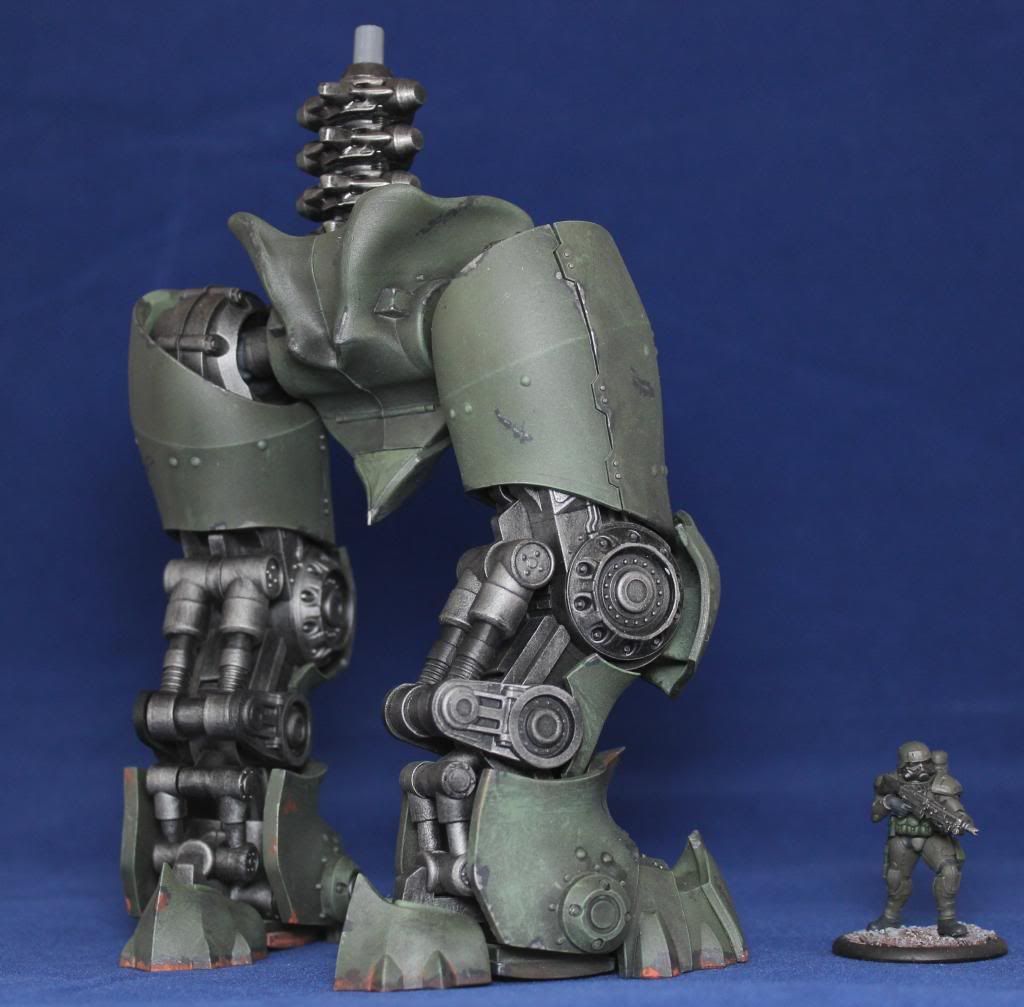
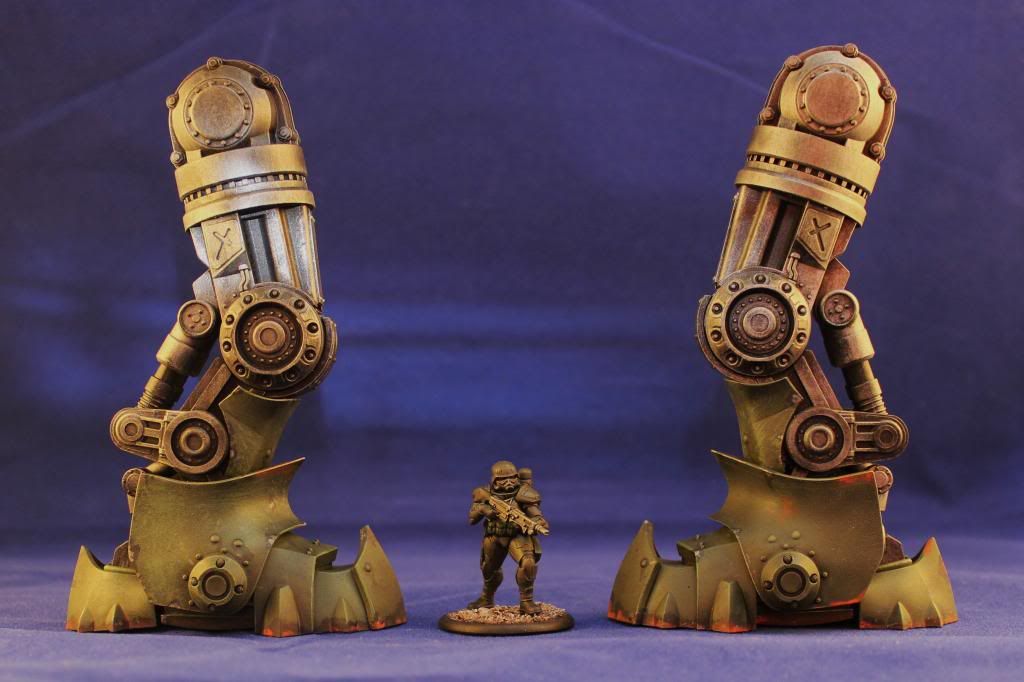
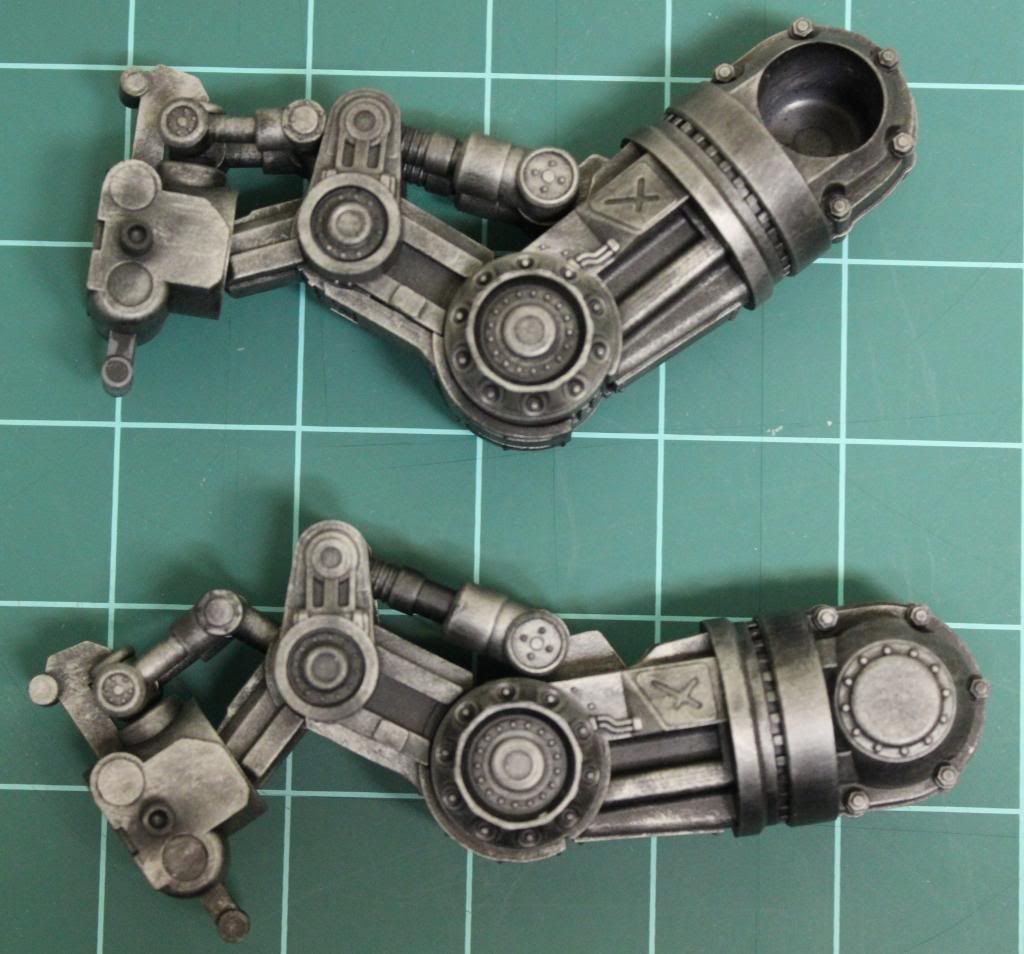
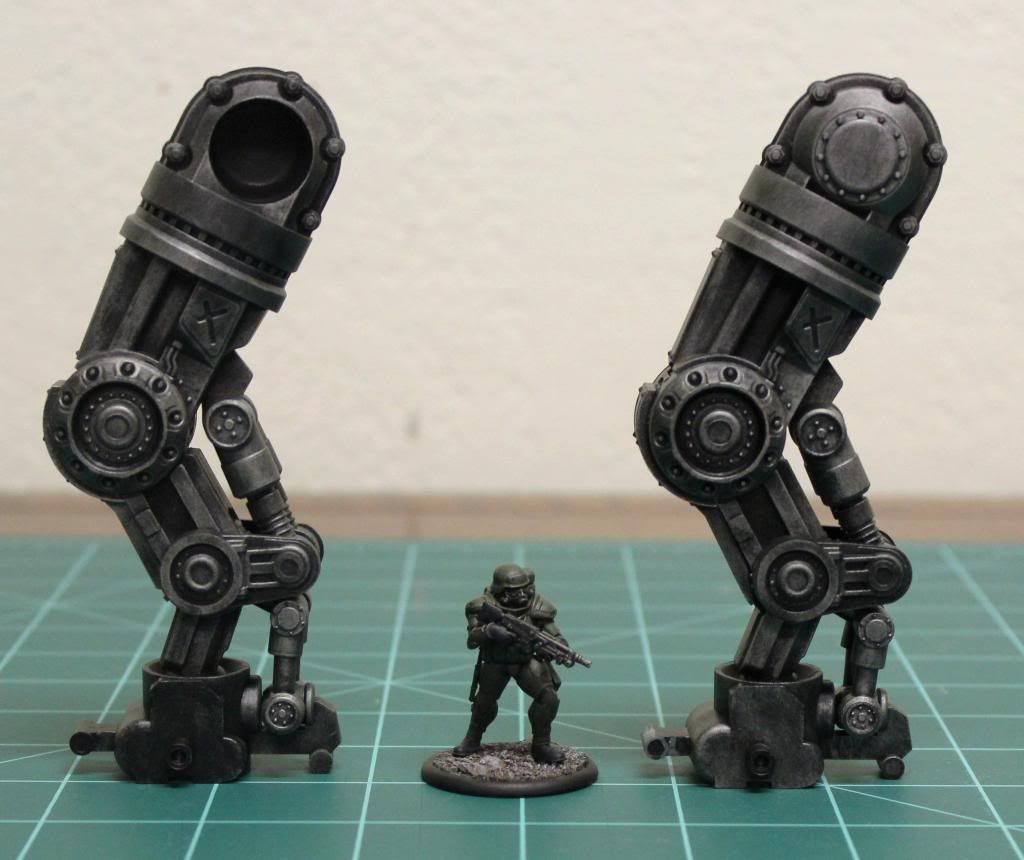
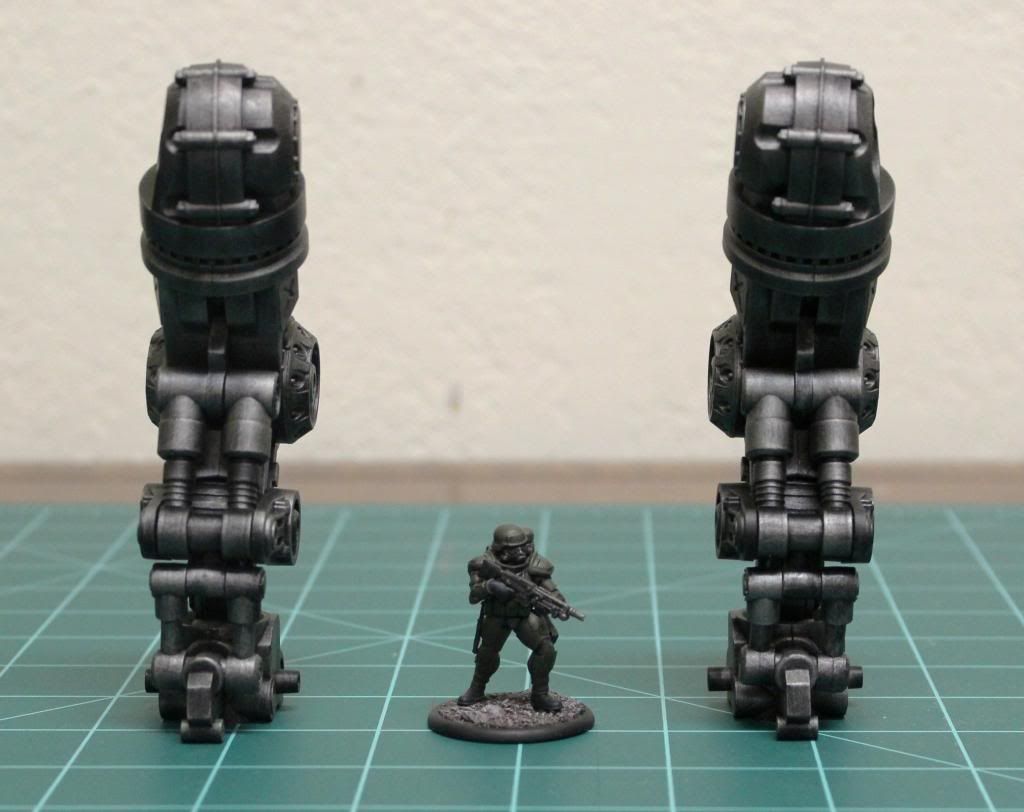
When I put together the legs, I assembled them without the hydraulic pistons on the back.  At first I was worried as the joints of the unpainted parts were not very stiff.  I was not sure that they would be able to hold up the rest of the model without sagging.  But Once I got the paint on, it stiffened up the joints considerably.  Next I added the pistons on the back, which stiffened up the joints even more.  I am now quite confident the joints will be able to take the load just fine. 


PAINTING
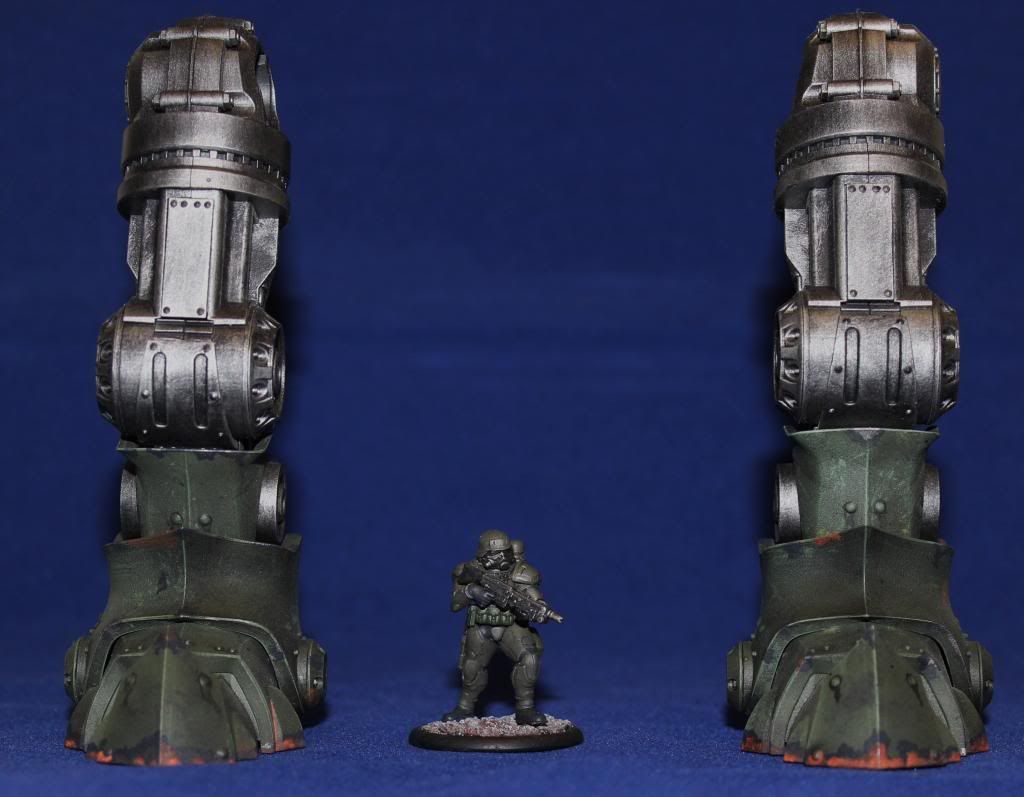
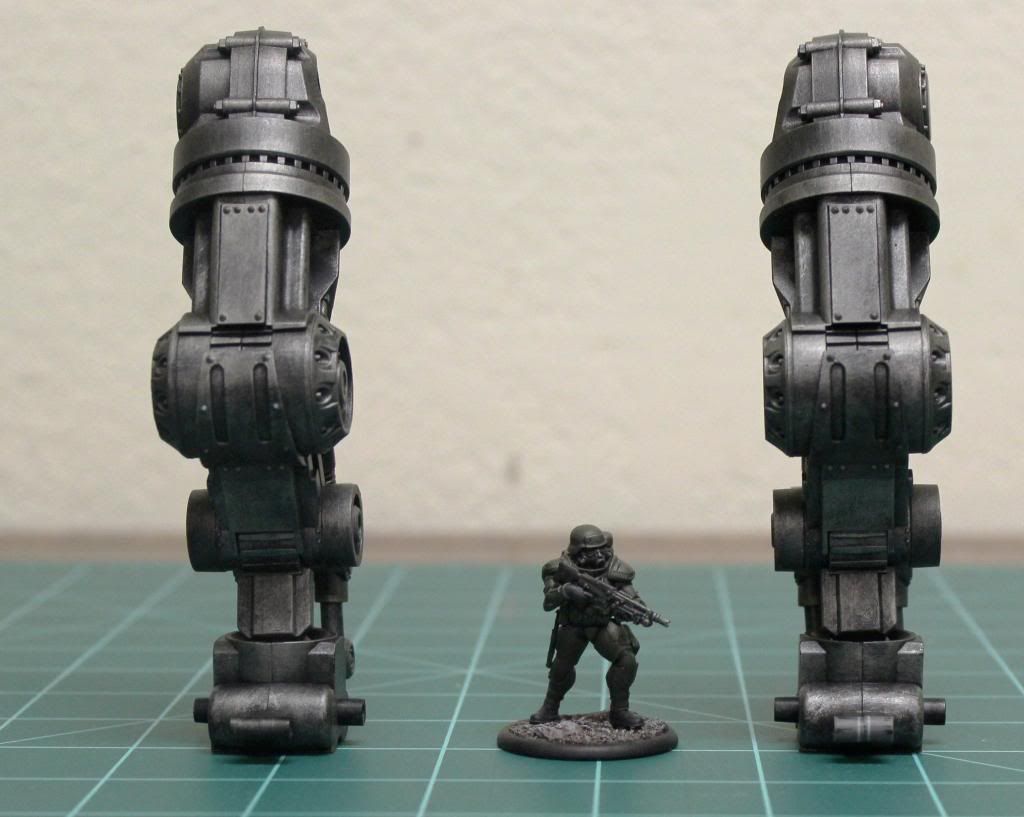
I kept the paint basic and went for a matte black primer coat and added a generous dry-brushing of boltgun metal.  My next plan is to give the legs a few light washes of black to grunge them up and then I’ll seal them before moving on the feet and leg armor.  It’s a shame, but most of these legs will be covered in armor plate and you won’t get to see much.


So far I am very pleased with the kit.  It is very well designed and cast.  It is a true joy to work with.  All of the joints move down to the pistons moving in and out.  The end result should be quite impressive.  Unfortunately, at the pace I’m working, this could be a three or four month project.


This thing will be a monster when complete as you can see by the scale of just the legs so far.  At over 10"  when complete it should be a site to behold.

Wednesday, May 1, 2013

Wargames Factory Survivor Scale Comparrisons

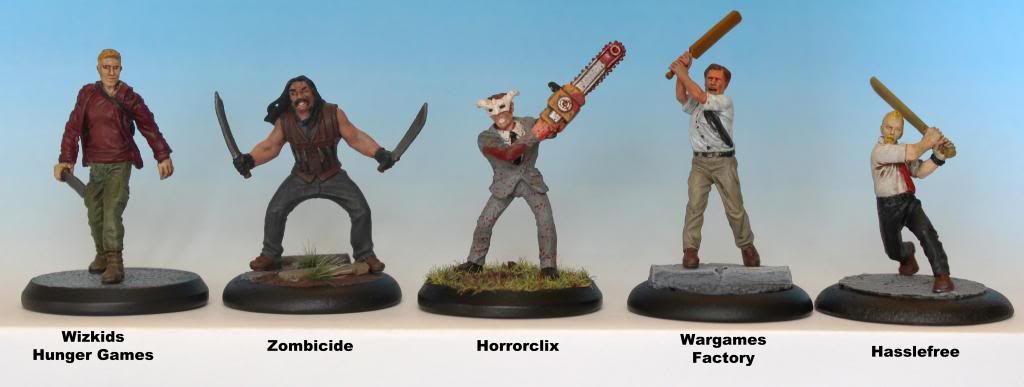
Following on my previous posts reviewing the new male apocalyptic survivors from Wargames factory,  I decided to take a few pictures and compare their scale to some other figures in my collection.

Especially in post apocalyptic game settings where no one manufacturer dominates the market, gamers are often almost as concerned with a figures scale as much as they are the figures quality.  Although I'm not incredibly picky about scale, there are just some figures that are too tall or too small to play well together.  I've tried to comb through my collection of painted and based figures to see how the new plastic survivors stack up.

One thing to keep in mind is that my base sizes are wildly inconsistent.  While they are generally all thirty millimeter in diameter some of them are short and some can be as much as six or seven millimeters tall.  For the most part I try to keep shorter figures on the taller bases and vice versa so that I keep figures looking as consistent as possible.

First up are a selection of figures with melee weapons.  As you can see the WGF figure fits in pretty well with the Wizkids and Zombicide figures on the left.  However even if you discount the taller base and the different poses, the figure is quite a bit taller than the Hasslefree figure on the right.  I found this is consistently true with a number of Hasslefree figures.


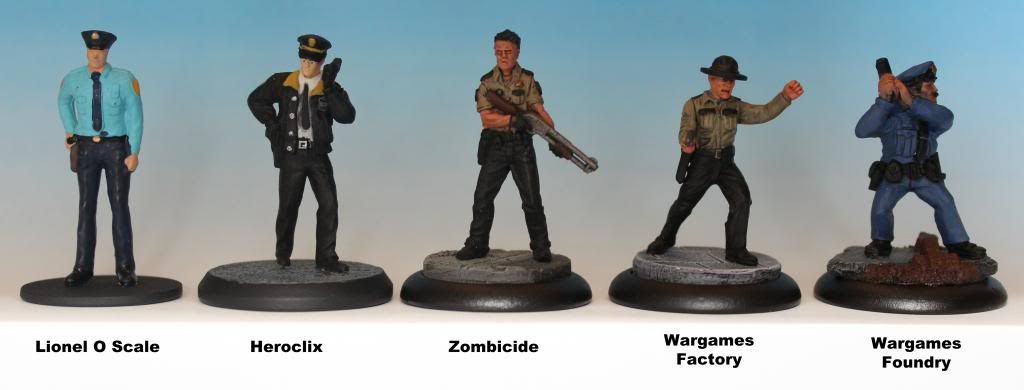
Next I pulled together some figures with police figures.  This picture is nice because it shows some of the biggest and smallest figure scales I have.  far left is a figure from Lionel in their O-Gauge range.  On the far right is a police man from the Wargames Foundry Street Violence range.  Even with a short disc style base the O-Gauge figure was just too tall to be used for anything else than a filler figure if I get desperate.  I think the WGF cop nicely splits the difference between the bigger and shorter figures.


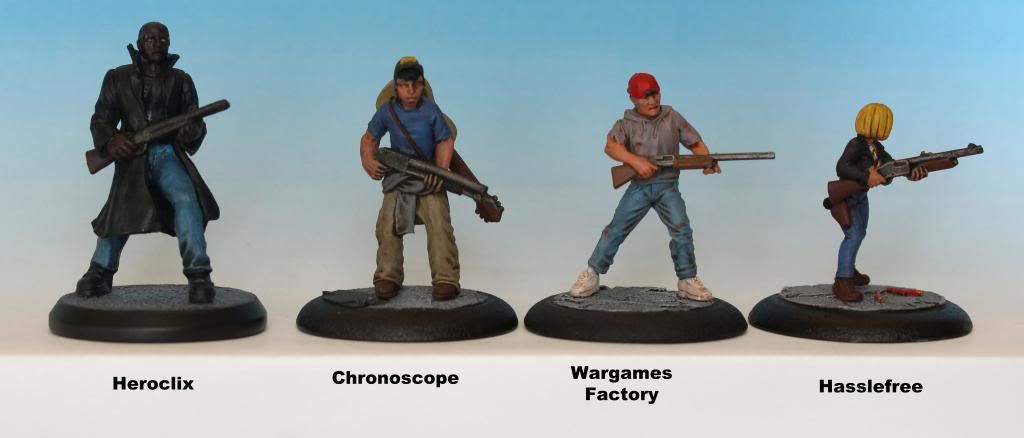
Here are a selection of shotgun armed figures.  The heroclix figure on the far left is probably the tallest Heroclix figure I have and although he seems too big, he can still blend with the rest of the figures at tabletop distance.  As with the others, the Hasslefree figure is just a little too small in my opinion to mix with the rest.


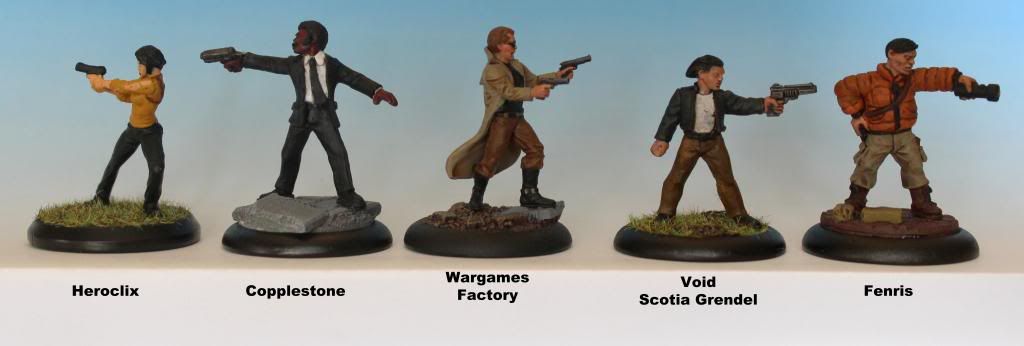
Here are some figures with pistols.  This one really demonstrates how WGF have toned down the proportions of the weapons to something more realistic.  The weapons on the other figures dwarf them by comparison.


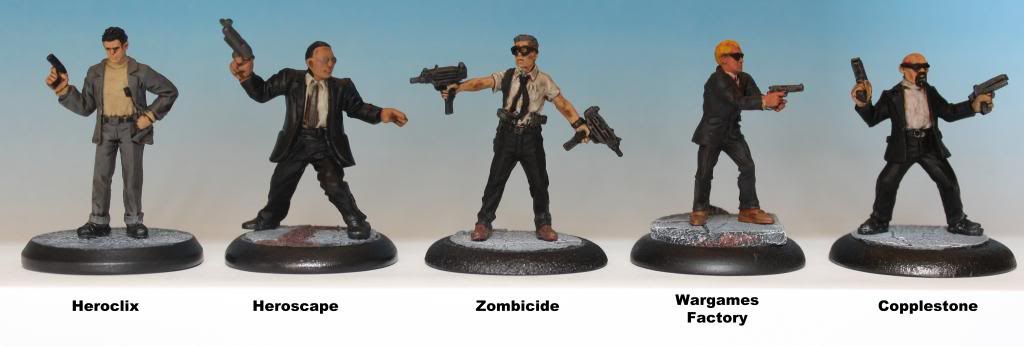
Last up are some figures in suits.


If I have some spare time I'll try to do some more comparison shots with different zombie figures later.

Review of Wargames Factory "Apocalyptic Survivors: The Men"


Today I’m taking a break a break from DreamForge’s Eisenkern and reviewing another new Wargames Factory kit, “Apocalypse Survivors:  The Men”. 
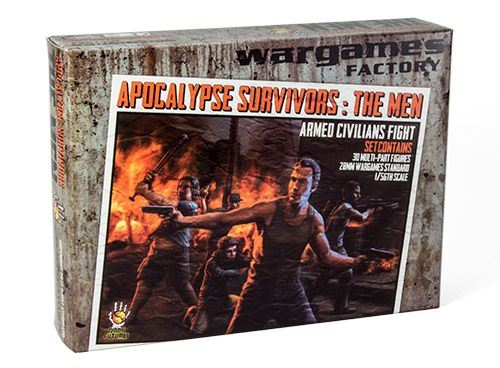
Picture courtesy of Wargames Factory

I’ve always been a fan of the “All Things Zombie” game from Two Hour Wargames, but a good experience usually involves having lots of unique NPC figures available to represent the various humans you meet.  There are plenty of wonderful metal figures on the market from Coppertone, Hassle free and others, but if you want plastic, you’re usually stuck with lackluster figures from Wizkids Heroclix line.

Wargames Factory has put out a new set of plastic civilians that will fit right at home in the post apocalypse.  The box contains four plastic frames containing enough parts to build thirty armed male civilians in modern dress.

FRAME 1 – BODIES & BASES

Picture courtesy of Wargames Factory
Each box has three copies of this frame which includes ten bodies, ten bases, all the heads and a selection of arms and weapons combinations.  As with all of the recent Wargames Factories kits I’ve looked at, the casting quality is top notch with no visible flash and minor mold lines.  Even though the mold lines are small, they will in some cases be a big pain to remove.  With all of the cloth and flesh detail on the figures there are lots of inside curves and hard to reach spots that will make it time consuming if you want to get the best figures out of the parts.  Also, some of the parts are very small and fine.  A trend with recent Wargames Factory kits has been a move from whacky gaming scale proportions to more of a “true” proportion look.  In this case that means some very thin and fiddly parts.  Two areas that are of concern are the gun barrels and the handle on the cricket bat, they will bend and break much more easily than your average Games Workshop plastic part.

Another trend with their other kits, the frames have slots and pegs so that the frames can stack together nicely and the standard 25mm bases are molded directly on the sprue with the WGF logo sculpted on the bottom.

Although there are no instructions in the box, WGF has thankfully labeled the parts with numbers and letters.  Each body is labeled with a letter and then each set of arms has a letter and a number.  I haven’t tried all the combinations to know this for certain, but the combinations I have tried look like the letters on the arms match up with the letters on the bodies.  This is important because not all of the arm combinations will work on each figure.  For example, the suit body (C) fits with the the arms in the two handled pistol grip (C1 & C2).  It makes things much better than trial and error.

One design that I dislike about the kit is that the bodies are single piece, not two pieces.  I know this would have added extra cutting and cost to the molds, but it would definitely helped making the figures a little more unique if you could have swapped some of the torsos and legs around, or at least gotten some rotation into them.  There is one set that is separate (the figure in the duster) but that was only done to facilitate the flowing coat.  A diligent modeler could saw the figures apart and putty them back together, but that would be a mighty chore.

FRAME 2 – SPARE WEAPONS, ARMS AND SUPPLIES

Picture courtesy of Wargames Factory
The box has only one weapons frame, which is a shame, as there are some arm and weapon combinations that you will probably want more of.  It also makes splitting the box with a friend a painful proposition as dividing up this frame would be impractical.  As with the other frame, casting is crisp, with no flash and small mold lines.  Also, the same thin parts are present so be wary as you cut them out.   The numbering system for the arms is carried over from the other frame.

This frame also has a number of packs, pouches and other supplies that is a bit odd.  These are copies of military items for the most part which will work for some of your figures that you assume raided a military post at some point, but what is lacking is any civilian packs.

This frame also highlights one of the big weaknesses that I have seen crop up on recent Wargames Factory kits.  They have too much of a tendency to copy and past parts.  Some of the arms are direct copies so that it will be difficult to get real variation to your figures.  Take the grenade launcher for example.  It is already a fairly unique item, and being held the same way in each arm is annoying.

Also, there is copying between kits as well.  All of the pistols and some of the pouches in the kit are direct copies of the Colt 45 and pouches from the WWII American soldier kit.  It is not a huge problem, but an annoying one that keeps a good kit from being a great kit.  I also had a little head scratching about the quantity and type of extra weapons included.   There are seven each AK-47, M-16 and I85A, but only two each of the rifle and hunting shotgun, a better mix, with a combat shotgun and a double barreled shotgun would have been appreciated.  Being as these are civilians, you'd expect a greater variety of civilian weapons.  There are not any spare pistols, but as those would have been tiny, that is probably just as well.

ASSEMBLY
The sprue attachment points are generally small and in good locations, meaning that trimming parts is a snap.  However as stated above, take your time with some of the thinner and more fragile parts.  Assembly of the figures is straight forward, but you should definitely plan things out before you start cutting and gluing parts.  There are some figures and arm combinations that work and some don’t.  I highly recommend test fitting arms before you glue them and leave the heads until last. 

The sprues are standard hard polystyrene so solvent style glues (think Testors orange) work just fine.   I found that the heads fit pretty well, but on the arms, even the intended arm and body combinations left small gaps.  If you use novel combinations, the gaps are even bigger.  I added a little green stuff to each joint but it is not strictly needed depending on the amount of time you want to invest in these figures.

ASSEMBLED FIGURES
Here are my first sets of assembled figures.  The WGF bases are serviceable  but as all of my other humans are on 30mm bases I did the same here.  These are a mix of bases from Fenris, Secret Weapon and Black Cat Bases.  I haven’t gotten to the point of naming any of the figures, so I just assigned them a name based on their body type.  Here is the first group (from Left to Right):


CARGO PANTS – This body is fairly versatile, in that you can use either long sleeves, short sleeves or even sleeveless arms and it looks like most of them will fit.  With the crossbow and sleeveless look you can make a fairly convincing Dixon from The Walking Dead, although I do not think there is a head in the set that matches dead on.  On this one I went for a head with a little more age and a cap.  I believe I can easily get three unique figures out of this body.

THE HOODY – This is another body that has good versatility in that the shoulders are generic and you could get away with any of the sleeve combinations in the kit.  I went with a hunting shotgun and ballcap on backwards.  The shoulders are a little squarer than the arms allow for without modification, so the hands don’t quite line up.  If I was to do this over again I’d probably shave down the attachment points a little bit to get a better fit.  Again this is another good body that will easily make three different figures.

THE TANKTOP – This is one of the cool but less versatile bodies in that the wife beater shirt leaves you with only the sleeveless arm options.  To top that off the shoulders are pointed inward such that you can’t use all of the sleeveless options (like the crossbow) without modification.  Although I went for a generic Asian guy, you can put together a pretty good Kurt Russell from “Big Trouble In Little China”.

KAHKI PANTS – This body is another less useful body as his shoulder’s are set in the “swinging for the fences” pose.  That means only the baseball bat and cricket bat will fit without some serious modifications.  This is also a little frustrating because there is only one baseball bat (on the weapons sprue) and three cricket bats (one on each body sprue) so I’m stuck with at least two cricket bats or major surgery.  The third body is definitely a candidate for converting into a zombie with some parts from the Studio Miniatures plastic zombies.

THE SUIT – This body is a good one with a generic look and good shoulders, but you are limited to the long sleeve arms.  I definitely like the two handed grip on the pistol and wish it had fit onto the cop body better.  There is also a set of arms with a bible raised up, which the commission painter for WGF turned into a priest.  That’s something I intend to do with one of these bodies.


FLIP FLOPS – This is another body that looks cool but is only good for one figure.   The problem here is that the big fat guy was sculpted with big fat shoulders, meaning that the normal sized arms don’t work.  So far the only arms that I found that fit are the ones I built here and one of the long sleeves with a machete.  Combine that with the distinctive look of beer belly and flip flops and I think this is another candidate for a zombie conversion. I really wanted to give him the arm with the soda can but I’ll have to work a bit harder to make that fit. 

THE COP – Another good body with potential this one has the belt and shirt of a police officer.  There is the head with the brown round pictured here and one with a wheel cap.  You might be able to make the arms with the two hand pistol grip fit, but you’ll have to do some puttying and cutting to make it work.  The arms with the M-16, shotgun and grenade launcher all seem to fit as well.  For this figure I cheated a little bit.  I didn’t like any of the hands on the set so I took one of the arms with the bible, cut off the hand with the bible and added a closed fist from one of my Eisenkern accessory sprues.  It didn’t work out quite like I wanted so I may go back and fix it later.

THE KID – This is an interesting figure.  I had not thought about it before but I do not have any non-adult figures in my collection.  I guess I put it down to the fact that most of my ATZ characters die messily at some point and probably was not too keen for even imaginary kids getting killed.  That aside, this body comes down on the less than versatile side.  I only found two sets of arms that work, the SMG shown and one with a hunting rifle.  I think you could make some of the other heads work, but it might give him a bobble-head look.

COVERALLS – I am not a fan of this body.  The set of the shoulders and the gate just don’t match the arms WGF sculpted for him.  There is the set shown and another set with crowbar and Molotov cocktail.  Both of which look awkward in my opinion.  I tried rotating the arms around a bit but it did not look much better.  This body is another where I think the third one’s going to be a zombie.

THE DUSTER – I think this body along with the fat guy contrasts how we all want see ourselves versus how we probably look.  Instead of the cool guy in motorcycle boots and trench coat we’ll show up for the end of the world with flip flops and a beer belly.  As he needs long sleeves, you’re competing with the suit body for arm combinations.  All in all he is a useful body that you could be built into neo from the matrix.


CONCLUSIONS
This is a nice set and even at full retail price it’s still pretty cheap.  It also fills an empty niche in the market for plastic survivors.  The kit has some problems in that the combinations of bodies and arms are not universal and the bodies are one piece, but in my opinions those are minor concerns.  For me I figure I can build twenty four to twenty six reasonably distinct figures and have a good pile of bits left over for a very reasonable price. 

The bad news for Wargames Factory is that I don’t ever see anyone needing more than one box of these guys, so unlike rank and file military figures, I think this will be a light seller for them.  There are confirmed rumors that they are already in producing a set of female survivors, so hopefully those will be just as good and have a different selection of weapons.  I also hope that they redo the male zombies.