Showing posts with label Eisenkern. Show all posts

Tuesday, May 14, 2013

I'll take the green in size 256

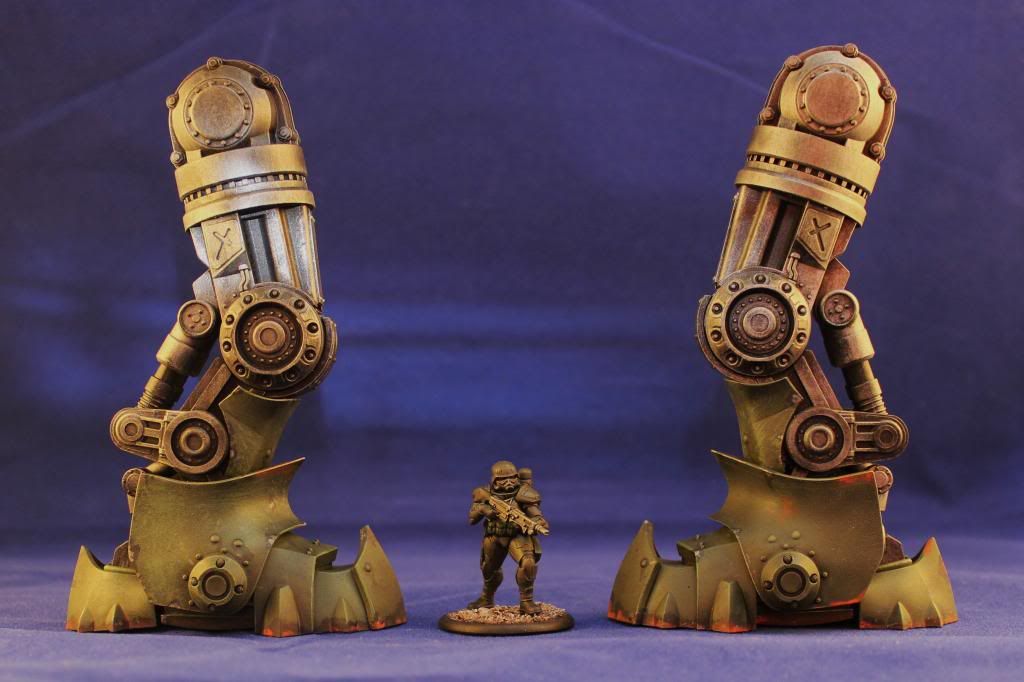
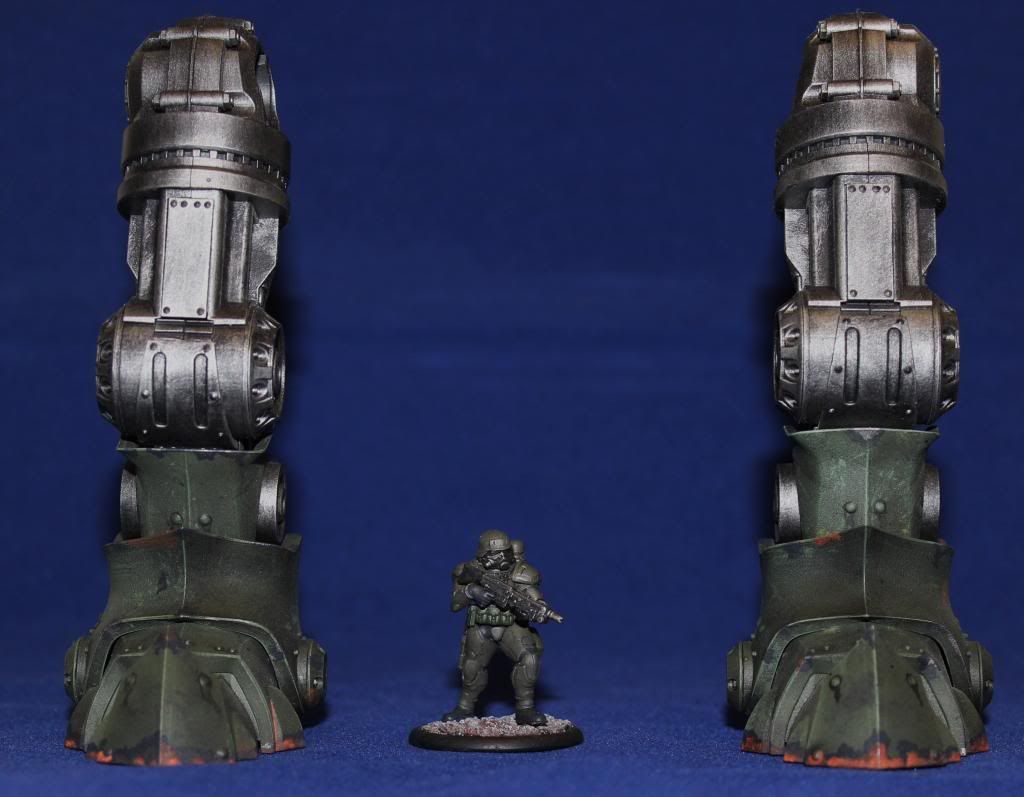
I've now completed the feet and ankle armor for my DreamForge Leviathan Crusader.  I cruised around the net to find what other paint schemes people had done and looked back at the initial background that was written for the Iron Core universe for inspiration on my paint scheme.

I came away with a couple of firm opinions.  First,  I won't be using camouflage or over the top Gothic style heraldry.  On the camouflage, it seems like a waste of time to camouflage a fifty foot tall robot.  On the heraldry, I found some very lovely painted examples, but they strayed too close to the Warhammer 40K aesthetic for me.  I'm not looking for a titan proxy.  I want the Crusader to stand on it's own merits.

In the end I opted for a dirty green color for the armor plates and I'll let the exposed mechanical bits remain dry-brushed metal.  I'm using a black primer, with a base coat of Army Painter "Army Green" spray.  To that I apply a couple of black washes and then I weather with some dark grey, metalics and some rust effects.


The weathering was a little ham-handed, as I haven't weathered anything this big in a while, but at tabletop distance, it holds together.  My plan is to have the most wear on the feet and then get cleaner as I work farther up the model.


I'm not really in love with the design style of the feet.  They are a little more pointy and Gothic than I'd like to see, but I'll get over it.  Any fear I had that the joints were too loose disappeared when I got the armor on.  With all of the fully painted parts put together, the feet and ankle joints are quite stiff.  I can still move them, but it is significantly harder now.  When complete this certainly won't be an action figure.


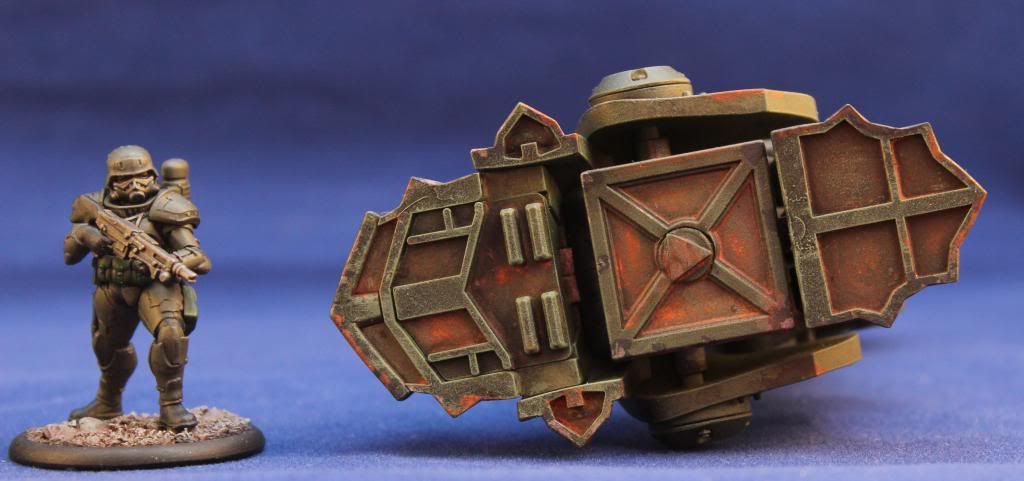
Here's a shot of the bottom of the foot and the first deviation to the instructions I've made.  The kit comes with a plastic base, but assuming that I ever use this guy on the tabletop, I'll want to make it removable.  The solution to that, as always is magnets.  The central foot pad had a circle at the center of the "x" just about  1/4" across.  It was easy to drill out this area and insert a 14" diameter, 1/8" tall rare earth magnet in each foot pad.  I plan to place an opposite pair into the model's base.  It will not be a terribly strong joint, but it should suffice for a static display model.  I've found in the past that when using magnets, the paint tends to chip out rather easily.  To prevent that, I used a triangular hole punch to create a thin spacer from .01" sheet styrene.

Things are actually progressing a little faster than I had imagined and I should have the leg and knee armor done this week.  Famous last words I know, but this project might finish up faster than I planned.

Thursday, April 18, 2013

DreamForge Games Stormtrooper Support Weapon Set Review


This has taken me a little longer to put together than some of the other reviews.  Some of that has been life intruding into hobby time (kids tournaments  spring break etc), but also these kits are quite a bit more complicated than the basic infantry and have taken longer to get put together, painted and based.

Today I’ll go through the Eisenkern Support Weapons Set.  This is the last of my DreamForge reviews for now.  I still have Ada, the feral Shadokesh & handler and the mighty Leviathan Crusader.  Ada and the Shadokesh are one of rewards and are a low priority for me and the Leviathan will probably take me into the summer to work through and report back on.  


This box set provides three heavy weapons team kits spread over three frames.  There is an anti-tank gun, a quad anti-aircraft gun and a mortar.  Each team comes with the weapon system, three crew members and a large base.

Frame #1 – Weapons Crew:

This frame contains all of the parts to build up the weapon crews as well as a few accessory bits like the battlefield computer.  The casting quality is high with no flash and very little in the way of mold lines.   All of my comments on the original stormtrooper base box go for this frame as well.  A point to note is that almost all of the body parts are a straight copy and paste from both the stormtrooper kit and the accessory set.  The only original parts are a set of arms/hands for each weapons loader holding spare ammunition and an arm/hand holding a firing switch.  Depending on your point of view it’s either a good thing or a bad thing.  It’s not optimal, in terms of customizing your crews, but the parts were well designed and have enough variation that it shouldn't overlap too badly with your regular troops if you plan out the poses.  On the plus side, all of the parts are compatible with the other boxes, so mixing and matching parts is a snap.


There are six sets of kneeling legs (left and right) and three sets of standing legs.  The upper torsos, heads, back packs and shoulder pads are all the same as the stormtrooper box.  There is a nice variation of arms from both other sets as well as some new arms holding ammunition, or firing the AT gun.  The frame also has three battlefield computers and three sets of binoculars.


One thing I found lacking was any personal weapons.  There are no rifles, SMGS, pistols or even combat knives for the crew.  This probably makes sense for game play purposes, but seems odd when you look at them as just models.  I rectified this by giving my crews holstered pistols and combat knives from the accessory set.  If you have an accessory set, there are also plenty of spare weapons on there that could be placed on the base.

Frame #2 – Weapons Systems:

This Frame contains all of the parts for the heavy weapons themselves as well as the attached support equipment and spare ammunition.  It also contains one of the large bases.  Each weapon system comes with one crate (I assumed a power pack), cabling to the weapon mount and an open crate of spare ammunition.  The AT gun also comes with individual live and spent shells and the mortar comes with some sort of sensor or targeting mechanism similar to what’s on the mule head from the accessory set.  The bases have the same thin profile and rounded lip of the 30mm infantry bases  with the DreamForge logo on the bottom.  The bases don’t come with any holes for mounting the infantry, so once you determine the positioning of the figures you’ll want to drill your own.

The bases are one area that frustrated me somewhat.  The outside of the bases measure 63mm and the inside of the lip measures 60mm.  This means that aftermarket themed bases (typically 60mm) will be a little too small.  As the bases are already crowded with crew and equipment, stepping down to a smaller base isn't an attractive option.  A standard size base that matched other manufacturers would have been preferable to me.


This is the first DreamForge frame that I found to have some real mold lines.  There seems to have been a small offset of the mold halves that has left mold lines on virtually all the parts.  They are not insurmountable but if you want the best looking result you’ll have to spend more time cleaning up the parts than on the other kits.  I don’t think this is enough that anyone should avoid the kit, but it’s certainly something to keep in mind.


Frame #3 – Bases

The last frame contains two additional large bases, the same as above.


Instructions

Like the other kits this one contains a single page, front and back set of instructions.  They are much clearer than the stormtrooper set and are a good aid to the assembly of the weapons.  One mistake is the diagram on the crew shoulder pads.  They are shown going on the model backwards.  Hopefully that will get fixed in future printings.

Construction

As with the stormtroopers, the weapons crew went together easily and painlessly.  One note of caution would be to assemble the weapons first and then assemble the crew around them.  I put my crew together separately, and some of the heads are pointing off in odd directions.  If you use all three crew and all of the equipment, the bases will get quite crowded and you’ll want to carefully plan your crew poses.  I cheated somewhat and put the standing observer figures on separate 30mm bases which I stole out of one of the infantry boxes, however any generic 30mm lip base would work.  As with my other infantry models, I added a few detail parts from the accessory sets (pistols, knives, pouches etc).

From a construction standpoint I found the weapons themselves to be a little hit and miss  The AA gun is very fiddly to assemble while the mortar and AT gun are a snap.  I get the feeling that Mark did not put quite as much time and effort into the parts breakdown of this kit as he did with the stormtroopers or the Leviathan.   

The AA gun is where the most issues lie.  First, the assembly of the gun barrels, mount, and rear arm go together with posts and holes that are just a little too small.  If you try to force them your are liable to break something.  The better solution is to back scrape the posts with a hobby knife to slim down the diameter enough to loosen the fit.  Next, up are the drum magazines.  These have small tabs on both the magazine and the gun instead of a male/female tab and slot.  If you just glue them as is, the joint is not strong enough.  I ended up shaving off both the tabs and gluing the drum straight to the gun.  

Another issue is the mounting point for the gun shield to the bottom of the guns.  This is a but joint that again does not seem to be strong enough.   After I had glued the parts together with solvent model glue I added some gap filling super glue to the inside joint to try and strengthen the bond.   The last issue I had with the AA gun were the legs to the mount.  There are four legs that fit into slots on a center hub.  The legs are just a little too thick to fit into the hub and as with the guns I found the best method was to back scrape the legs until they fit into the slots.

Similar to the mechanical mule in the accessory set, the mortar has some thin and fragile parts that will require time and patience to gain the best results.  Also, you will need to be careful during painting.  I got a little too vigorous with dry brushing and broke off the support legs and had to repair them.

I strongly suggest leaving the weapons and cables separate for painting.  Otherwise there are some areas that will be nearly impossible to paint.  I also left the gun shields off for painting as well.

As I stated above, I still haven’t based the figures.    From what little information available on the game rules, the spotter figure(standing with binoculars) will be an option.  As I want to keep the figures as cannon as possible, I’m considering either magnetizing the spotter or just putting him on a separate 30mm base of its own.

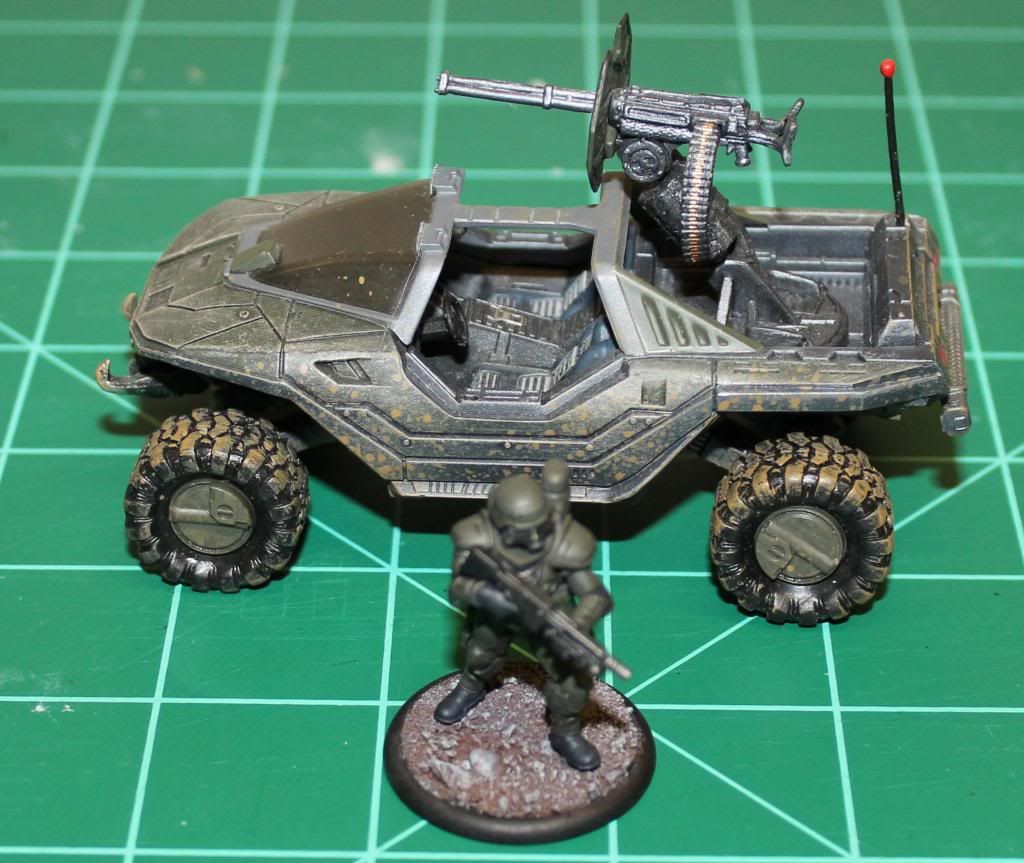
One change I made was to magnetize the mount on the AA gun.  From earlier posts I’m working on a scout car conversion and I haven’t settled on the weapons.  To keep my options open, I drilled a set of 1/8” magnets between the quad gun and the mount.   The magnets fit width wise but there was not quite enough room vertically.  To solve that I put in a 1/8” spacer made of tube styrene.  The end result blends pretty well and gives me the option of mounting the gun in the back of the Warthog.

Conclusions

This is another good kit.  It does have some in built challenges with mold lines and part design, but I think they are outweighed by the end result.  Overall they go together well and result in some nice and convincing weapons systems.  With the AA gun, definitely take your time, read through the instructions and think happy thoughts.  Other than that I’d recommend these to anyone that likes great plastic figures.  While they are not quite as fantastic as the stormtroopers, they are still a great addition to expand the line.

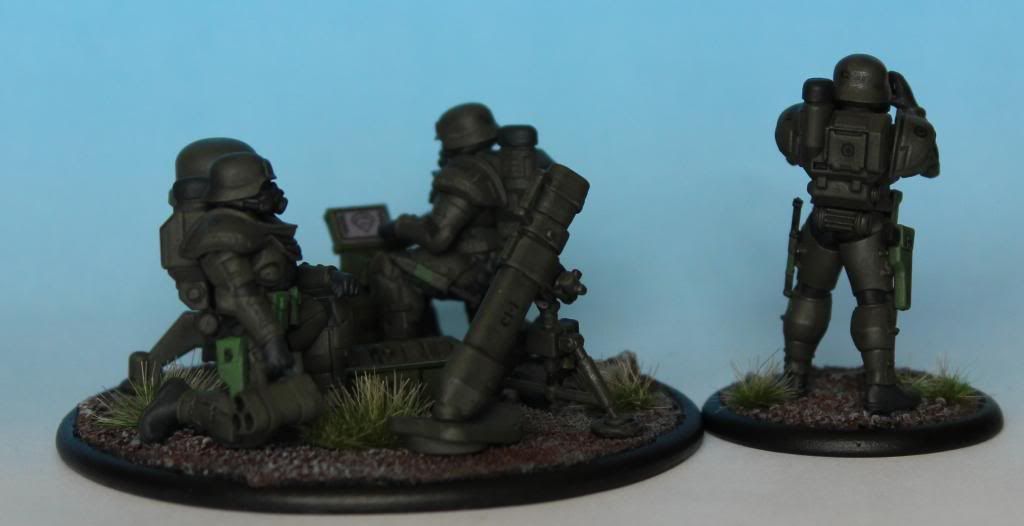
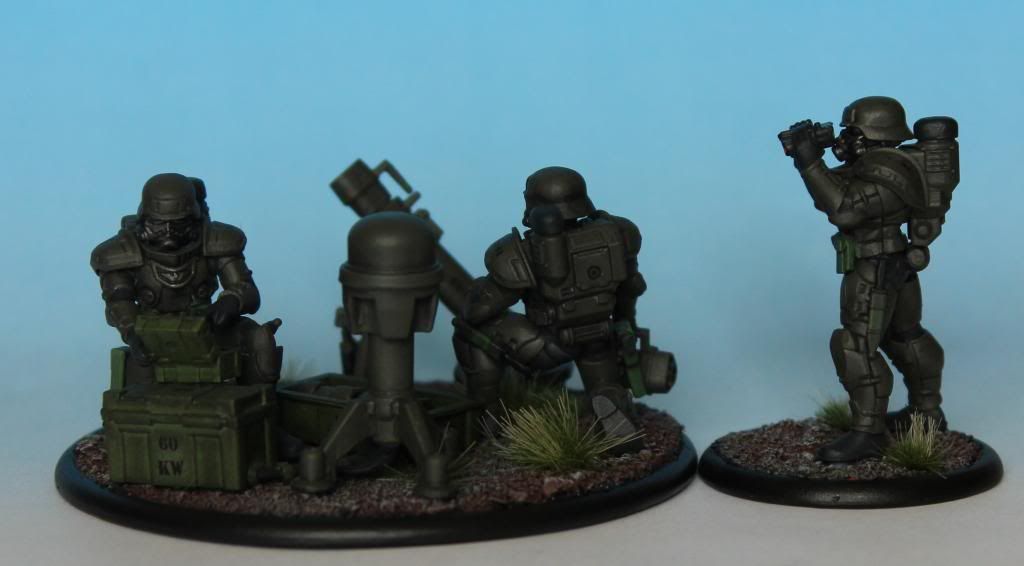
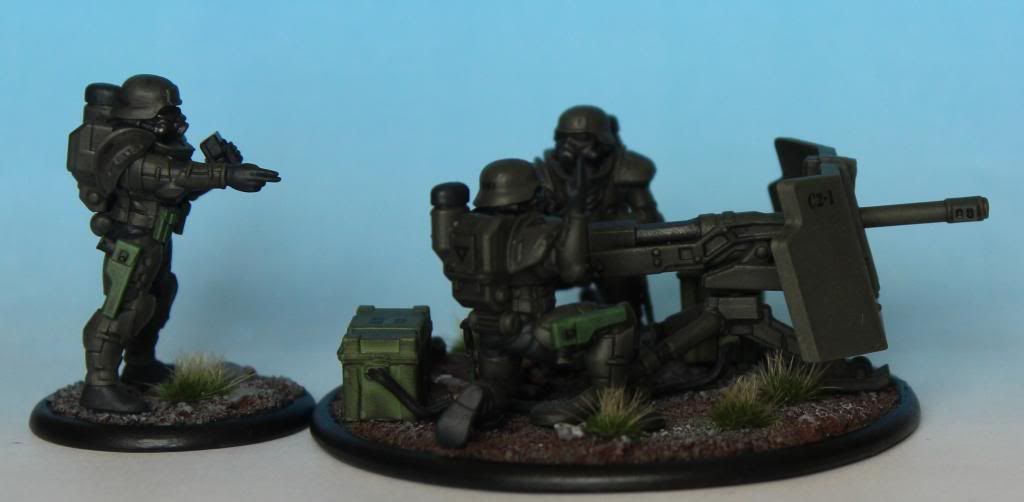
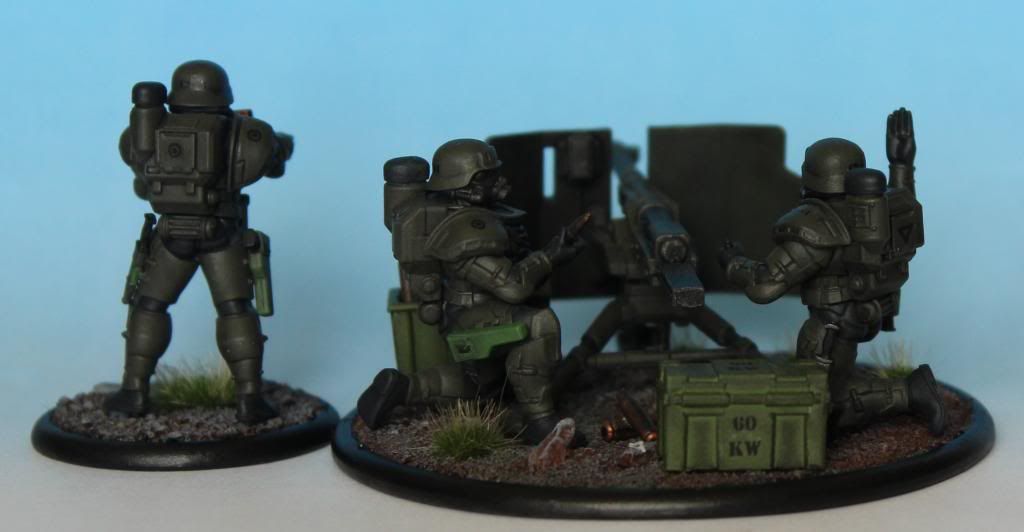
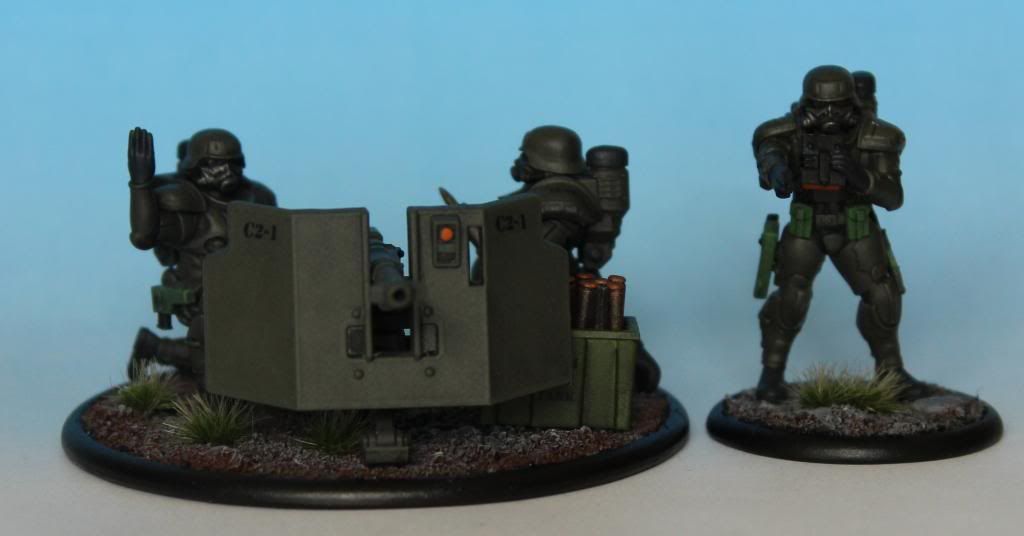
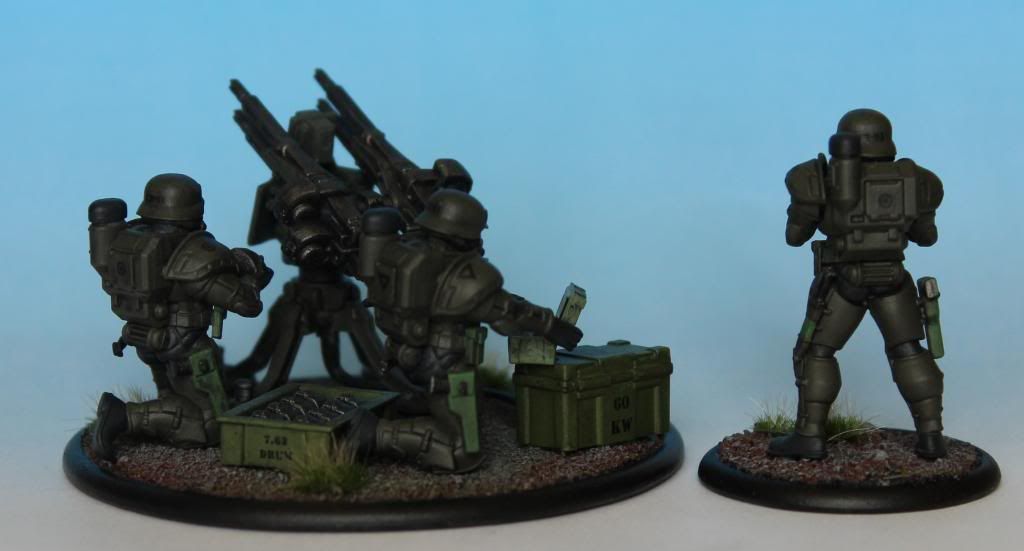
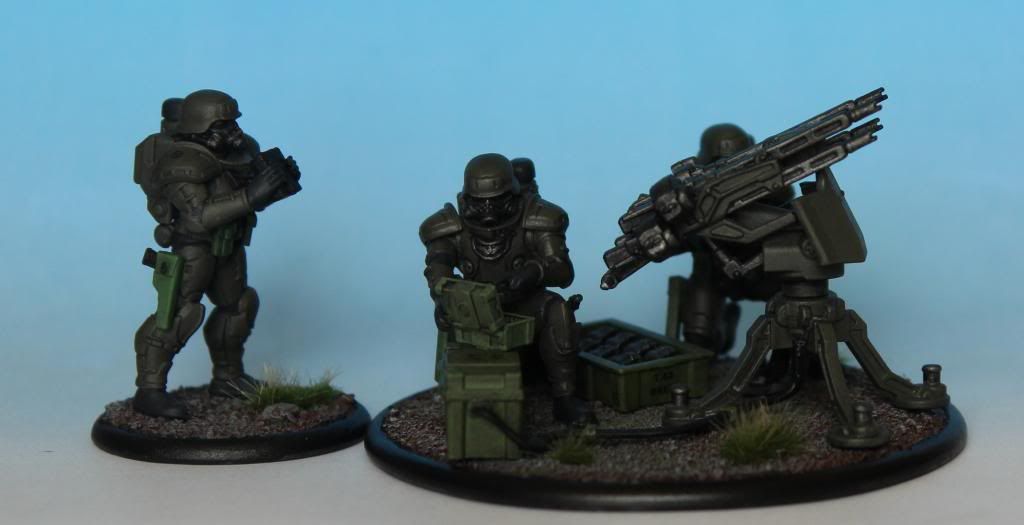
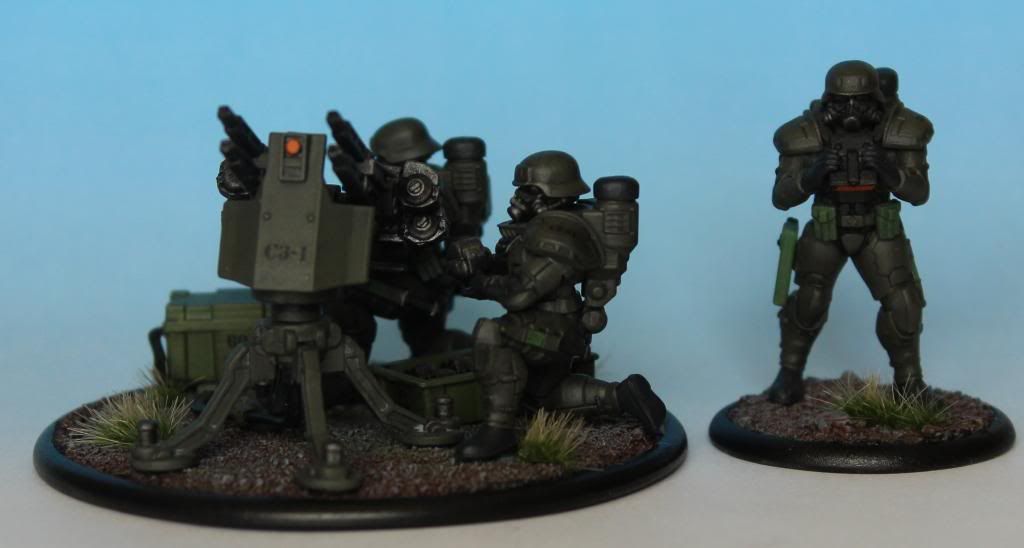
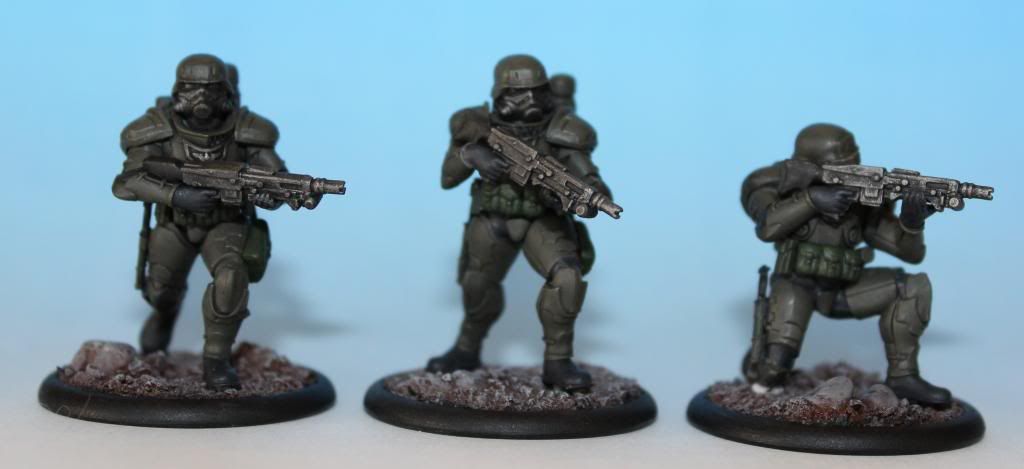
Now on to the finished figures.  As mentioned above, I thought the bases were too crowded for all three crew and I put all of the forward observer figures onto a separate 30mm base.  As these are optional figures in game terms, I'm not too worried about them in terms of future rules.  I flocked the bases with the same combination of rocks and sand as my infantry figures, but felt they looked a little too sparse   I added some tufts of Silfor grass to break them up a little.  Lastly, when I as doing decals for the weapons systems I decided to add some home made rank and unit insignia for the troopers.  I put a rank on the backpack and right pauldron and a unit marking on the back of the helmet and left pauldron.  I like how it turned out and might go back and add them to my already completed troopers.


I didn't glue the hands close enough to the face so the binoculars are pointed down instead of out.  Dang.


I really need to weather the gun shield of the AT gun, but I just don't have the time right now.

As I mentioned above, I added a set of magnets between the AA gun mount and the head.  It sits about 1/8" higher than standard, but I can remove it and maybe use it on my warthog.


Sunday, March 17, 2013

Eisenkern Warthog Progress

I've been working away at finishing up a review of the Eisenkern heavy weapon box set, but in the meantime I've worked up a little progress on my warthog conversion.

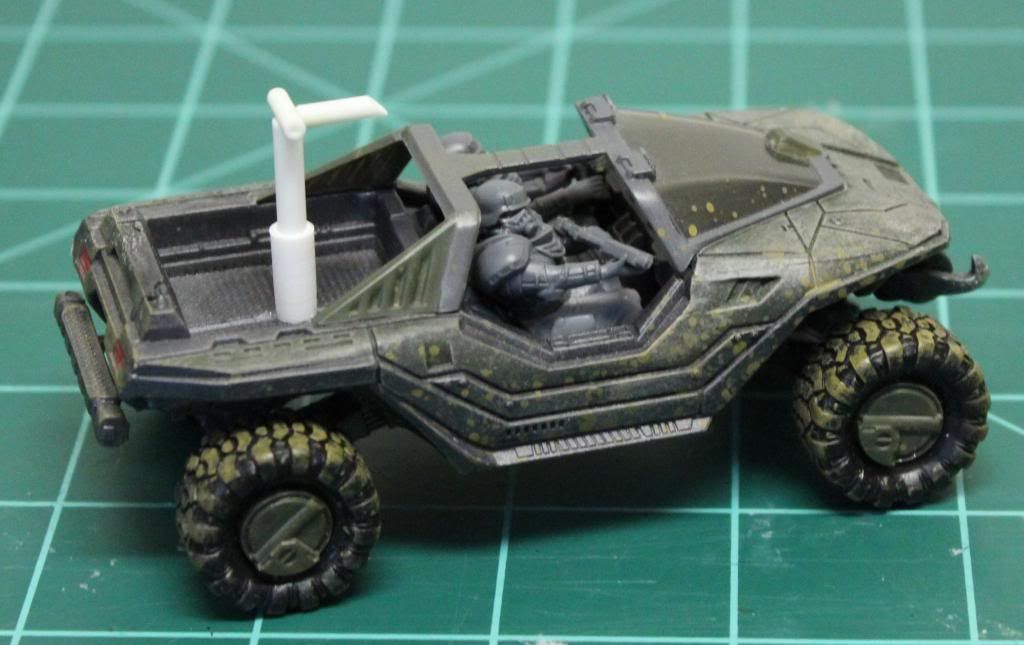
First up I worked up an A-Driver figure with an SMG.  It's a little bit of a cheat as he's holding it left handed, but it was the only way to make it fit without torquing the upper torso very far around which didn't look right.  This uses the upper body from the basic stormtooper box and another set of legs from a 40K Imperial Guard Sentinal Driver.


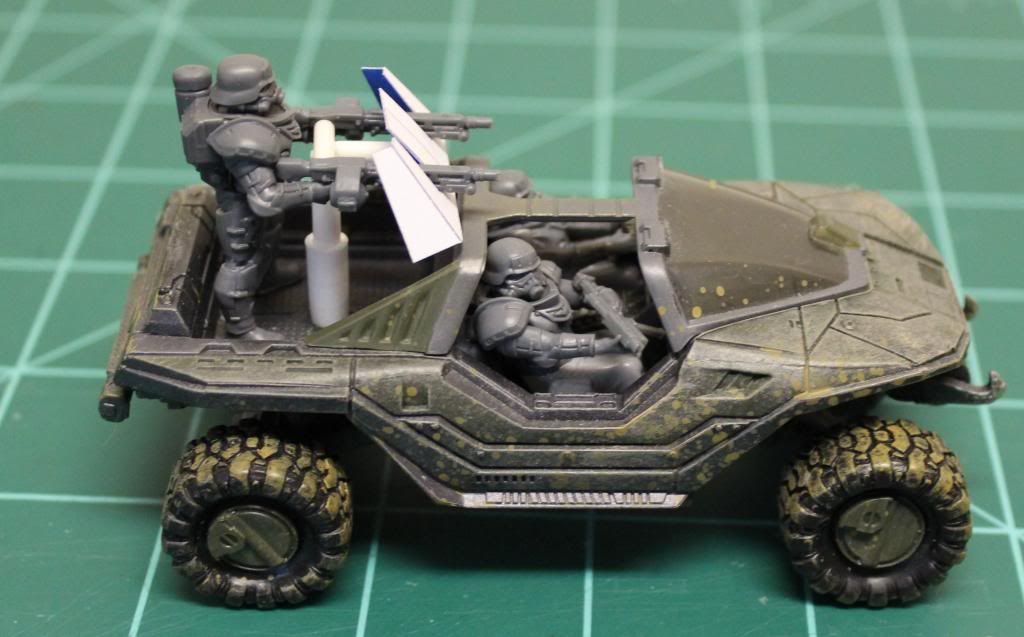
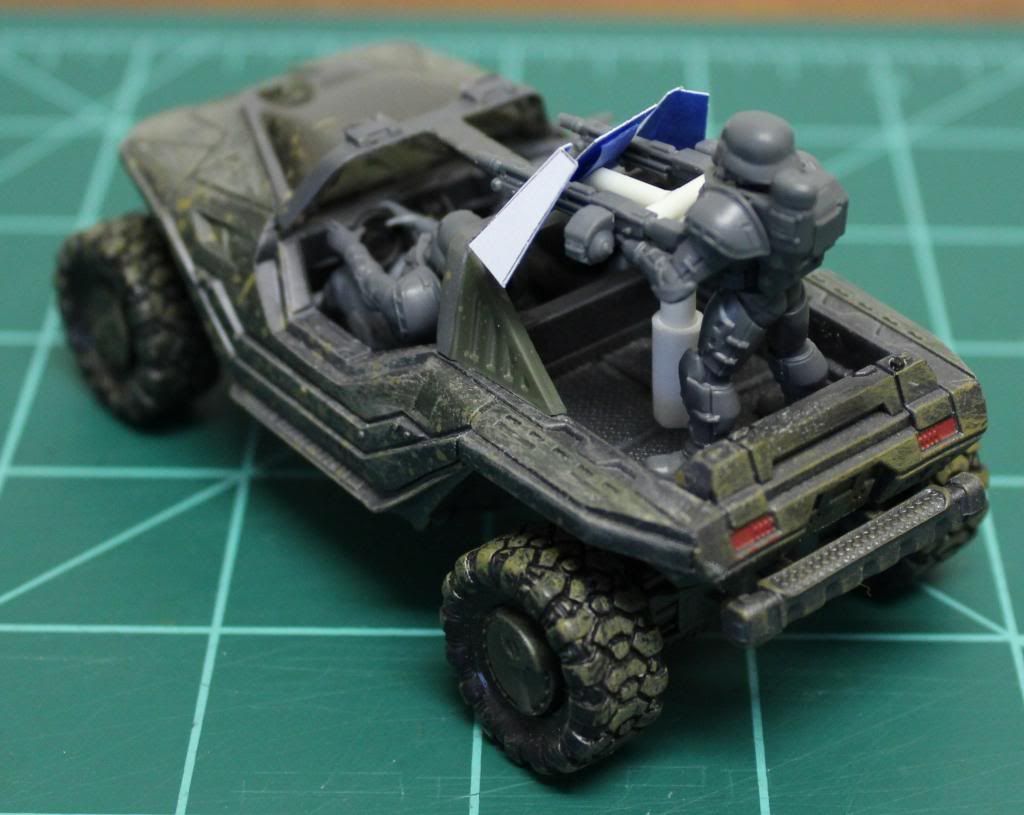
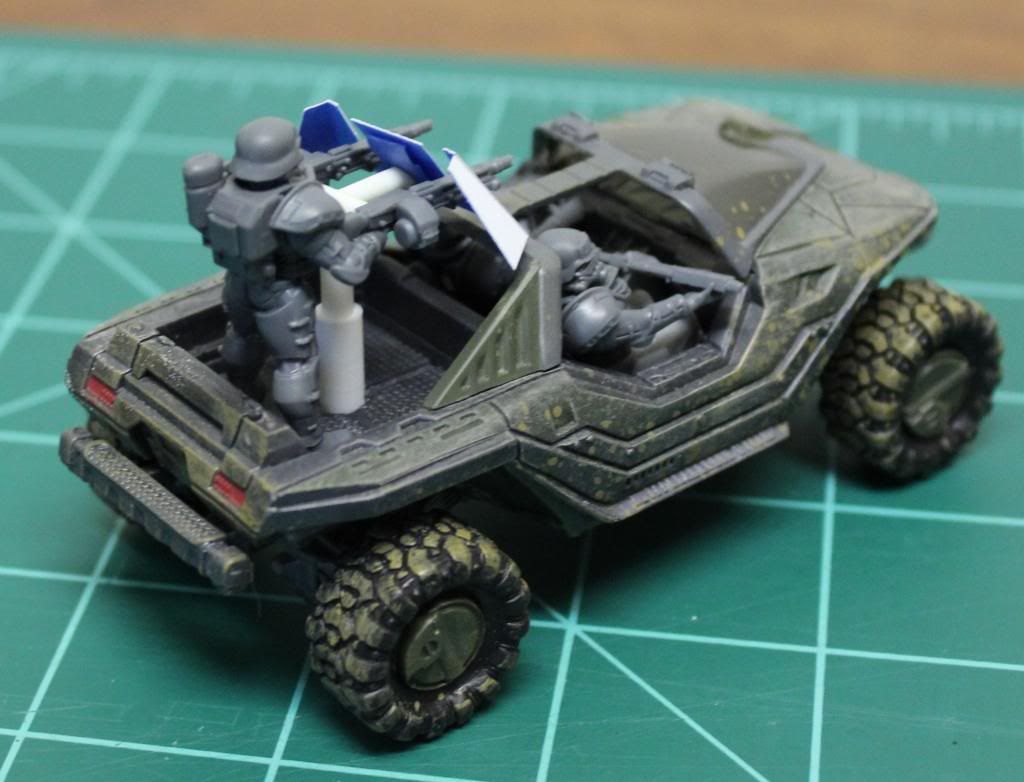
Next up I worked on a gunner with pintle mounted machine guns for the rear bed.  Again I started with a body out of the basic box.  Then I added arms and twin machine gungs from the accessory box.  With the shoulder pads I couldn't quite get them tucked into the shoulder sockets, so they are right about chest level.  I used spare drum magazines from AA gun in the heavy weapons set as they are a little bigger than the ones from the accessory set or the basic set.


I used various sizes of styrene tubes to work up a rough pintle mount and a gun shield.  The mount needs more clean up and detail work.  I'll see if I can fit a belly pad in there as well.  The gun shield is just a paper mock up to test out the dimensions.  Once I settle on a shape and size I'll make the final version out of .02" sheet styrene.


The leg position doesn't quite give you the ability to turn the gunner all directions, I can turn him left and right.  Tactically this thing is silly as all get out, but I think it still looks pretty cool.  Hopefully I'll have this ready for paint next week.  Here are some more pics.  As always comments welcome.


Wednesday, March 6, 2013

Stormtrooper Scout Car WIP

I'm still having lots of fun with my DreamForge Eisenkern Stormtroopers and one idea I've been doodling around with is the idea of giving them a ride.  There was a stretch goal during the kickstarter campaign to produce some vehicles like an APC, artillery, and ant-tank vehicle but I didn't pledge for them for a couple of reasons.  First, they will be BIG.  Listed at 7.25" (L), 3.25" (W) and 2.25" (H) that's getting close to land raider sized.  Second, at the time of the kickstarter I wasn't certain how the kits were going to turn out and the vehicles were more than I was willing to risk.  I might still purchase them when they come out, but for now I want to come up with something else.

So, looking for alternatives, I went with what I already had on hand rather than ordering something.  Here's some things I rejected:

Old Crow - I really like Old Crow's style, but being closer to 28mm models than 30mm, they look just a little too small next to the figures.

Warhammer 40K - No, just no.  I might steal a turret off of a Space Marine Predator for some future project, but that's all that fits.

AT-43 ONI - I managed to pick up a bunch of the armored fighting vehicles from the ONI faction of AT-43 before Rackham went in the crapper.  I might use some in the future, but as they are closed vehicles, with no TC or drivers hatch, there's not much to tie them in.

1/43 Diecast Cars - I picked up some cheap civilian H2 hummers a while back and they showed promise, but they were just a hair too big.  Again, I might use them in the future but they are sidelined for now.

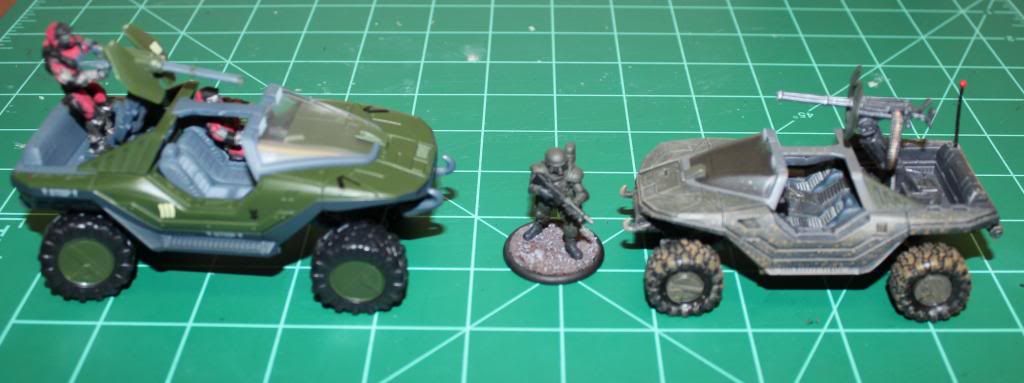
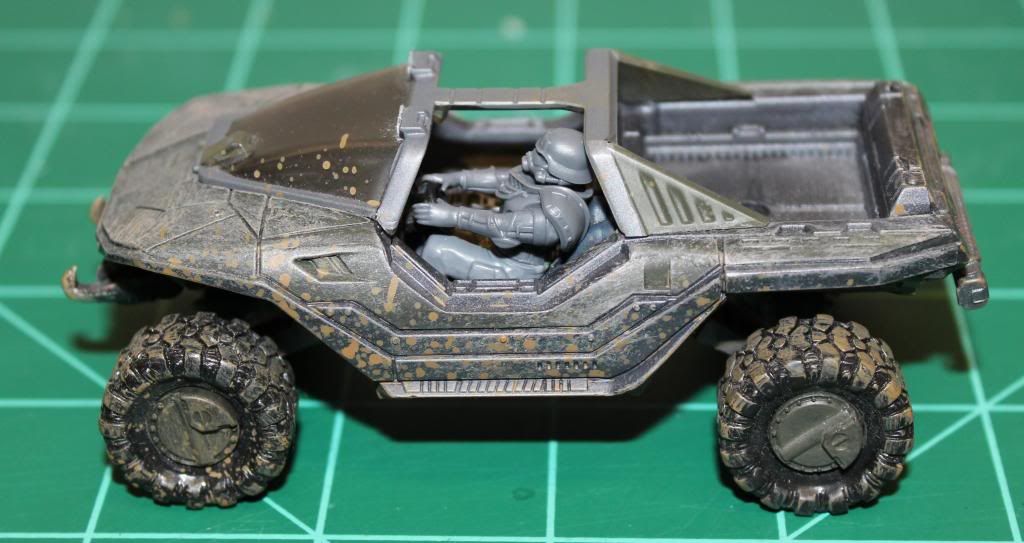
So what was I left with?  Halo warthogs.  I have a two different kinds on hand.  The first is the Wizkids version from the Halo Actionclix line and the second from McFarlane's first vehicle series.  Both are now out of production but you can still find them both for around $14 a piece +/-.


With my estimation of the Stormtroopers being 1/51 scale, the Wizkids version was actually dead on at 1/51 while the McFarlane version was a little small at 1/58.  In the end what tipped the balance was ease of conversion.  The   Wizkids version is glued together and damn near impossible to get apart with breaking or cutting something.  The McFarlane version is screwed together and comes apart (and goes back together) with ease.  Plus the ones I have I managed to pick up cheap at $5 a piece a few years ago.


Breaking down the vehicle was the first step, which was easy, mostly unscrewing eight screws.  I did have to use a hobby knife to take off the windshield part.  There are two posts on the back that are glued and I couldn't get apart.  Here's the parts line up.


So far, my only progress has been to get a driver.  I first tried to use legs from the Stormtrooper box.  If you use the left and right legs from the mirror image kneeling legs, you can get a lower body in a sitting position.  Unfortunately the legs were too big to fit in the cockpit and the angle didn't really fit with the seat.  Back to the bits box I went.  When I bought the hogs in the first place, I also bought a bunch of leg pieces from a GW Imperial Guard Sentinel Kit.  They actually fit much better than the Stormtrooper legs.  You have to cut off the feet and cut out the center console between his legs, but I can build that back with green stuff later.


To the legs I added a standard torso, head and shoulder pads.  The arms and hands came out of the accessory set.  The whole thing was pretty fiddly because the seats have a serious Detroit lean to them.  In the end I managed to get it together and keep it just under the top of the roll bars.

What's German for Yeehaa!


Next up I need to clean up the legs.  I need to green stuff the center where I cut out the console and I think I'll shave off the cargo pocket on the outer thigh and use a press mold to add in the same detail as the stormtrooper thighs.

After that I need to get to the passenger.  I'm thinking of giving him an SMG firing leftie.  After that I am noodling through what to do in the back.  I can add the quad MG from a Heavy weapons kit or I can add a standing stormtrooper firing an MG from a pintle mount.

I think the biggest challenge will be to keep it from looking like the iconic warthog that it is.  I think festooning it with stowage, adding doodads (front pusher bar, grab handles, pioneer tools etc) and giving it a new paint job should help get it looking at least a little distinctive.

More to come, vroom vroom.


Monday, March 4, 2013

Dreamforge Eisenkern Mule

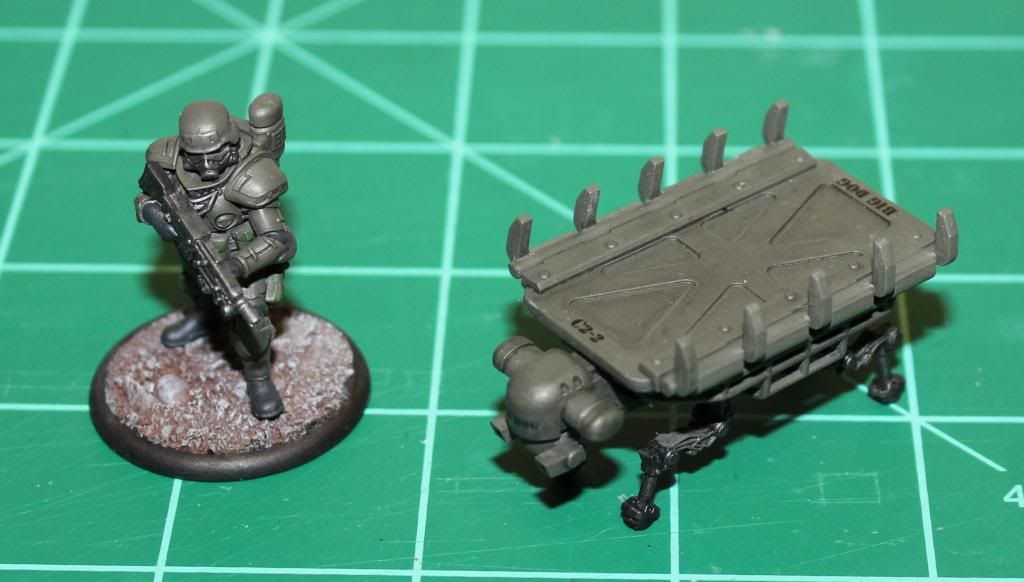
I've been working on more of the DreamForge plastic models and am still impressed by their quality.  I recently finished one of the mechanical mule kits that come in the Eisenkern Accessory Set.

The model is inspired by the "Big Dog" robot created by Boston Dynamic.  More on the real thing can be found here.

The DreamForge accessory set comes with three mule kits in the box to accompany your stormtroopers.  The mule is well designed and goes together easily until you get to the legs.  Each leg comes in three pieces.  Let me rephrase that, three tiny pieces.  Mark from DreamForge gave some good advice on his blog to assemble the legs and let them dry before attempting to attach them to the body.  It's good advice and it helped me get the kit together without much trouble.  The kit comes with two heads.  One is a more artificial looking head with a sensor mast called the "command and control head".  The other, which I chose for this model is the more anthropomorphic "smart mule head".  I don't know if the different heads will have any effect on game play, so I'll probably magnetize the heads on any future kits.

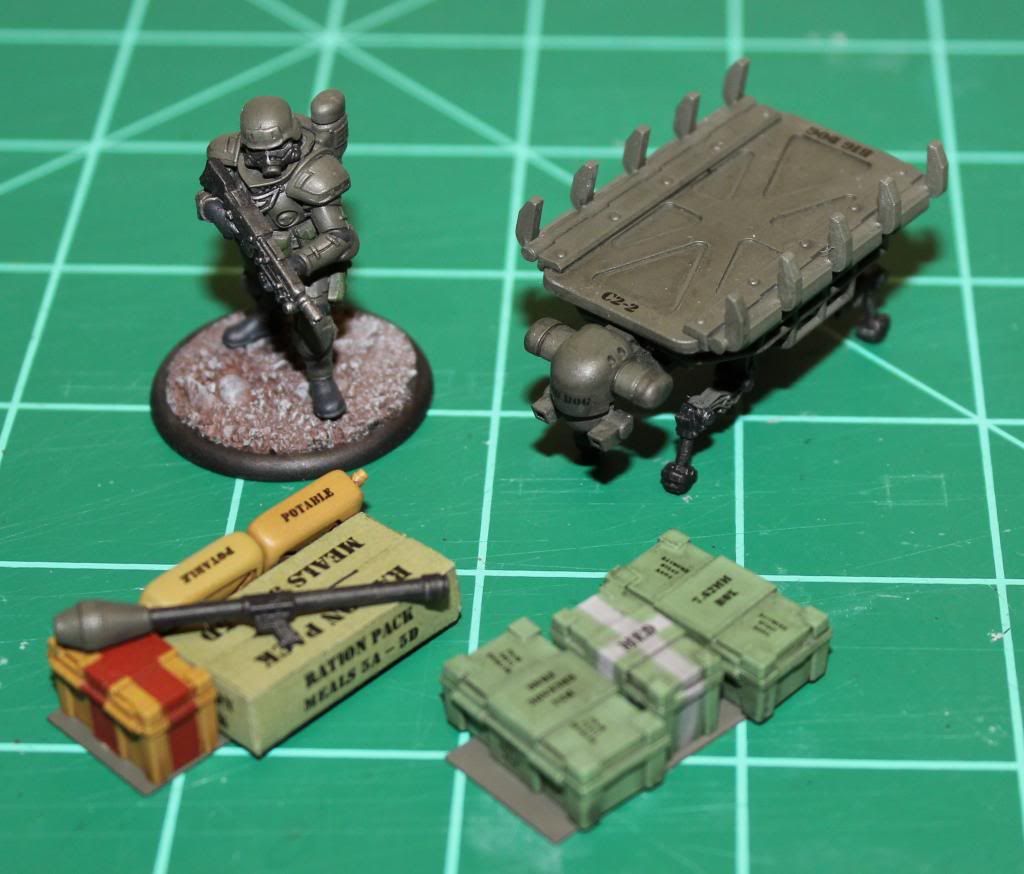
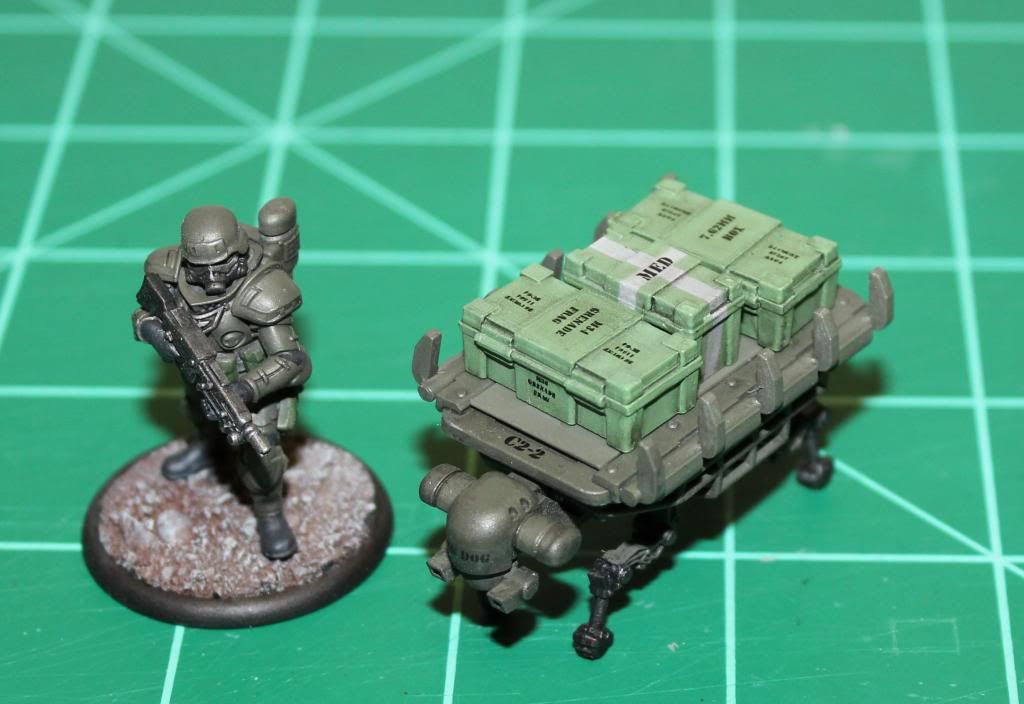
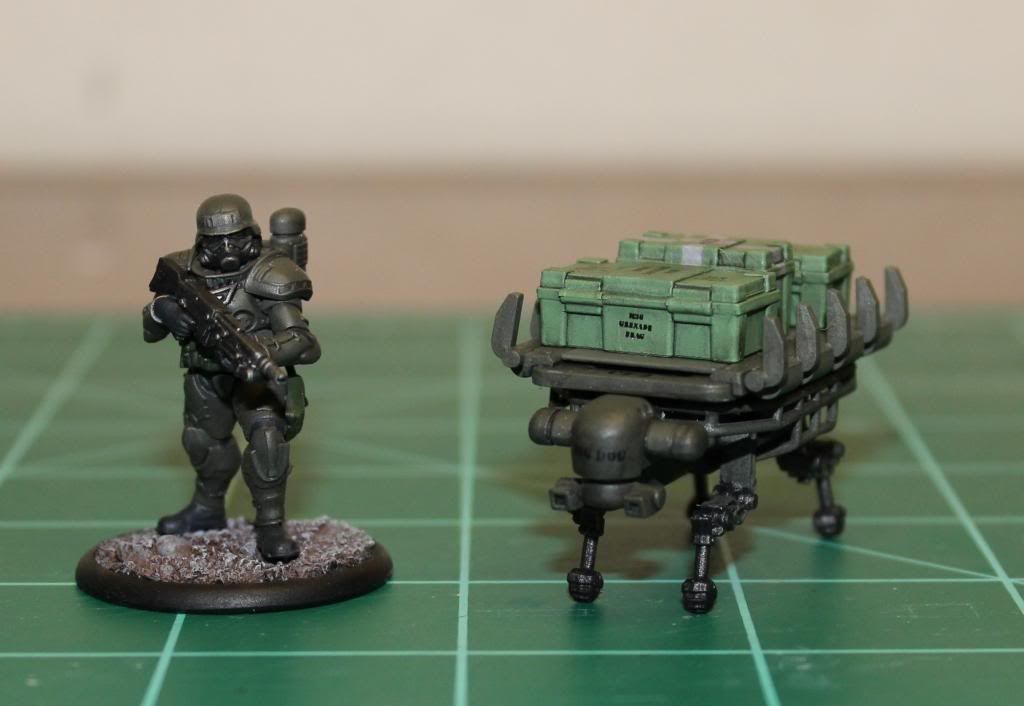
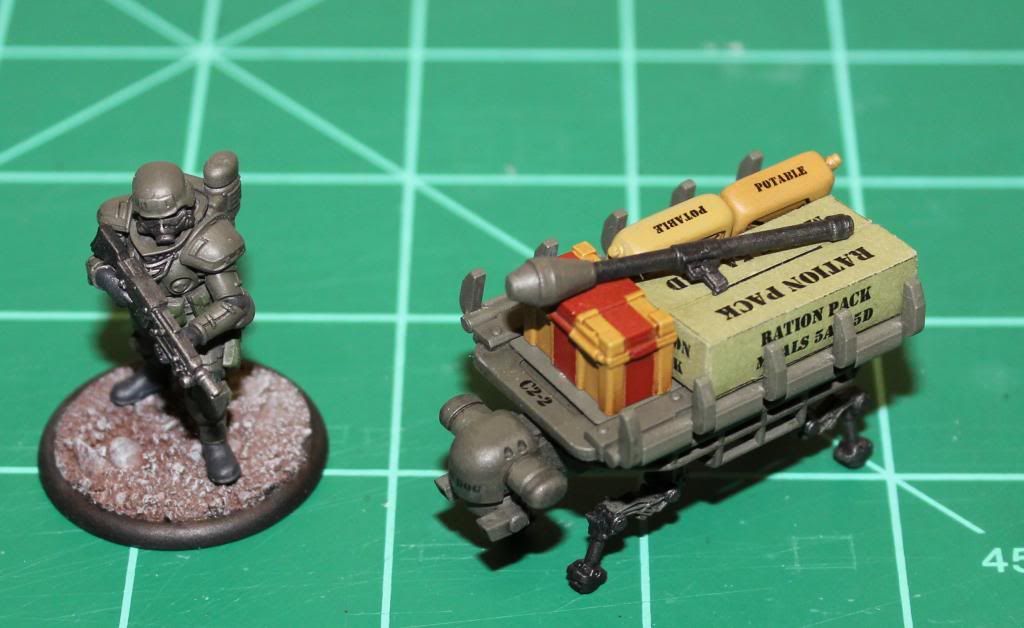
For ease of painting, I assembled the body, head and legs, but left the top platform and side cages separate until the end.  I painted the body in gunmetal and the rest in the same German Fieldgrey as my trooper's armor.  Just to add a little personalized touch I printed up some decals for ID markings.  This mule is C2-2 "Big Dog" (Charlie company, 2nd Platoon, 2nd Squad).  They turned out ok, but the decal on the head silvered a little.


A mule won't do the squad much good without cargo.  The accessory set also comes with storage crates (three small and six large).  I painted these up in a lighter green and gave them decals as well.  The smaller crate is medical supplies and the larger crates have ammunition.  I also wanted to add some Class I supplies (food and water).  I scrounged through my bits box and dug up some 1/35 scale water cans and added a ration box that I printed on card stock.

Without knowing how the mule should be loaded up for game play, I decided to make the cargo loads interchangeable   I cut two small pieces of 0.04" sheet styrene to fit between the side rails of the cargo platform and then glued the cargo to the styrene to create cargo pallets.  I painted up a spare panzerfaust (also from the accessory set) but haven't glued it down.


Here is the completed mule with a Class V loadout (ammunition):


Here's one with a Class I loadout:


All in all, a nice little mini kit, although the engineer in me thinks the large platform so high up would make the thing very top heavy and prone to toppling in rough terrain.  I think the real life version with the saddlebag type arrangement would work better.  I have to say that this should be for experienced modelers or novices with an abundance of patience.

Monday, February 25, 2013

Dreamforge Eisenkern Fire Team Built and Painted

I've been working for the last week and now have my first fire team built and painted.  I've got a box of twenty stormtroopers and one accessory box.  The Iron Core rules (for which these figures are intended) are still in the early development stage, but I certainly couldn't wait to start building up some figures.  I did manage to get some information from the DreamForge forums on how they intend (at this point) to break down the Eisenkern infantry.

The basic unit will be based around a fire team of five soldiers.  Each fire team will have one team leader, one weapon specialist and three riflemen.  There will also be an alternative fire team with just a single rifleman.  A squad will be made up of two standard or three alternate fire teams.  Once you get passed the squad level, it gets more complicated with command elements and heavy weapons teams.  It's early days, so for now I'm going to keep it simple with the standard fire teams.

Fire Team Leader
First up, I built a fire team leader.  Based on the forum info, he can either have a standard rifle or an SMG (which will grant some sort of assault bonus).  I decided to go with the SMG just for variety's sake.  Most of the basic parts are from the trooper box, but I tricked him out with extras from the accessory box.  I gave him ammo pouches on the right thigh and a cargo pouch on the left thigh.  You can't see it at this angle but he's got a stick grenade and sheathed knife on his belt.  Both arms come from the accessory box as well.  He's the kind of leader that leads from the front, so he's striding forward with the left arm pointing in the "Follow me!" pose.  The accessory box also contained heads with soft caps, but I'm going to reserve those for higher ranking figures that might be farther from the front lines.

The base (and all the bases I've done so far) were flocked with a combination of sand, model rail road ballast and aquarium rocks.


Weapon Specialists
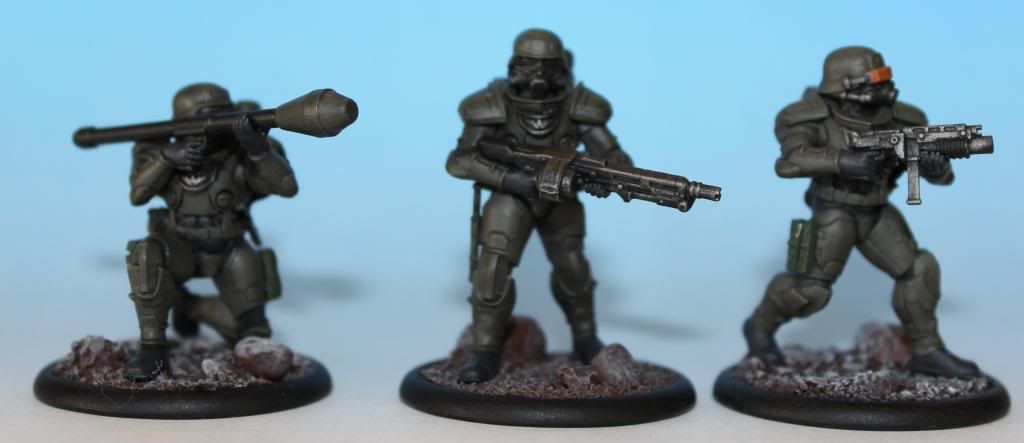
Each fire team will have one of three weapon specialists, either an SMG with underslung grenade launcher, a SAW (squad automatic weapon) or an anti-tank rocket launcher.  I figured that I'll eventually I'd want all of them so I built one of each.

All three of them have bits from the accessory set.  Knives, ammo pouches and although you can't see it, the AT gunner has an SMG with a folded stock hanging off of his back belt.  I don't know if that will fit with the eventual rules, but to me it's logical.  The grenadier has one of the helmets with the targeting scanner on the right eye.

For all of the parts that the accessory set comes with, these guys point out that there are a couple of more I would have like to have seen.  There wasn't a pouch or any spare ammo for the grenade launcher.  I'd like to see if I can find some from the third party or bits sellers if I can.  For the AT gunner, I'm assuming that the launcher works like a modern day RPG, in that the launcher is reusable and the gunner would carry spare rockets.  The accessory set didn't have any spare rockets, but there are a number of spare rockets on launchers that I can cut off.  However, the spare rockets or the rockets with launcher, I don't see that there is room for them with the big back pack.


Standard Riflemen
Next up I built three riflemen to build up a standard fire team.  One of my biggest problems with the trooper box was that the heavy machine gun and the standard rifle use the same part (a gun that looks similar to a WWII German MG-42).  The only difference is that the machine gunner would have a drum magazine on the weapon.  I thought a while about using some third party rifles, but after searching around, I didn't see any I liked that would really fit the theme with the rest of the figures.  Plus at $.075 or more a piece, it would get pricey for one of the most common weapons I need to build.

I fell back to using the kit rifles, but to get a more assault rifle look, I cut out approximately a quarter inch between the front hand grip and the muzzle, which also cut out the folded bi-pod.  It wasn't much work and I think the conversion worked, but I'm still not satisfied with the look.  The large receiver on the but end still make it looks like a machine gun.  I'll have to ponder this before building any more.  Any thoughts, comments or suggestions are welcome.

Like the others I added extras from the accessory set, with knives, grenades and pouches.  I liked giving these guys the belly cargo pouches, but I won't have enough to go around for all the riflemen though.


Painting
I painted the whole team with a quick, tabletop standard scheme.  Here's what I used:

Primer - Army Painter - Uniform Grey
Armor Base - Vallejo 830 - German Fieldgrey
Under-suit, Boots & Gloves - Vallejo 995 - German Grey
Pouches - Vallejo 823 - Luftwaffe Camo Green
Metalic Bits - GW Abaddon Black drybrushed with GW Leadbelcher
I gave the whole figure a wash of GW Nuln Oil

Thoughts So Far
After building the first fire team, I stand by my original review.  These are well designed kits with well cast, good fitting parts and tons of options.  Now that I can see the the figures together, some of the right weapons hands seem to have odd looking poses, especially the right arm on the AT gunner.  Overall, the figures look great and I can't wait to get them on the tabletop.  With the Iron Core rules a ways out, I think they might see some use with either Dust or in a Game of 5150.

Going forward, I need to find some decals.  The big, broad should pads are just calling out for some rank and squad markings.  I think I should be able to find some good stuff from Company B.

DreamForge Games Stormtrooper Accessory Set Review


This is my second article reviewing the new plastic model kits from DreamForge Games.  In my first review here I looked at the basic Eisenkern Stormtrooper kit.  This kit has all of the basic parts to build standard stormtroopers.  In this review I will review the accessory kit that is available to add detail and options to a stormtrooper squad.


Printed Components
Like the main stormtrooper kit, this kit comes in a sturdy cardboard box with color art work on all sides as well as a one page, double sided instruction sheet.  The art is of 3D renders rather than actual models.  As with the stormtrooper instructions, the sheet in the box was a first draft that has been replaced by an updated electronic instruction sheet located at the DreamForge website.

Frame Breakdown & Components
The box includes three frames.  The first two frames include a staggeringly vast array of detail parts to customize your figures.  There are:
Pouches – There are six different ammunition and utility pouches.
Extra Weapons – There are numerous machine guns, sub machine guns, panzerfaust and pistols.  There are bare pistol grips that can be put on spare weapons, pistols in holsters as well as empty holsters.  There are also combat knives in sheaths and World War II style German Model 24 Grenades (also known as potato masher or stick grenades).
Replacement heads – There are non-mask heads with both soft cap (M43 Einheitsmütze) and officer’s crusher cap.  Some of the faces have goggles and some are bare.  There are a number of different expressions as well.
Replacement arms – There are replacement arms in various poses from straight to bent give your figures a range of different poses.  There is a several pairs of arms specifically to hold the binoculars.  All of the other arms have no hands, allowing for greater flexibility.
Replacement Hands – There are a host of hands, both left and right.  There are hands with pistol grips, hands holding weapons, fists, hands pointing and hands with flat palms.  There are also hands holding a grenade.
Miscellaneous Items – There are six large and three small ammunition crates, a small field computer (with a specific pair of arms) and three sets of binoculars.


The last frame has three mechanical “mules” that represent cargo haulers that can accompany the squads.


Detail Parts, Construction & Use
Just like the stormtroopers, the frames are very well laid out and cast with great quality.  There are small but manageable mold lines on most of the parts, but there are two areas that require additional time.  There is a small amount of flash on the frames around the mule engine and all six of the panzerfaust have a mold offset that can’t be removed without taking some of the detail with it.  I found no sink marks on any of the parts.
This isn’t a complaint, only fair warning that these parts are very tiny and fiddly.  I strongly suggest that you put any details you want on the belt before attaching the arms; otherwise they are a huge bitch to get in the right place unless you resort to tweezers.

One small complaint is that there is a medical pouch (looks like the World War II gas mask container) that is supposed to hang off the back of the belt.  However the back pack comes down to cover the belt, leaving the medical pouch to ride at but level.  Another concern is that the contact point for the grenades is very small, and if you handle your models roughly, or paint with a vigorous dry brush style they can pop off very easily.  It might just e worth giving the grenades a pass.

Depending on how you use the parts, there should be enough bits to detail two big boxes of stormtroopers, or forty figures.  As mentioned above, the instruction sheet in the box was an early draft that is not entirely clear.  There is a better instruction sheet available on the DreamForge Website

Mechanical Mule, Construction & Use
The mules are actually stand alone models.  The legs come in three parts and can be posed multiple ways, but I found that to get the mule standing level and stable, you really want to have all of the legs posed the same way.  The designer has some helpful advice on this on the DreamForge blog.  There are also two head styles.  There is the “Command Control” head and the optional and more anthropomorphic “Smart Mule” head although there is no explanation as to what the difference is.

After assembling two of the mules, I strongly suggest that these are fore experienced modelers only.  For beginners, the legs could be an exercise in frustration.  The watch word fort these models is certainly “patience”.  To ease painting, I left the side cages off of the main body and the platform off the top and assembled everything when complete.

Overall Thoughts & Opinions
This is another wonderful kit and I think it dovetails in very nicely with the stormtrooper box.  However this kit certainly won’t be for everyone.  If you don’t enjoy modeling or just want to get the figures done in a hurry, I’d probably pass on this kit and just build the stormtroopers straight from the main box.  On the other hand if you like to build models just for the sheer joy, or want to achieve some characterful poses this kit is almost a must in my opinion.  As I said above, there are probably enough bits that you can get at least thirty or forty depending on what kind of detail bits you want on them.


DreamForge Games 20 x Stormtrooper Box Review


With the imminent release of the new DreamForge Games Eisenkern kits to the retail market, I thought I would give my review of the figures for anyone looking to purchase them. 

DreamForge Games was started by Mark Mondragon in 2003.  To date their main property is the Iron Core science fiction universe with which it hopes to eventually launch into a full tabletop miniatures game.  You can find more information at their website.  The first physical project to reach market was a pair of large resin kits of Leviathan robots.  Later in 2001 they launched the “Are you man enough for Metal” kickstarter campaign to produce Eisenkern stormtrooper figures.  By all accounts the project was a modest success and the figures were delivered to a generally satisfied audience.  DreamForge was still dreaming of bigger and better things and last fall they teamed up with Wargames Factory to create a second kickstarter campaign, called “Something Wicked This Way Comes” this time to bring the resing and metal kits to plastic.

The centerpiece to the second kickstarter campaign was the 8.5” tall Leviathan Crusader kit.  The campaign was an even larger success and many new kits were funded through stretch goals.  Along with the Crusader kit, the first kits to be released to the kickstarter backers were the basic Eisenkern stormtroopers, the stormtrooper accessory kit and a set of stormtrooper heavy weapons. 

I was a backer of the second campaign and received my rewards in early February.  After having had some time to build and paint a squad of figures I decided to write up my thoughts.  I hope to get to the other kits in time, but this first review will focus solely on the stormtrooper box.


Printed Components
The kit comes in a sturdy cardboard box with color art work on all sides as well as a one page, double sided instruction sheet.  The art work on the box is of 3D renders rather than actual models, which is disappointing.  However, due to the compressed schedule of the kickstarter, the boxes were produced before DreamForge could get studio quality photos of the actual models.  Hopefully this will be rectified in future print runs.  The instructions are apparently only the first draft and a better revision was not printed before the boxes were shipped from the factory.  DreamForge has provided an electronic version of the updated (and clearer) instructions on their blog.

Frame Breakdown & Components
The basic stormtroopers come as either a box of ten or twenty figures.  The breakdown for the twenty man box has three frames.  The first frame contains bases, heads, weapons and shoulder pads.  The second frame has the bodies, arms and back packs.  There is a third frame with additional weapons and pairs of arms.

Starting with the body frame, there are ten torso front and backs, ten back packs and twelve sets of legs.  The torsos and backpacks are all identical and the legs have six unique poses from standing to crouching and running (although the other six are a mirror image of the first).  The frame has 10 pairs of left and right arms, all with a pistol grip in the right hand and an open palm on the left.


Moving on to the base frame, you will find ten 30mm bases cast on the frame.  The bases have the DreamForge logo cast in the bottom and a location hole that lines up with pegs on the feet of the figures.  While the bases have the same round lip shape as many other manufacturers, at 2.45mm tall they are noticeably shorter than what I’d consider the standard for this style (3.8mm tall).  There are ten heads with German World War II style helmets and full face masks.  Eight of the heads are identical while two have targeting recitals over the right eye.  The frame contains ten machine guns that look like a beefed up German MG-42.  The machine guns are missing the pistol grip (in order to mate with the hands) and some are missing parts of the stock where they will mate with the arms.  Lastly the frame contains ten pairs of left and right shoulder pads and ten drum magazines for the machine guns.


The third frame contains additional weapons and arm pairs.  There are eight submachine guns, some with folded stocks and some with under-slung grenade launchers.   There are four rocket propelled grenades that resemble a larger version of the German panzerfaust.  Last the frame contains another nine pairs of arms, again all with the pistol grip in the right and the open palm left.  The submachine guns are the first real departure from the German World War II theme.  They resemble more modern weapons like the fictional StA-11 or the real world PP-19 Bison rather than the iconic German MP 40.


One nice feature pioneered by Wargames Factory and carried over onto the DreamForge kits is to use tabs in the bottom of the frame that fit into slots on the top.  This makes it very convenient to stack frames one on top of another without worrying about damaging the parts.

Assembly & Construction
The plastic feels and works like standard model styrene.  It feels very similar to other Wargames Factory kits and in comparison feels slightly harder than Games Workshop plastic.  The parts bond well with standard solvent style glues such as Tenax and Testors.  For the best results you will want to remove the parts from the frame with sprue clippers and clean them up with a sharp bobby knife.

There are some mold lines but they are generally minor and easily removed with careful cutting and back scraping.  For the most part I would not advise sanding or filing as that would remove too much detail.  The one exception is the helmets.  There is a small but noticeable mold offset along the top and back all of the helmets that will take some work to remove.  Scraping works, but sanding might be faster.  Just be careful to rock your tool back and forth to keep from creating flat spots.

The parts assemble fairly logically with pegs on the feet and locating tabs for the crouching leg halves, torso halves and the back packs.  The part that might cause confusion is the arm and weapon combinations.  Each set of arms is meant for a specific weapon on the frame.  The instructions in the box rely on some part numbers, but mainly they color code the proper left and right arms to go with each weapon.  There are reports around various forums that some have found this a little confusing.  My problem is that I am partially color blind.  For the bold colors like red that’s fine, but for some of the more subtle colors, I just couldn’t tell them apart.  Fortunately the updated instructions provided on DreamForge’s blog use part numbers in addition to the colors, making the whole process of matching up the right weapons with the right arms much simpler.

The rest of the parts go together easily.  I had no fit problems with any of the combinations or poses that I tried.  As with most of these types of multi-pose kits, it’s best to work out what you want the final pose to look like before starting to assemble the parts.  I found it best to assemble the legs and torso first, letting the glue cure for ten minutes, then adding the arms and weapon.  This will still give you the ability to tweak the rotation of the torso on the legs if they aren’t lined up just as you want them.  Only after these parts are fully cured did I add the head, shoulder pads and back pack.

I prefer to paint the figures separately from the base so I did not glue the feet to the base at this stage.

Size & Proportion
The most upright pose you can build results in a figure approximately 32mm tall to the eyes and 34.5mm tall to the top of helmet.  Making assumptions for the stance, average height etc, I come up with a figure scale of 1/53 which is slightly larger than the 1/56 stated on the box.  From the perspective of other popular figure lines, they generally fit, being slightly taller than Games Workshop Imperial Guard.  

In terms of proportions, the head, hands and weapons are more realistic than the cartoonishly exaggerated style of Games Workshop, but I wouldn’t say they are “true” either.  I think they strike a good balance.  Figures with more realistic proportions, such as Wargames Factory World War II Germans, end up thinner and more fragile.

Overall Thoughts & Opinions
From a strictly quality perspective, these figures are very well designed and cast.  The part breakdown is logical and the sprue attachment points are in well thought out locations that will be easy to clean up or hide.  There was no flash or sink marks on any of the parts.  As I said above there are light mold lines and a few parts with mold offsets, but they are minor and easily cleaned up.  From a quality perspective, these kits are equal to the best kits that Games Workshop is producing today and I think they rival the quality of main stream modeling companies such as Tamiya and Bandai.  When complete they result in a solid gaming figure that can stand up to normal play and even an occasional trip to the floor with trouble.

However good the quality is though, it is only one aspect of the figures.    From an aesthetic point of view I do have a few issues with the kit.  First, and foremost, the look and feel the figures is clearly “space Germans”.  People can honestly quibble about whether they resemble more an alternative Weird War look such as Dust, or an updated post World War II look projected forward like the movie Jin Roh.  Either way this is ground well trodden in the gaming figure industry.  What sets these figures apart is that they are the BEST space German figures I have ever built, and I have built a few.  They are better than the Dust Germans and better than Wargames Factory Shock Troopers just to name a few.  They may not be original, but they are well executed.

My next issue is with the rifles.  The intent from the instructions seems to be that the larger machine gun is the standard rifle for the squad.  The only difference between the riflemen and the support machine gunner is the drum magazine on the side.  For me this causes two problems.  From a gameplay perspective, it is always best to make figures distinctive and easily identifiable.   If Iron Core follows the normal direction of tabletop games, a machine gunner will be a higher value target than a standard rifleman.  With the drum magazine being the only identifier, this might lead to confusion and misunderstandings.  Secondly, the machinegun just looks off as a standard assault rifle.  It’s always dangerous to bring real world sensibilities into a science fiction universe, but as a US army vet with deployments to Iraq, the machine gun seem too long and bulky to serve as the standard rifle.  The exclusion of an assault rifle from the kit like the StG 44 seems to be a large oversight.

Even taking those issues into account, this is a wonderful kit.  I highly recommend it to anyone that likes building great models or needs generic future armored soldiers.  The kits can be built with little difficulty even by the most novice of modelers.  Even with Iron Core being at least a year or more away from reality, these are great figures that could stand in for many games on the market for now.