Showing posts with label Dreamforge. Show all posts

Wednesday, June 26, 2013

Leviathan Crusader Complete (sort of)

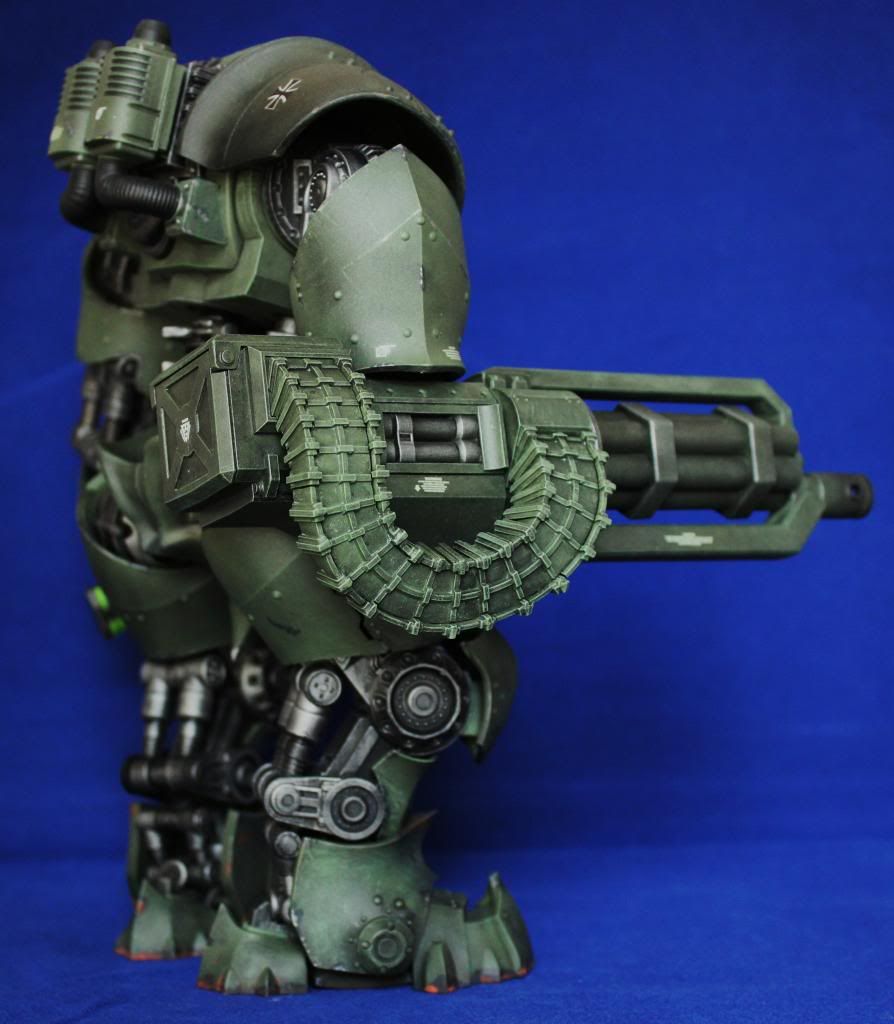
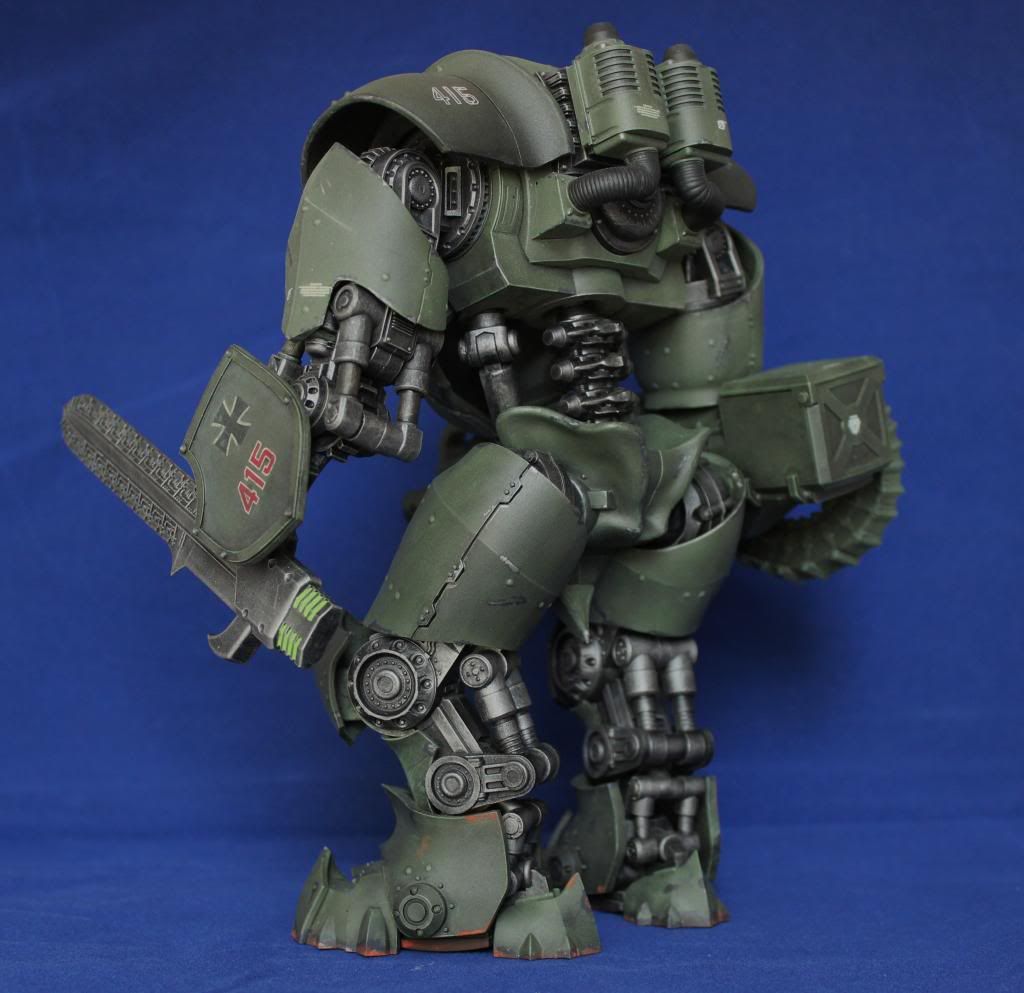
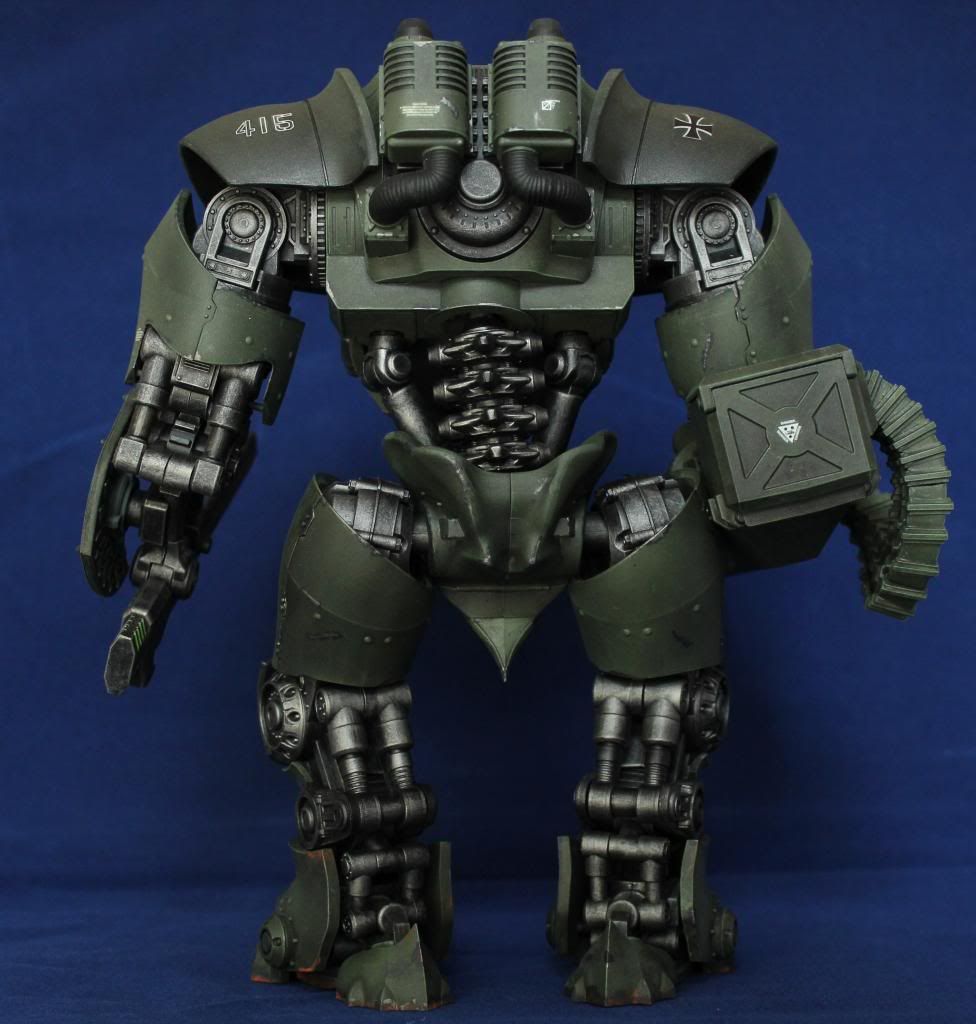
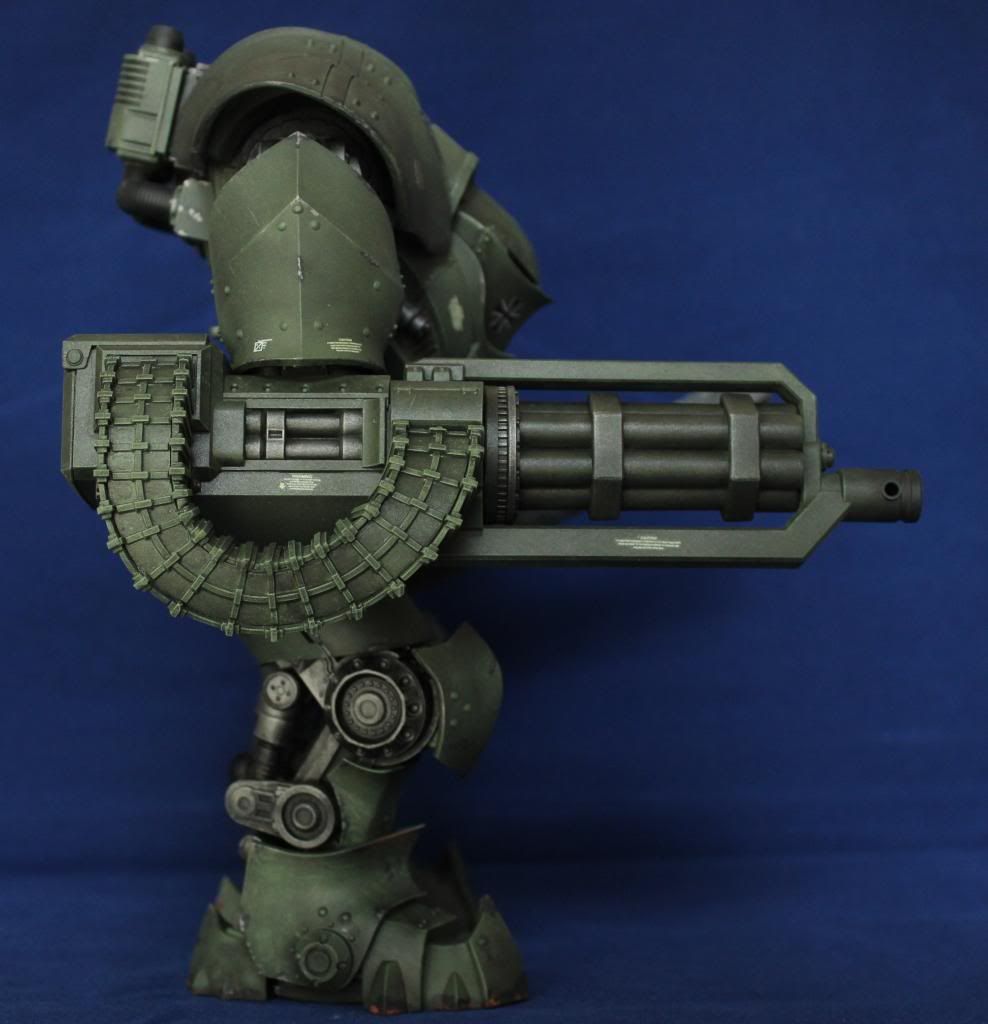
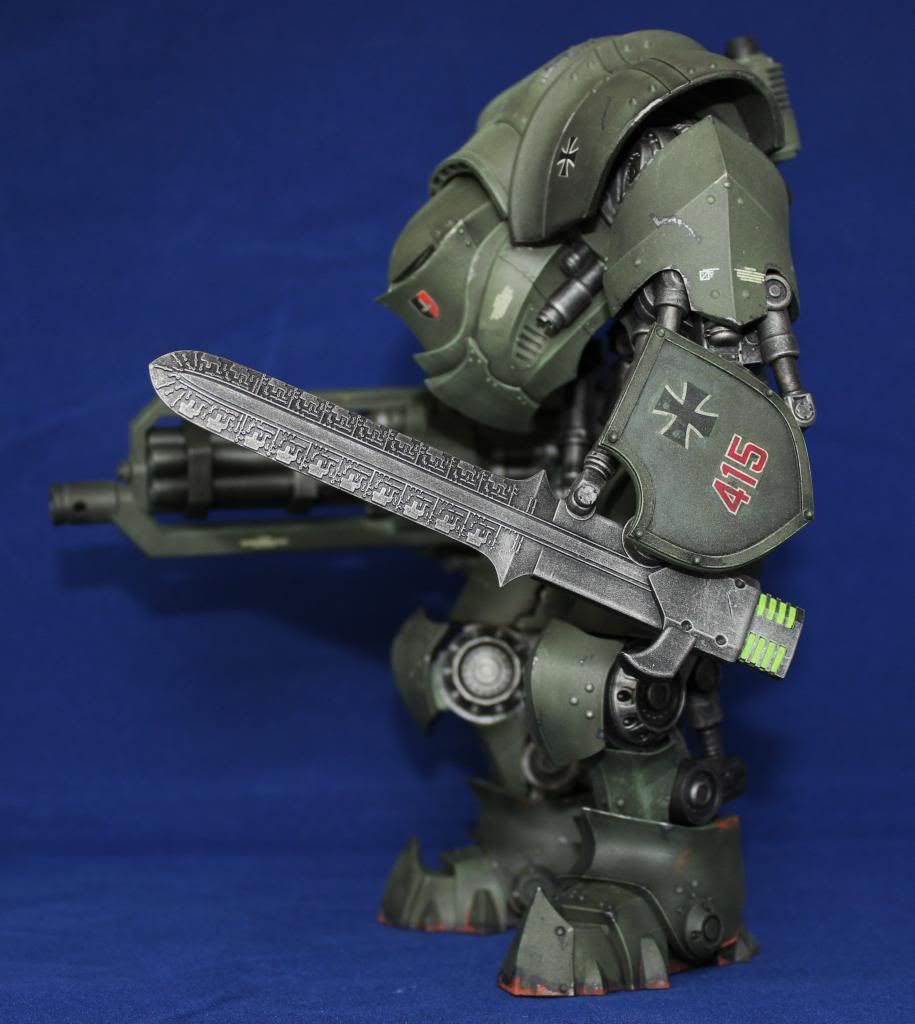
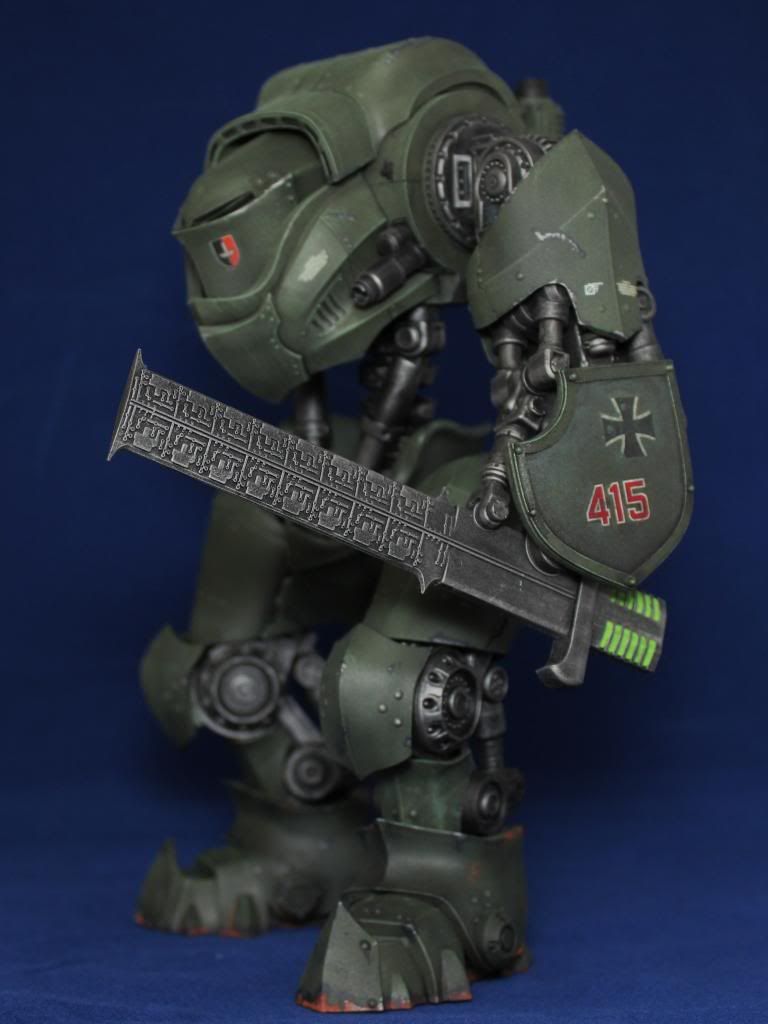
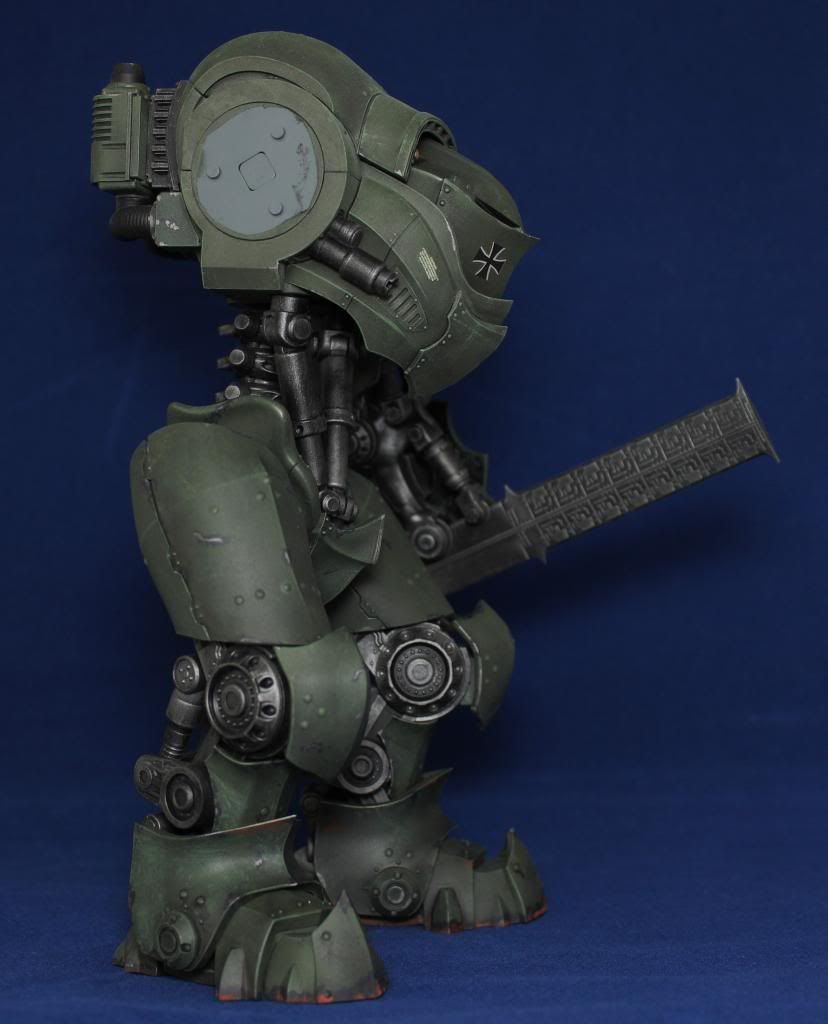
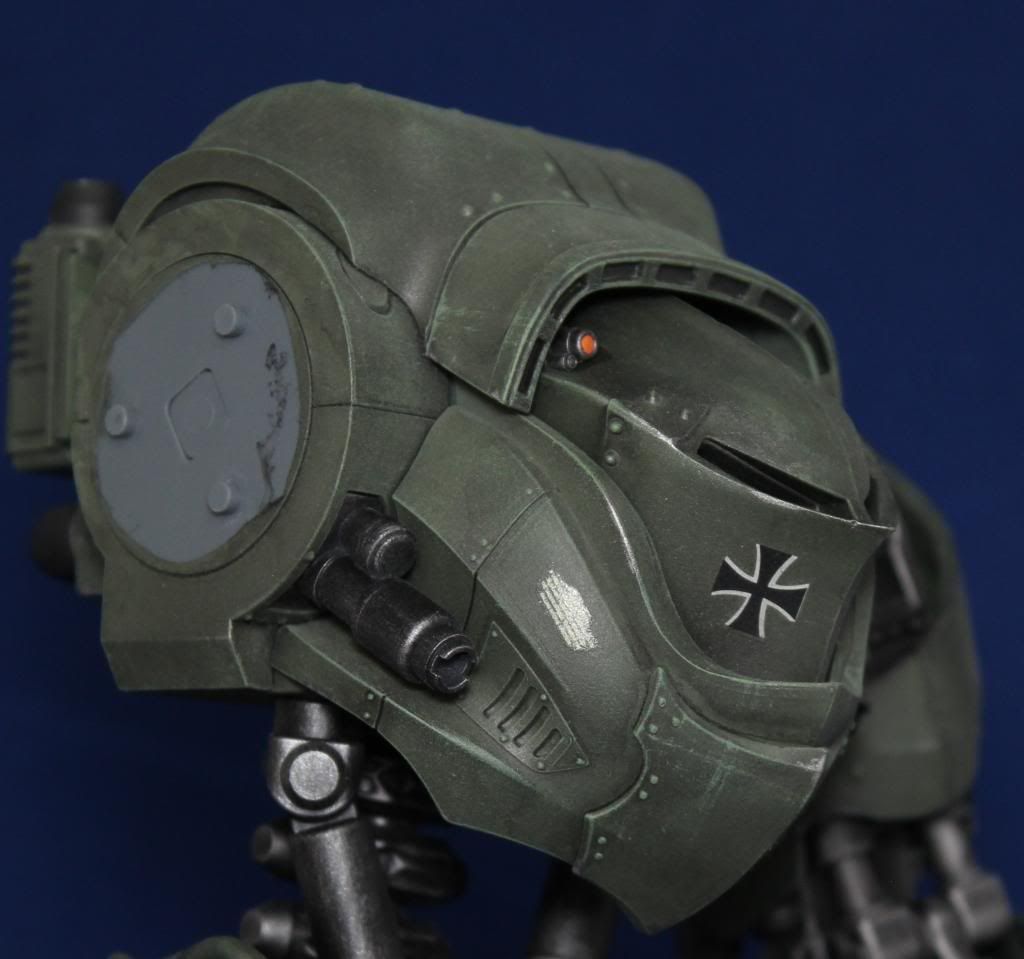
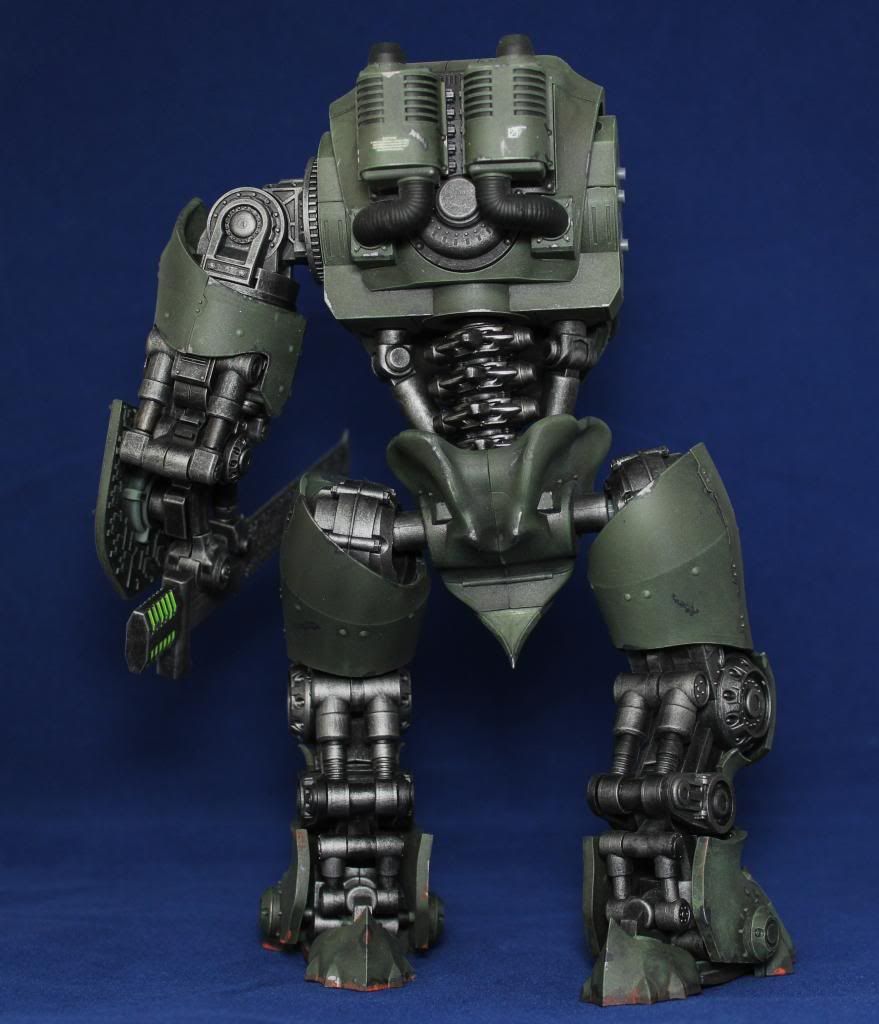
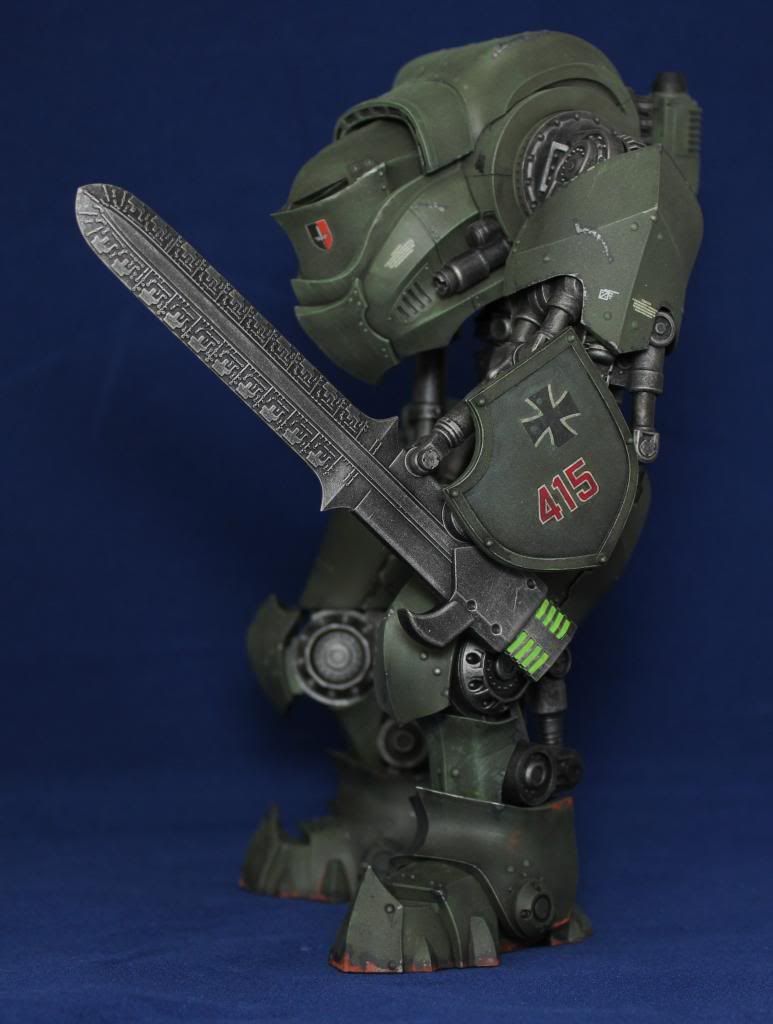
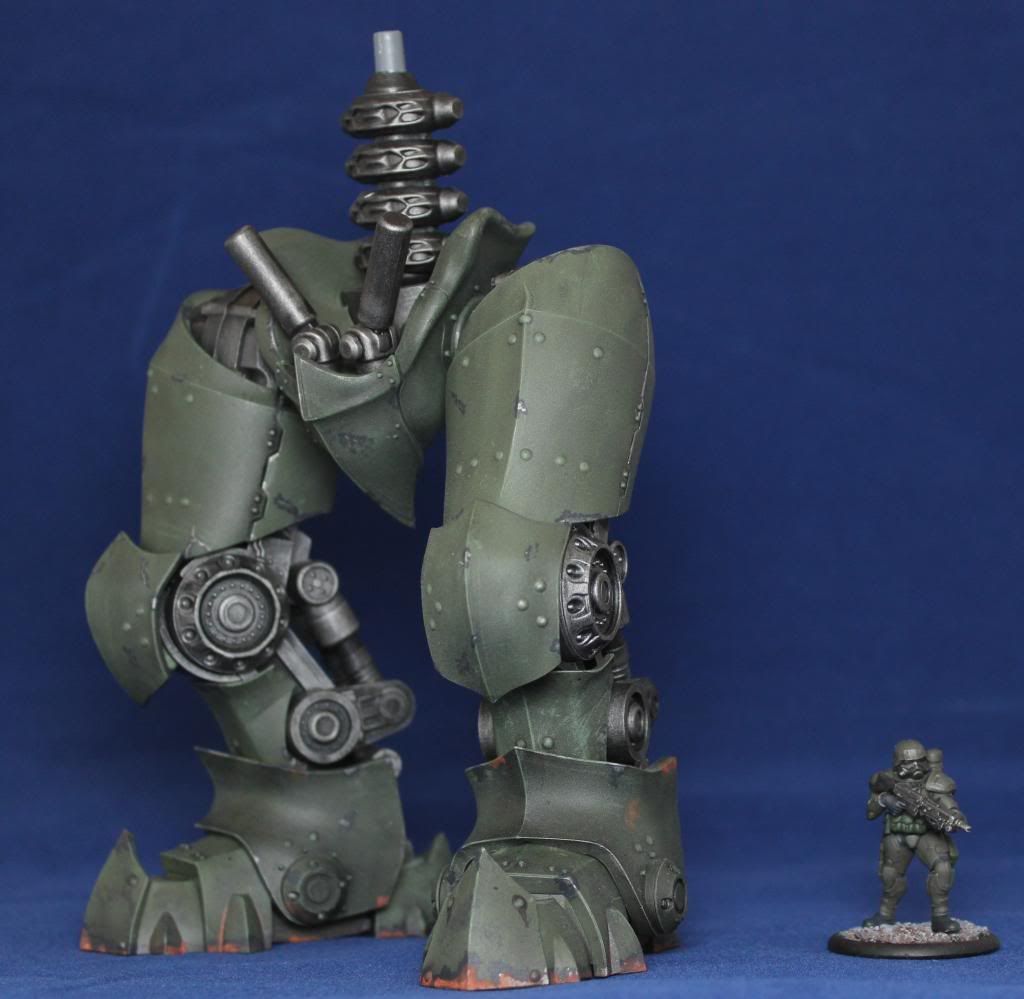
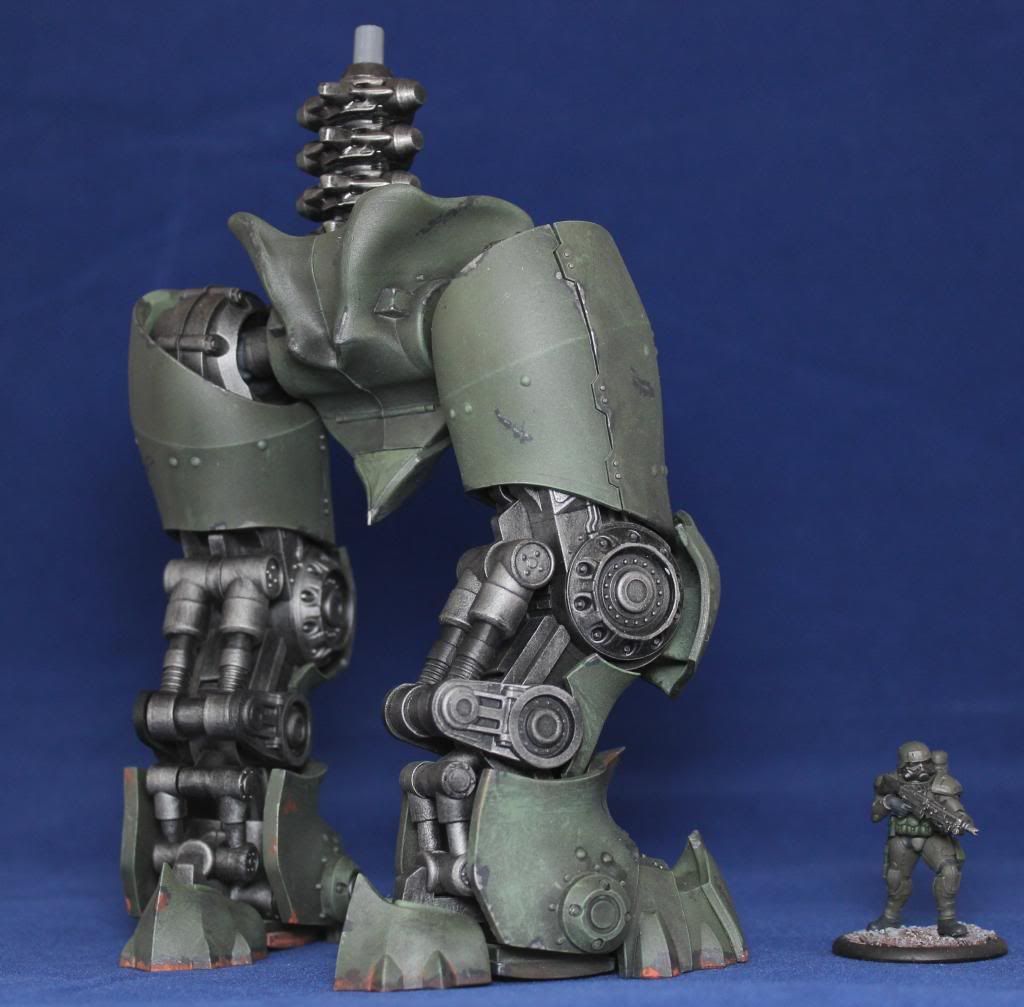
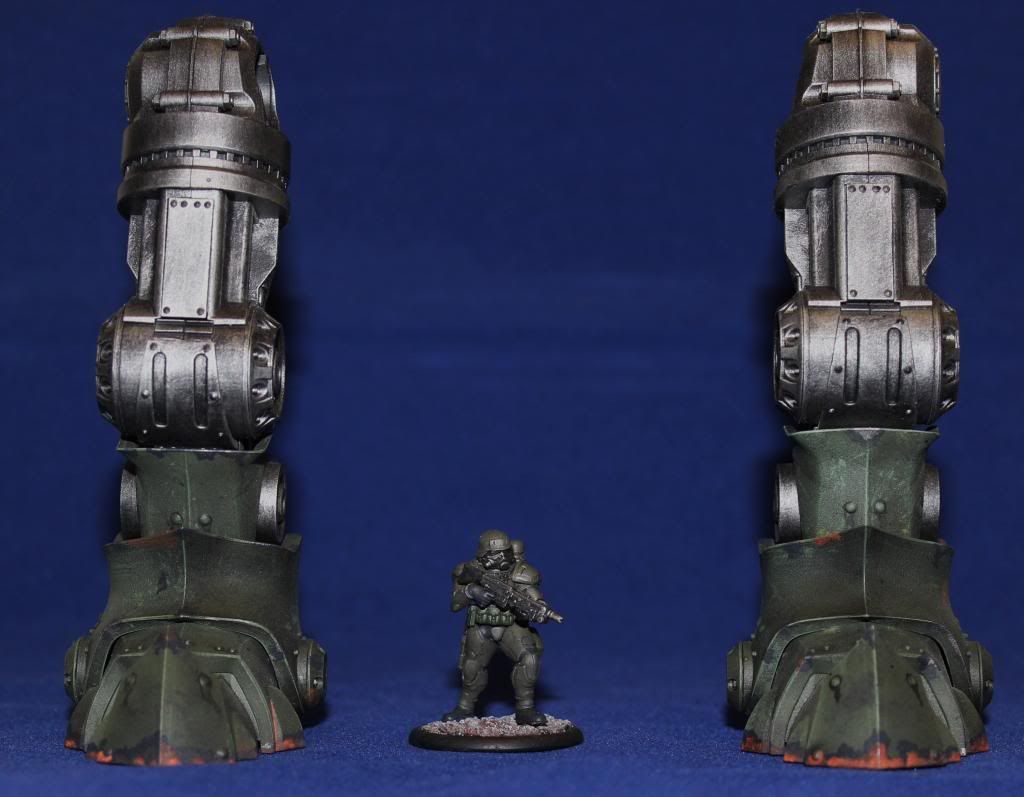
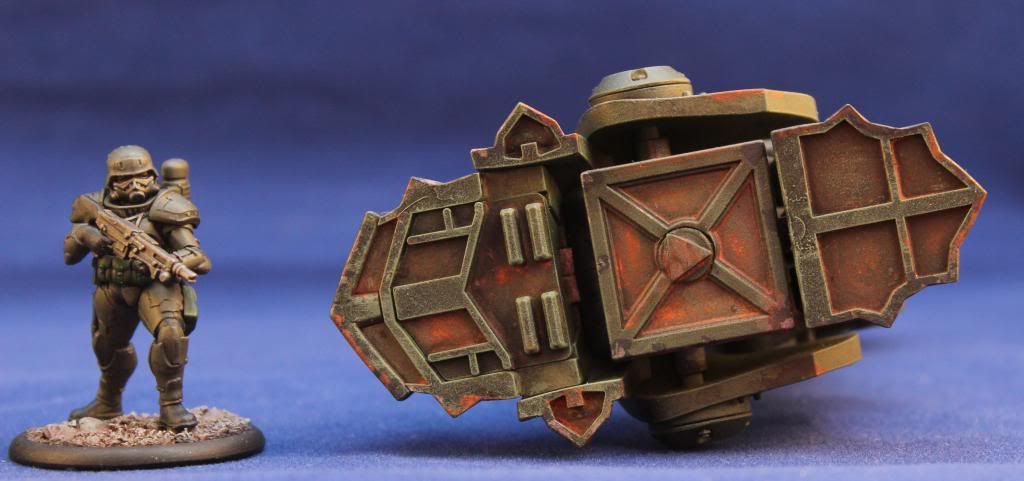
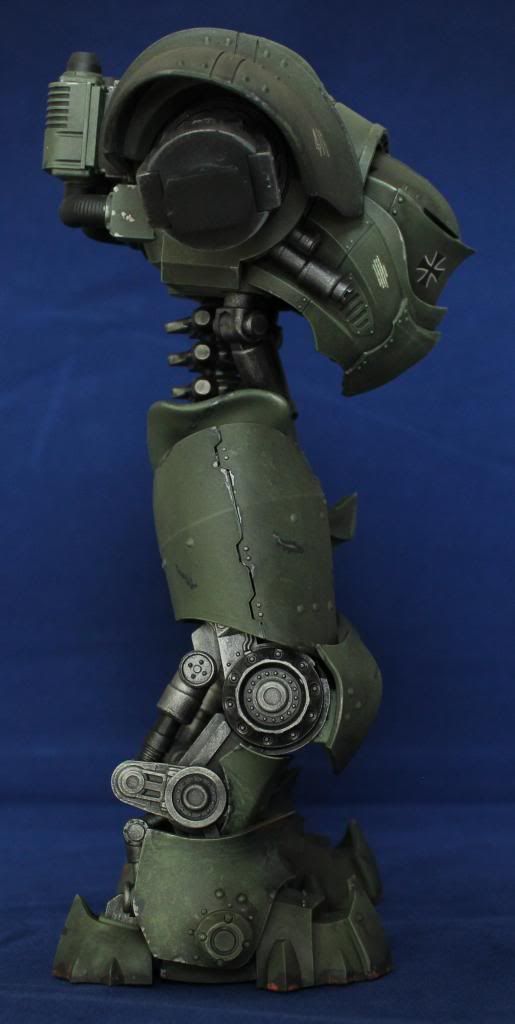
Whoo, Hoo!  The Leviathan Crusader is done!  Well almost done.  I still need to complete the base and the gothic style exhaust stacks.  But those are minor details and I have the major components together, painted and weathered.  Here are some shots in all its glory.


Now that I've got the project to this stage, I would like to share some of my thoughts on how the Leviathan shaped up, the completed result and tips on things I would do differently if I built another one.

SMALL ISSUES

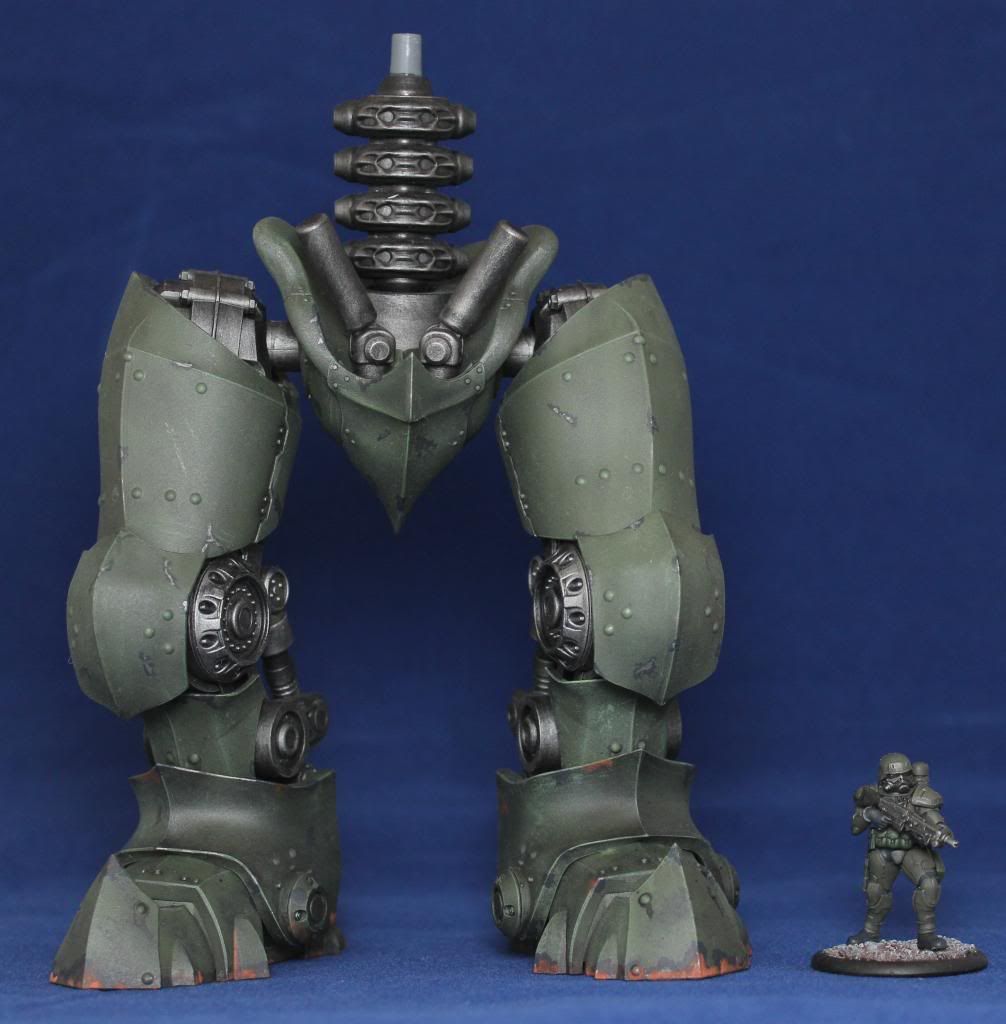
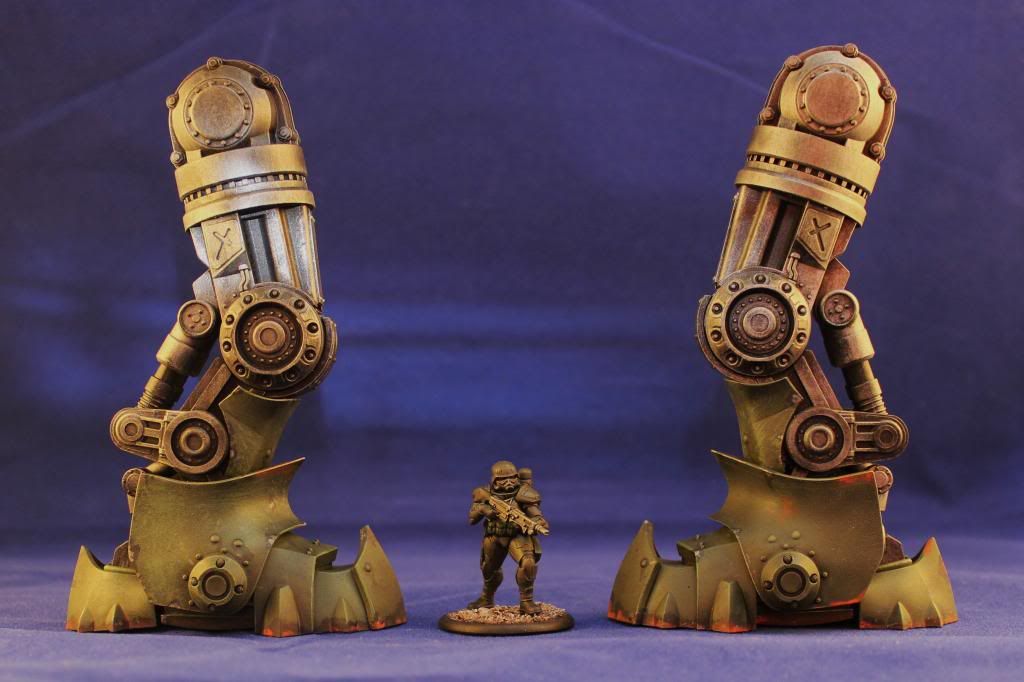
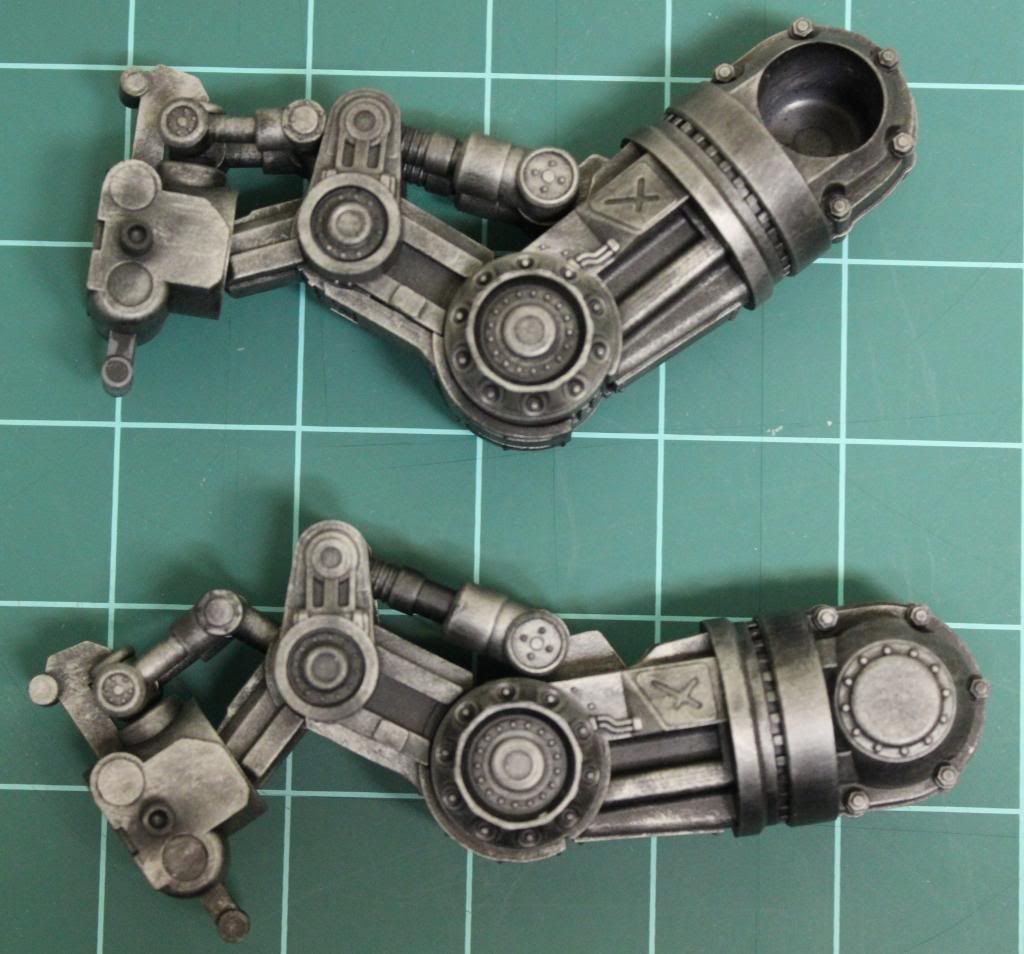
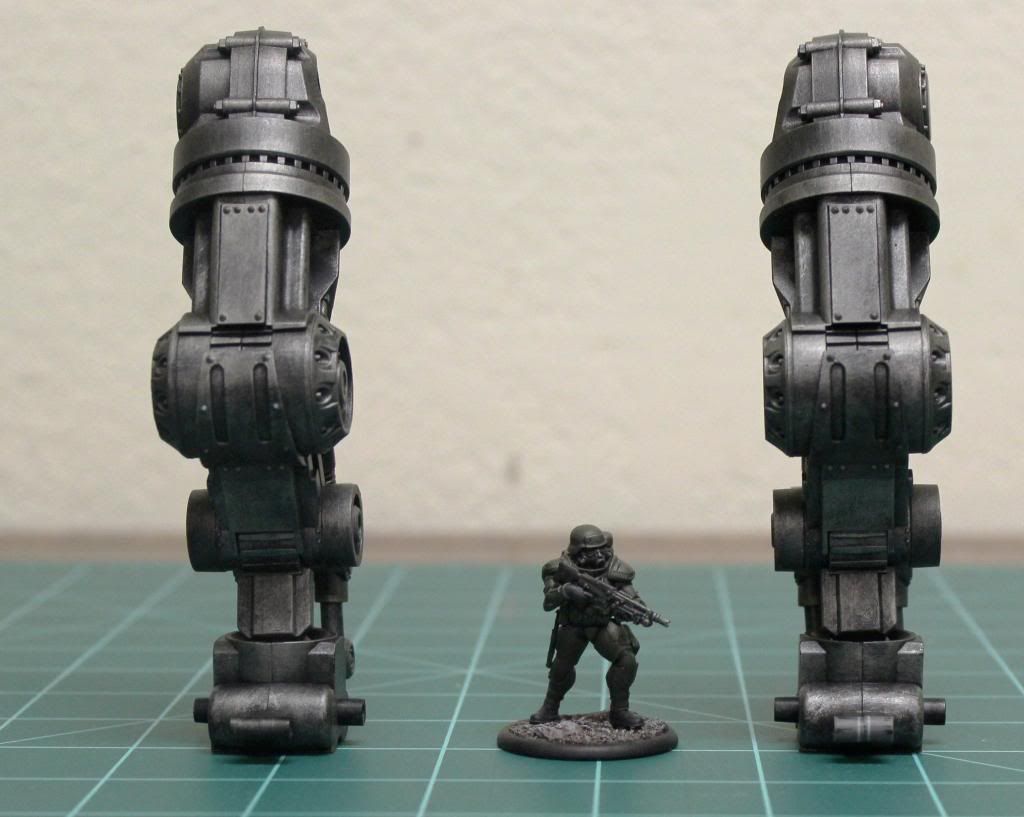
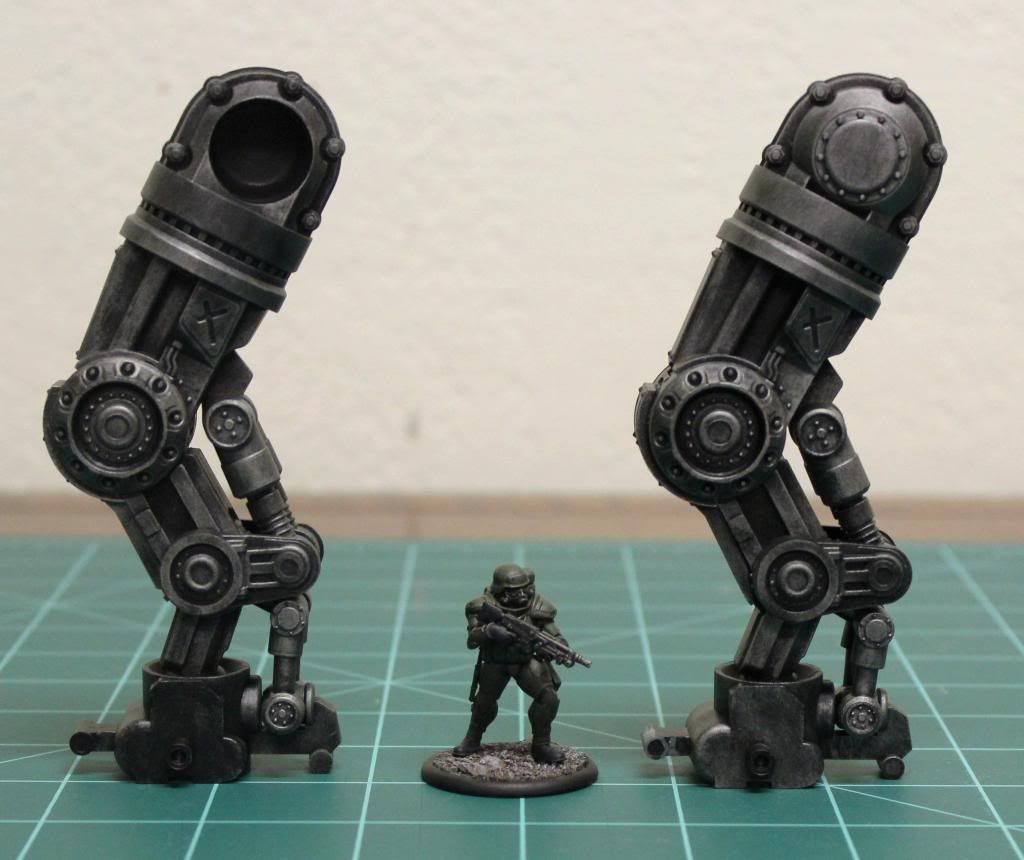
The first issue is the leg joints.  As you can see, my model squats down a little further than the shots of the factory plastic kit from DreamForge.  This is because, despite my earlier assessment, the knee and ankle joints weren't as tight as they should have been.  I thought I had them tight before painting, but they must have loosened up a bit somewhere during construction.  I do not know if I could have tightened the screws any further without stripping them out, so it was just guesswork.  I could try to use a little super glue to stiffen the joints (without completely locking them in place) with capillary action, but with the armor and pistons in place there really isn't a good spot to apply the glue.  It's not a huge deal as there is some realism to the lower stance, but I have to worry a little bit about keeping the torso and arms in the right place to keep the center of gravity firmly over the feet.  I have a comparison between the legs in my desired upright position and the spot they eventually sag to with the weight of the body and arms on them.


I also had an issue with the joint where the torso meets the spine.  Again before painting this joint seemed sturdy enough, but now that I have the cannon arm in place the torso tends to sag a little to the right (as the cannon is significantly heavier than the sword arm.  I don’t think this is so much of an issue as the joints because I have more room to get in and tighten up the ball joint.

My last issue is the range of motion for the sword arm.  It seems a little silly to be contemplating the relative merits of a totally impractical weapon, but the fact is that the sword arm is very restricted in its movements.  The shoulder guard up tops keeps it from being able to raise it any more than waist height, so it would never be able to lift it for a power blow.  Second, there is no rotation at the wrist to use it to parry other swords.  The best the leviathan would be able to do with the weapon as designed would be to flap its arm like a chicken.  

OVERALL THOUGHTS

The joint and sword arm issues aside, the final result of the build is still magnificent.  The kit was a true joy to build.  While there were a few rough patches here and there, most of the kit went together without issue.  I would like to reiterate that only modelers with some experience should attempt this kit.  If you are an inexperienced modeler, or someone only familiar with smaller war gaming kits, I believe this kit could cause you no end of cursing and frustration. 

From an aesthetic point of view, I’m still not a huge fan of the gothic, faux-40K look that the kit sports.  It certainly makes sense from a certain point of view.  DreamForge is a smaller company and having cross-over appeal with Warhammer fans almost certainly boosted the Kickstarter pledges and post Kickstarter sales.  I prefer a more traditional “blocky” style similar to the Battletech universe, but I don’t see the Leviathan design as obnoxiously pointy and fortunately there are no skulls to be seen anywhere, so it will do.

THE FUTURE

So where does the project go from here?  Well, I need to take a little brake from the Leviathan for a while and I will be out of the hobby for most of July, so the short answer is that not much will happen before August.  When I do come back to the kit I will have a couple of priorities.  First, I need to take a few tweaks here and there, like stiffening up the joints and cleaning up some of the flubs on my weathering.  I also need to paint the original exhaust stacks as well.  Then I’ll tackle the base.  I have plans to go with a rubble strewn battlefield theme, so it will require quite a bit of Epoxy-Sculpt and parts from the bits box to trick it out. 

In the longer term, I need to find a storage solution.  Hopefully, the next Kickstarter wave (with alternate arms and weapons) will come to retail this fall.  I will probably wait until then to build the left cannon arm.

All in all this has been quite a rewarding project and I can’t wait to see where DreamForge goes from here.


Wednesday, June 5, 2013

I Can See The End From Here

It's been a slow slog with the holiday and my kids getting out of school for the summer, but I've continued with progress on my Leviathan Crusader.  I now have the torso and left arm complete.

TORSO & DECALS

If you read my last post, I was still dithering about weather or not t build in a cockpit.  I decided not to do that now, but I've left the cockpit cover unglued in case I want to give it a go in the future.  Right now it's just held on with sticky tack.


I must not have tightened the leg joints as much as I thought.  I assembled the figure in an upright pose, but after a couple of days, it settled down into somewhat of a squat.  I'll have to keep an eye on that to see if it sags farther.

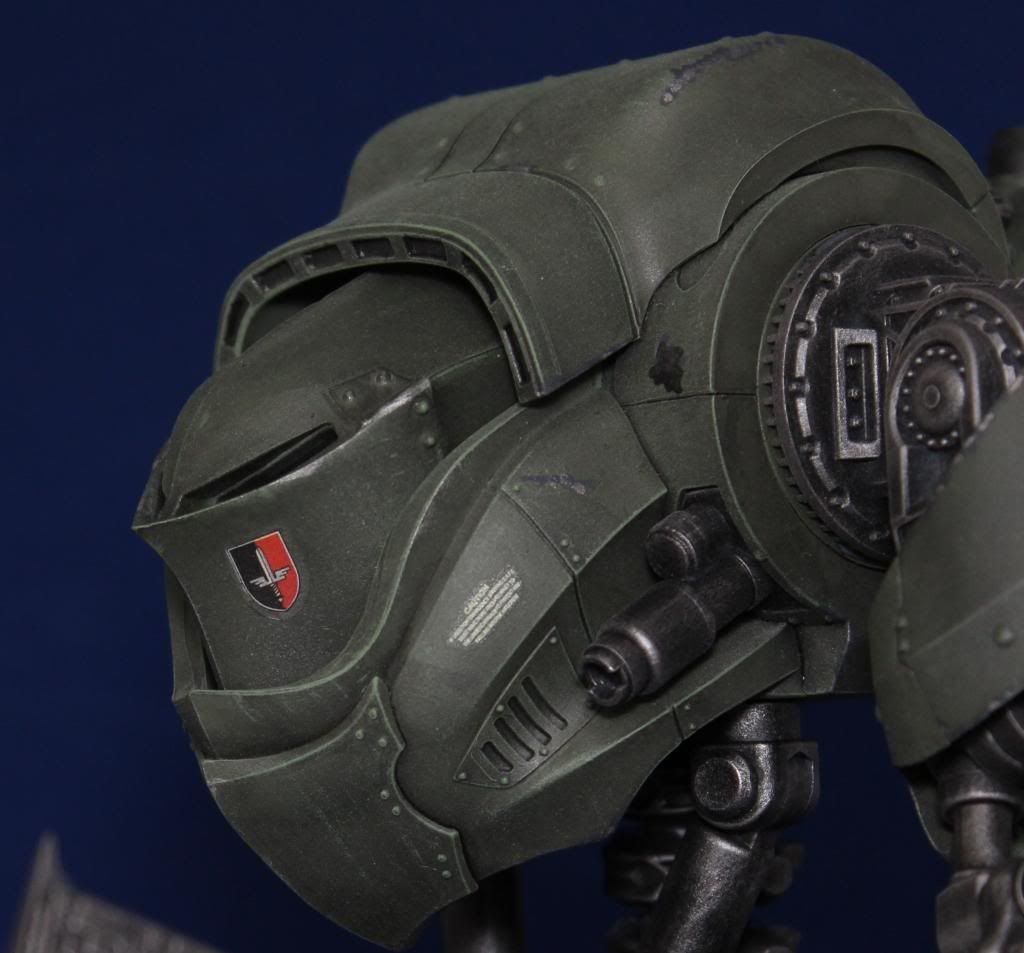
I also added some markings to the kit.  I wasn't a big fan of the over the top heraldry I'd seen on other Leviathan's posted around the net.  It reminded me too much of the Warhammer look.  I decided to go simpler with a little more utilitarian look.  Fortunately, after building model kits for almost two decades, I have a whole file drawer full of half used decal sheets from other projects.  I had a look through then and dug out some markings that I thought would work.  My first goal was to avoid anything  Nazi related.  From a fluff perspective the Eisenkern left earth before the rise of the Nazi party, but more importantly, it avoids any need to censor the pictures.  (for more information on that see HERE).

I decided to go back to the Prussian Iron Cross prominent with German forces during the first world war.  Unfortunately I've never built any WWI subjects and didn't have any left over decals.  However I did manage to find find a set of modern iron cross decals from an old 1/35 MLRS kit meant to depict a Bundesweher vehicle.  As the model doesn't have a proper "chest" I decided to put one on the right side of the face and another on the left arm shield.  For a squad or unit marking, I found the "415" decal from an old 1/48 Messerschmidt sheet.  

German war machines have never really been known for sporting much fun nose art, so I added a subdued sword and shield crest to the left side of the face.  I have no idea where that came from.  Unfortunately this decal was too old and after it dried the backing "silvered" a little around the edges.  I tried to get it to settle down some with Microsol, but this is the best I could get.


I also found some nice "caution" decals from an old SF3D Raccoon kit to each side of the face, the arm armor and the exhaust stacks.  Here's a picture with the upgraded vent stacks in place.  I don't have the Gothic ones painted so a comparison picture will have to wait.


SWORD ARM MODIFICATIONS

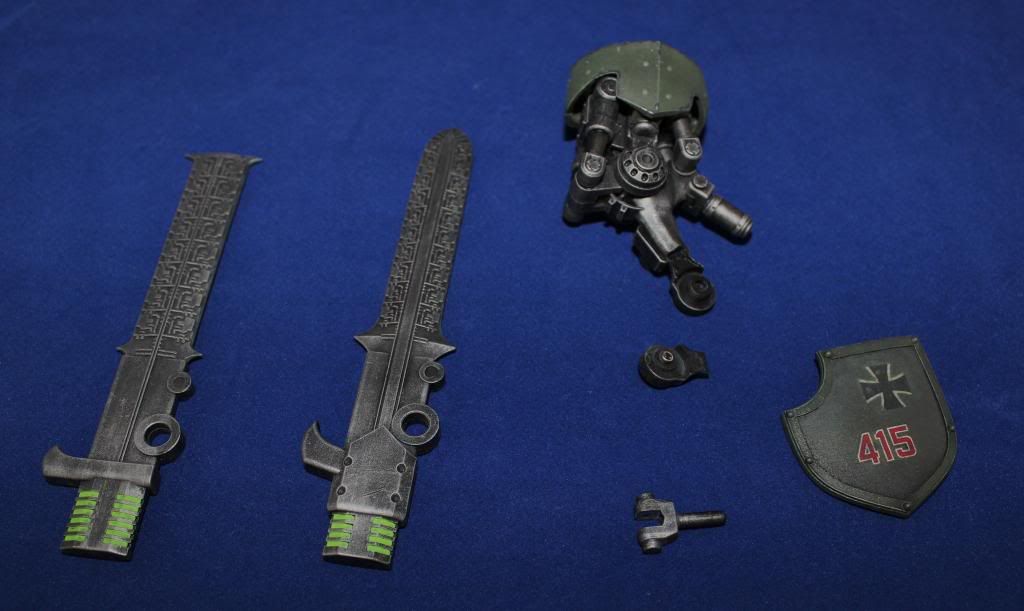
As part of a kickstarter reward, I received not only the standard sword arm (shown above), but also a more traditional looking sword labeled as Excalibur.  I wanted to be able to mount both and magnets seemed the way to go, but this looked substantially more complicated than than the modification on the exhaust stacks.  I searched around the net and found a wonderful tutorial from a blogger named Wazza:


I followed his process exactly, so I won't bother duplicating it here, but It was reasonably easy and now I can swap between both blades:


Well that's it for now.  It's down to the home stretch, I just have the cannon arm, shoulder pads and base left to go.  I've got the cannon arm assembled and primed, but the rotating barrel is making it a pain in the butt to paint.  Hopefully I'll have something more to show next week.


Monday, May 20, 2013

Building Some Upper Body Strength

I'm still plugging away at the Leviathan Crusader.  This is a bit of a surprise to me as this tends to be the point in a project when I get distracted by life, work, or just some new shiny project that comes along.  This weekend I got the upper torso together and managed to magnetize the vent stacks.

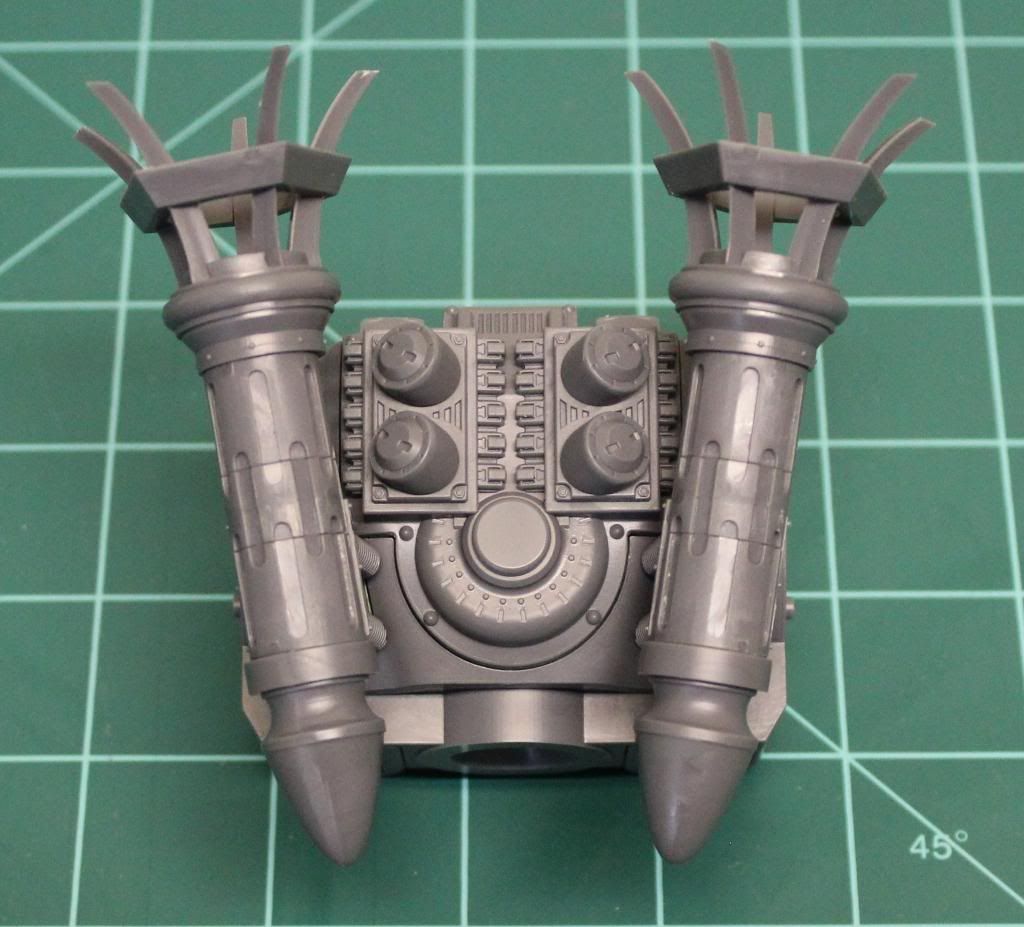
During the Kickstarter campaign for the Leviathan, DreamForge offered up a free set of alternative exhaust parts for anyone pledging for the Leviathan itself.  The original parts were a little too gothic In my opinion, looking like giant braziers straight out of the Warhammer milieu.  The alternative parts on the other hand have a sleeker and more stream-lined look to them.

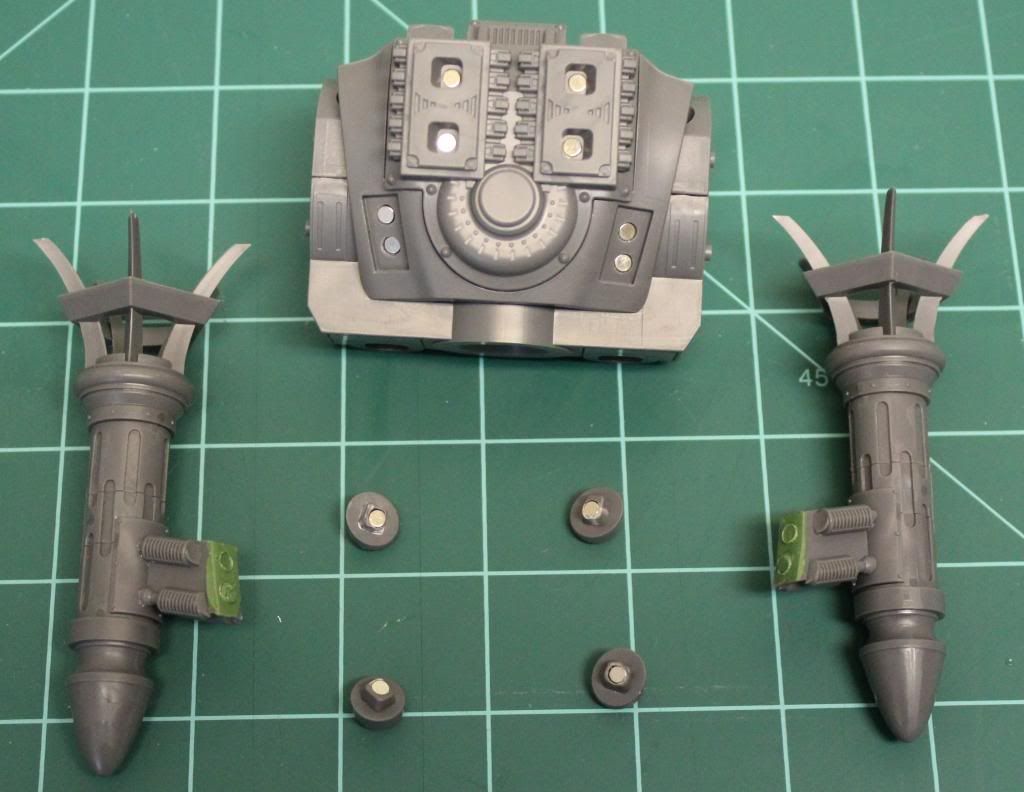
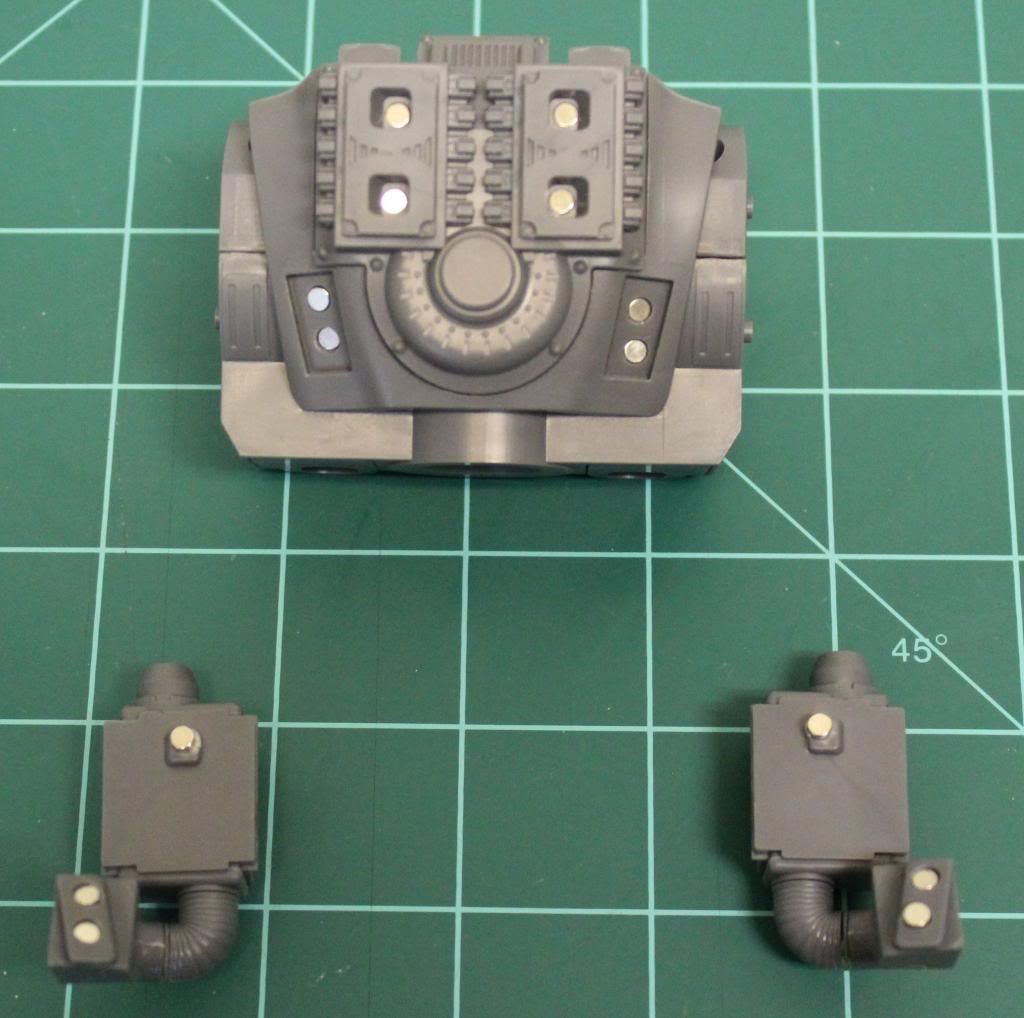
After mulling over the situation for a while I decided to use both, with a set of magnets for swapping back and forth.  The original kit parts are rather beefy so it took two magnets in the slot before I felt that it would hold fast, and then two opposing magnets in the exhaust part itself.  I am using 1/8" long and 1/8" diameter cylindrical, rare earth magnets on the parts.  Unfortunately I was off on my drilling slightly and the magnets didn't quite line up true.  As you can see by the photos I had to add a little green epoxy stuff putty to get everything to fit right.


There are also four small parts that fit on the back of the engine that would have been in the way of the alternate parts.  I had to magnetize them as well.


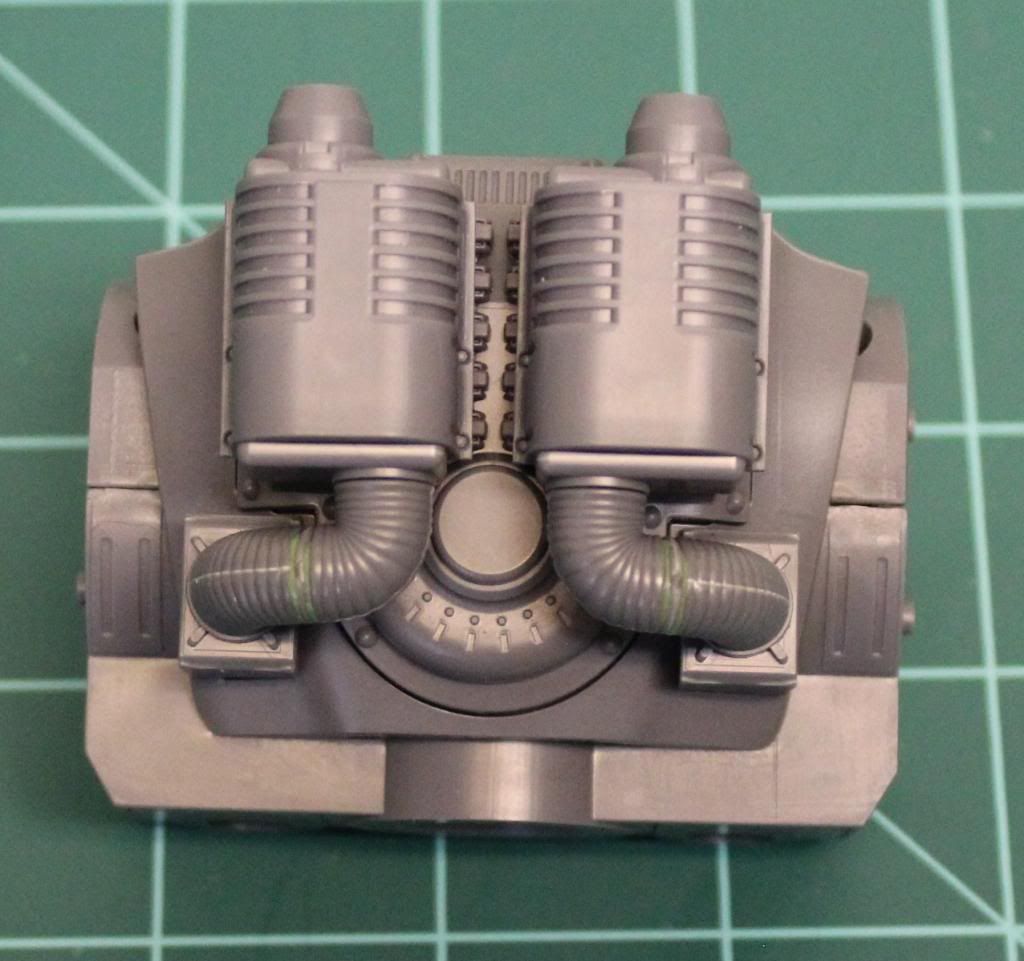
Next up were the alternate parts, listed from DreamForge as "Leviathan Capacitor Cooler".  What I gather from the small amount of Iron Core background that has surfaced is that the exhaust stacks are intended, to vent excess heat when the Leviathan makes extended attacks or hard maneuvers, similar to the heat sinks in Battletech.  The alternative parts are supposedly more efficient at venting that heat.  Either way, I like the look of the alternative set much more.  As you can see, I've magnetized these as well utilizing the same sized magnets in the most of the same locations.  These parts are lighter and fit closer to the torso, so I didn't need all four.

I was a little more careful with my drilling this time and the opposing magnets lined up much better this time.  The hoses that connected the coolers to the torso did not fit quite right, so I needed to green stuff the joints a little bit as well.


  One dissapointing thing that working on the torso has shown me is that I will have to give up the idea of adding a cockpit.  The way the chest, face and roof parts all fit together, it will be nearly impossible to make the face part removable to see the cockpit without some major surgery.  Oh well, that will cut some time off the schedule and keep the project rolling.  I probably would have spent a week or two scratch-building a cockpit and converting a pilot to fit.

Thursday, May 16, 2013

Leviathan Progress Continues


I have had quite a productive week on a couple of projects and have some good progress shots to share of the Leviathan.  I have managed to get the legs complete and make a good start on the body.  I haveve deviated from the instructions a bit and have split the torso into lower and upper assemblies.  This also splits the front pistons into upper and lower parts, but as they are designed to be free to move, they should be alright.  I've done some dry fitting with the chest piece and it will be tricky to mate the pistons but it should be doable.


As far as assembly goes, it was pretty straight forward.  This kit continues to amaze me.  The fit on the upper leg armor was so good that it doesn't need to be glued.  


I continued the weathering up the legs, but toned it down somewhat.  I think when I get to the chest and higher I'll tone it down even further.  I didn't notice it until I started taking pictures, but I missed the back, bottom side of the codpiece with my last wash so it's a little lighter than it should be.  I'll get that remedied before I take any more photos.


After this stage, the project might slow down for a while.  So far the assembly has been straightforward and I haven't deviated much from the instructions.  However as I look at the chest and the arms, I'm seeing a few speed bumps and detours.  First, I want to magnetize the extra kits that came with the kickstarter (optional sword and exhaust stacks, so I'll have to work out a plan for those.  Second, I want to see if I can make the face part hinged so that I can open it up and detail a pilot and cockpit.  I'm not sure it's feasible  but I want to give it a try.  If that doesn't work out I can just throw an LED light in there as I have seen other modelers attempt.  Last, looking at the gun arm assembly it seems like it will be a bitch.  The center barrel assembly rotates, but it will have to be sandwiched in the main housing halves.  I see a number of long seams that will have to be filled and sanded while avoiding damage to the barrel.

Tuesday, May 14, 2013

I'll take the green in size 256

I've now completed the feet and ankle armor for my DreamForge Leviathan Crusader.  I cruised around the net to find what other paint schemes people had done and looked back at the initial background that was written for the Iron Core universe for inspiration on my paint scheme.

I came away with a couple of firm opinions.  First,  I won't be using camouflage or over the top Gothic style heraldry.  On the camouflage, it seems like a waste of time to camouflage a fifty foot tall robot.  On the heraldry, I found some very lovely painted examples, but they strayed too close to the Warhammer 40K aesthetic for me.  I'm not looking for a titan proxy.  I want the Crusader to stand on it's own merits.

In the end I opted for a dirty green color for the armor plates and I'll let the exposed mechanical bits remain dry-brushed metal.  I'm using a black primer, with a base coat of Army Painter "Army Green" spray.  To that I apply a couple of black washes and then I weather with some dark grey, metalics and some rust effects.


The weathering was a little ham-handed, as I haven't weathered anything this big in a while, but at tabletop distance, it holds together.  My plan is to have the most wear on the feet and then get cleaner as I work farther up the model.


I'm not really in love with the design style of the feet.  They are a little more pointy and Gothic than I'd like to see, but I'll get over it.  Any fear I had that the joints were too loose disappeared when I got the armor on.  With all of the fully painted parts put together, the feet and ankle joints are quite stiff.  I can still move them, but it is significantly harder now.  When complete this certainly won't be an action figure.


Here's a shot of the bottom of the foot and the first deviation to the instructions I've made.  The kit comes with a plastic base, but assuming that I ever use this guy on the tabletop, I'll want to make it removable.  The solution to that, as always is magnets.  The central foot pad had a circle at the center of the "x" just about  1/4" across.  It was easy to drill out this area and insert a 14" diameter, 1/8" tall rare earth magnet in each foot pad.  I plan to place an opposite pair into the model's base.  It will not be a terribly strong joint, but it should suffice for a static display model.  I've found in the past that when using magnets, the paint tends to chip out rather easily.  To prevent that, I used a triangular hole punch to create a thin spacer from .01" sheet styrene.

Things are actually progressing a little faster than I had imagined and I should have the leg and knee armor done this week.  Famous last words I know, but this project might finish up faster than I planned.

Wednesday, May 8, 2013

And So It Begins! - Starting A DreamForge Leviathan Crusader


I have finally cleaned off my workbench (at least of recent projects) and have gotten enough space cleared off that I can start on my Leviathan kit!  This plastic kit was the main showcase for the 2012 Kickstarter Campaign by DreamForge Games.  They added many other kits along the way, but this was always the centerpiece.  Leviathan’s are a bipedal, manned, fighting robot that constitute the elite weapons of the Iron Core Universe.  The written descriptions to date sort of reflect the Mechwarrior Dark Ages where these large machines are rare and greatly treasured.  DreamForge has stated that the Iron Core game (if and when it is released) will be built around using these models (and other leviathan kits) on the tabletop.  I’m a little dubious that DreamForge can pull that off, but even if it never comes to be, this will still be a pretty cool model.

I received my kit this March and while I have been marveling at it, I waited until now so I could really devote the time and attention it deserves.  There have been other very nice un-boxing reviews and video build-ups of the leviathan posted around the net.  I can’t add a whole lot to those so I’ll go down a different road and just walk through my progress as it happens.

One important note is that the printed instructions provided in the box are incorrect in a number of places and DreamForge have released an electronic version with the correction for wrong part numbers.  This is very important as you’ll end up scratching your head when parts don’t fit if you are using the old instructions.

Here's a link to the updated instructions:


Another important note is on the screwdriver.  Parts of this model are held together with small Philips head screws.  The kit provides a small screwdriver, but I found it to be severely inadequate.  First, the provided screwdriver is too small for the screws.  If you use it, you will start to strip out the inside of the screw head as it slips around.  Secondly, you need to apply a fair amount of torque to the screws to get them to tighten up.  The screwdriver provided is so small that it’s hard to get a good grip.  I just ditched it and used a larger screwdriver from my tool box.  It is also a little hard to find the point where the screws are tight enough to hold the joint stiff, but not so much that you strip out the plastic.  It takes quite a bit more force than you might think.  Luckily I managed to get all of the screws in the leg joints without problem.

CONSTRUCTION PLAN
The kit is designed in a very similar way to some of the fancier Gundam “Perfect Grade” kits that Bandai produces, in which there is an internal frame that articulates and an outer shell of armor parts.  I built one of those kits years back and I figure that assembling the leviathan the same way will work best.  To that end I have started with just the internal leg pieces.  From there I’ll work on the armor plates from the bottom up.  After I get the legs in good shape I’ll re-evaluate and see where to go next.


When I put together the legs, I assembled them without the hydraulic pistons on the back.  At first I was worried as the joints of the unpainted parts were not very stiff.  I was not sure that they would be able to hold up the rest of the model without sagging.  But Once I got the paint on, it stiffened up the joints considerably.  Next I added the pistons on the back, which stiffened up the joints even more.  I am now quite confident the joints will be able to take the load just fine. 


PAINTING
I kept the paint basic and went for a matte black primer coat and added a generous dry-brushing of boltgun metal.  My next plan is to give the legs a few light washes of black to grunge them up and then I’ll seal them before moving on the feet and leg armor.  It’s a shame, but most of these legs will be covered in armor plate and you won’t get to see much.


So far I am very pleased with the kit.  It is very well designed and cast.  It is a true joy to work with.  All of the joints move down to the pistons moving in and out.  The end result should be quite impressive.  Unfortunately, at the pace I’m working, this could be a three or four month project.


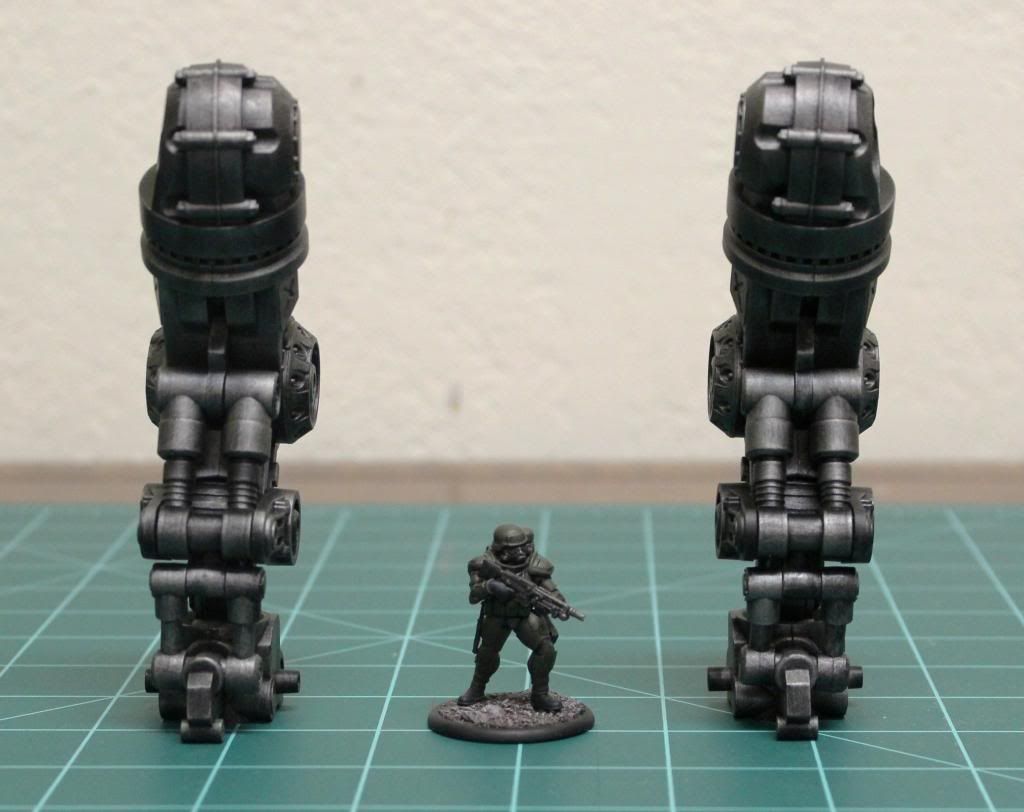
This thing will be a monster when complete as you can see by the scale of just the legs so far.  At over 10"  when complete it should be a site to behold.

Thursday, April 18, 2013

DreamForge Games Stormtrooper Support Weapon Set Review


This has taken me a little longer to put together than some of the other reviews.  Some of that has been life intruding into hobby time (kids tournaments  spring break etc), but also these kits are quite a bit more complicated than the basic infantry and have taken longer to get put together, painted and based.

Today I’ll go through the Eisenkern Support Weapons Set.  This is the last of my DreamForge reviews for now.  I still have Ada, the feral Shadokesh & handler and the mighty Leviathan Crusader.  Ada and the Shadokesh are one of rewards and are a low priority for me and the Leviathan will probably take me into the summer to work through and report back on.  


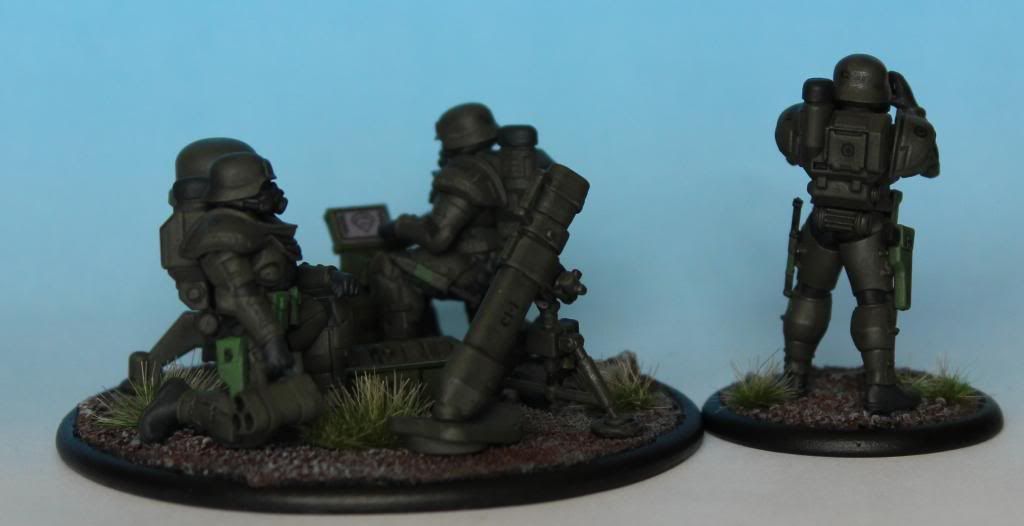
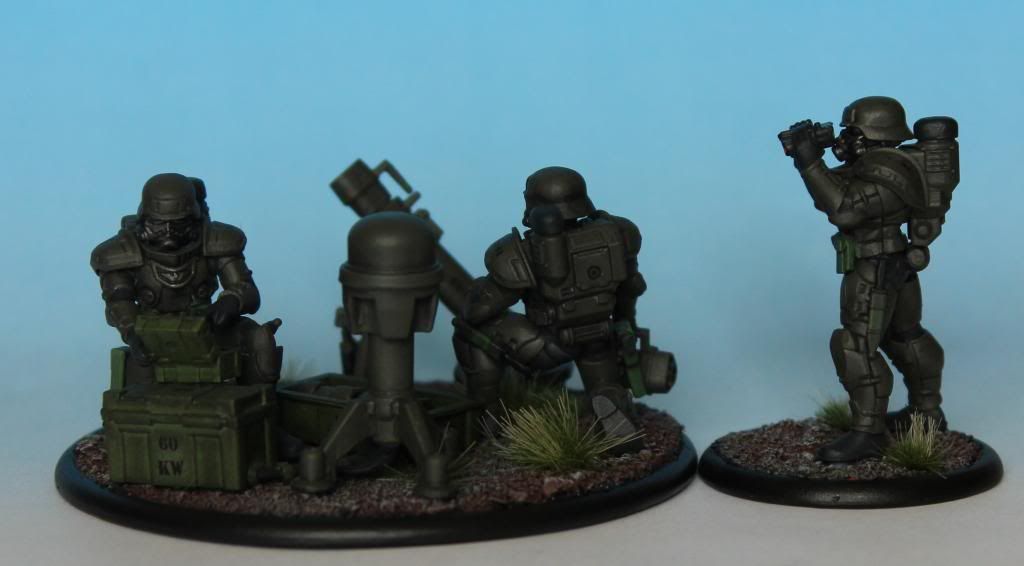
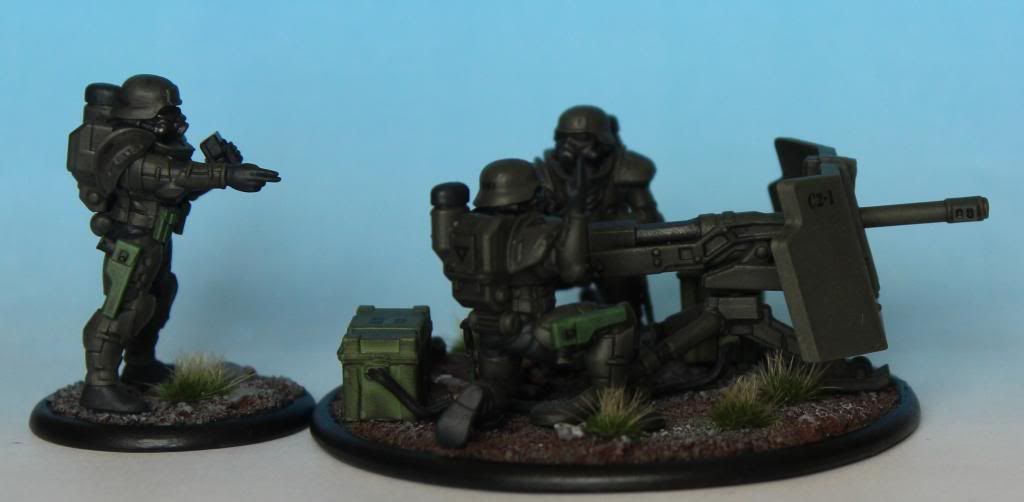
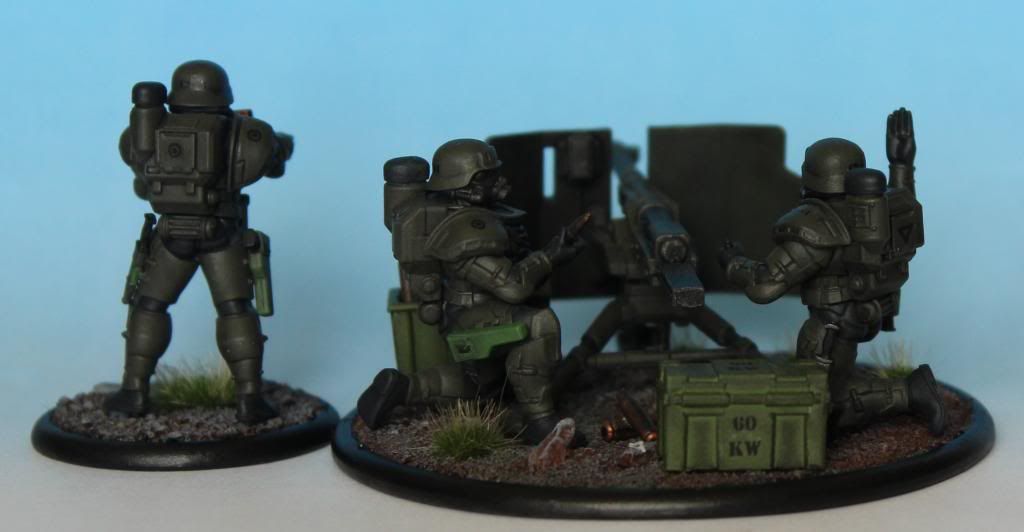
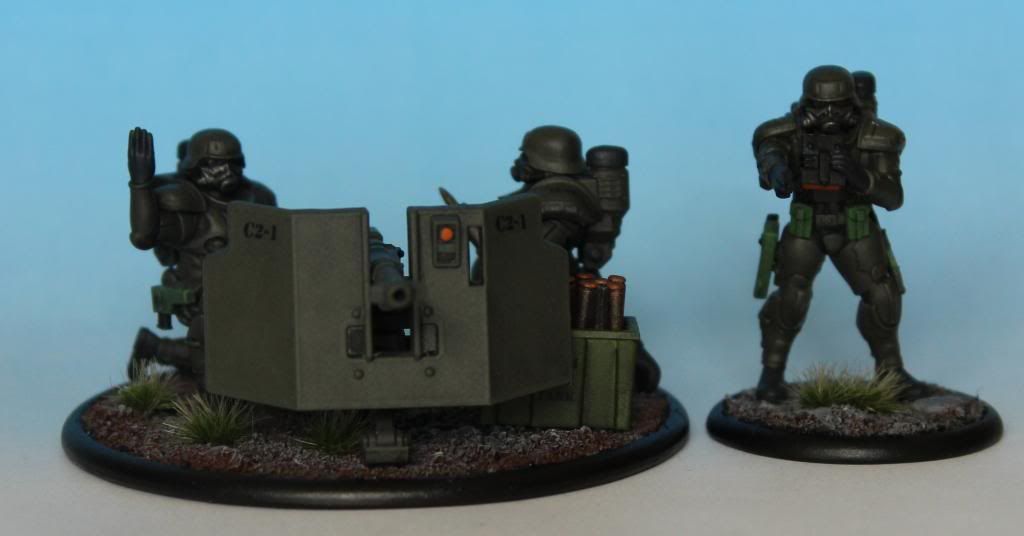
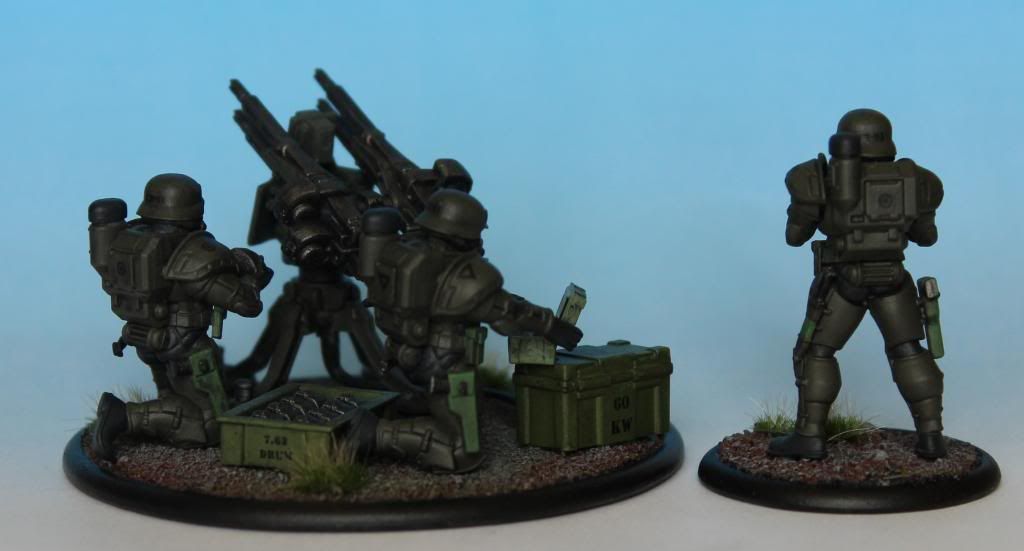
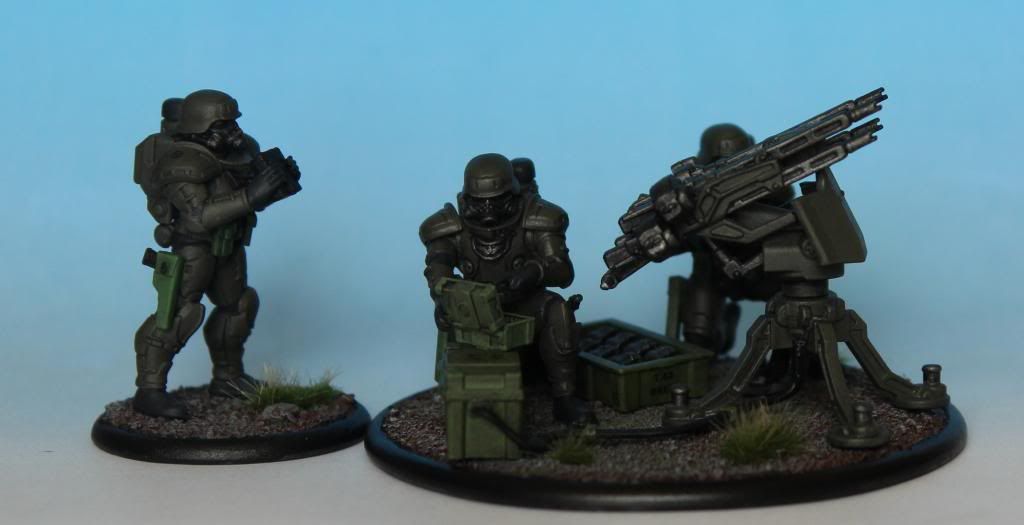
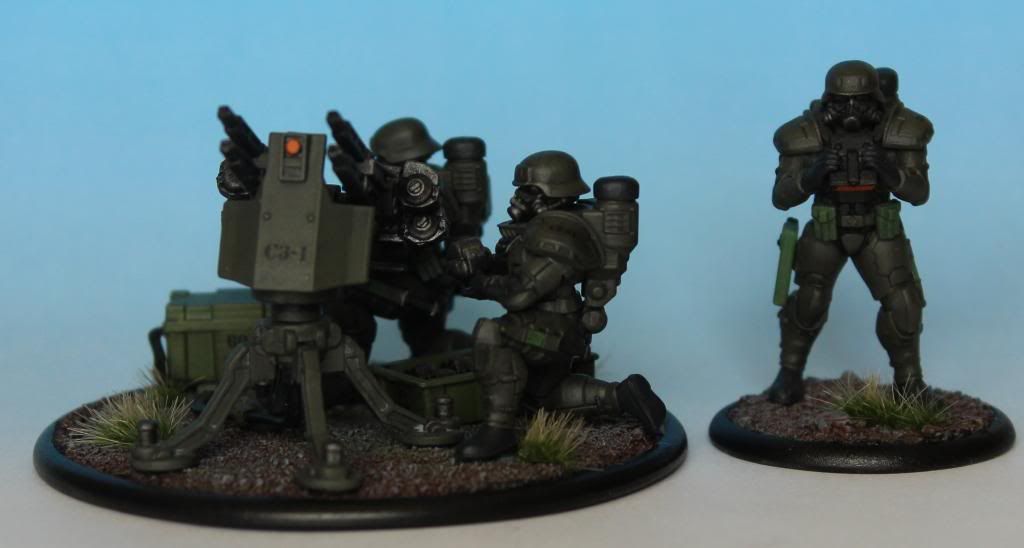
This box set provides three heavy weapons team kits spread over three frames.  There is an anti-tank gun, a quad anti-aircraft gun and a mortar.  Each team comes with the weapon system, three crew members and a large base.

Frame #1 – Weapons Crew:

This frame contains all of the parts to build up the weapon crews as well as a few accessory bits like the battlefield computer.  The casting quality is high with no flash and very little in the way of mold lines.   All of my comments on the original stormtrooper base box go for this frame as well.  A point to note is that almost all of the body parts are a straight copy and paste from both the stormtrooper kit and the accessory set.  The only original parts are a set of arms/hands for each weapons loader holding spare ammunition and an arm/hand holding a firing switch.  Depending on your point of view it’s either a good thing or a bad thing.  It’s not optimal, in terms of customizing your crews, but the parts were well designed and have enough variation that it shouldn't overlap too badly with your regular troops if you plan out the poses.  On the plus side, all of the parts are compatible with the other boxes, so mixing and matching parts is a snap.


There are six sets of kneeling legs (left and right) and three sets of standing legs.  The upper torsos, heads, back packs and shoulder pads are all the same as the stormtrooper box.  There is a nice variation of arms from both other sets as well as some new arms holding ammunition, or firing the AT gun.  The frame also has three battlefield computers and three sets of binoculars.


One thing I found lacking was any personal weapons.  There are no rifles, SMGS, pistols or even combat knives for the crew.  This probably makes sense for game play purposes, but seems odd when you look at them as just models.  I rectified this by giving my crews holstered pistols and combat knives from the accessory set.  If you have an accessory set, there are also plenty of spare weapons on there that could be placed on the base.

Frame #2 – Weapons Systems:

This Frame contains all of the parts for the heavy weapons themselves as well as the attached support equipment and spare ammunition.  It also contains one of the large bases.  Each weapon system comes with one crate (I assumed a power pack), cabling to the weapon mount and an open crate of spare ammunition.  The AT gun also comes with individual live and spent shells and the mortar comes with some sort of sensor or targeting mechanism similar to what’s on the mule head from the accessory set.  The bases have the same thin profile and rounded lip of the 30mm infantry bases  with the DreamForge logo on the bottom.  The bases don’t come with any holes for mounting the infantry, so once you determine the positioning of the figures you’ll want to drill your own.

The bases are one area that frustrated me somewhat.  The outside of the bases measure 63mm and the inside of the lip measures 60mm.  This means that aftermarket themed bases (typically 60mm) will be a little too small.  As the bases are already crowded with crew and equipment, stepping down to a smaller base isn't an attractive option.  A standard size base that matched other manufacturers would have been preferable to me.


This is the first DreamForge frame that I found to have some real mold lines.  There seems to have been a small offset of the mold halves that has left mold lines on virtually all the parts.  They are not insurmountable but if you want the best looking result you’ll have to spend more time cleaning up the parts than on the other kits.  I don’t think this is enough that anyone should avoid the kit, but it’s certainly something to keep in mind.


Frame #3 – Bases

The last frame contains two additional large bases, the same as above.


Instructions

Like the other kits this one contains a single page, front and back set of instructions.  They are much clearer than the stormtrooper set and are a good aid to the assembly of the weapons.  One mistake is the diagram on the crew shoulder pads.  They are shown going on the model backwards.  Hopefully that will get fixed in future printings.

Construction

As with the stormtroopers, the weapons crew went together easily and painlessly.  One note of caution would be to assemble the weapons first and then assemble the crew around them.  I put my crew together separately, and some of the heads are pointing off in odd directions.  If you use all three crew and all of the equipment, the bases will get quite crowded and you’ll want to carefully plan your crew poses.  I cheated somewhat and put the standing observer figures on separate 30mm bases which I stole out of one of the infantry boxes, however any generic 30mm lip base would work.  As with my other infantry models, I added a few detail parts from the accessory sets (pistols, knives, pouches etc).

From a construction standpoint I found the weapons themselves to be a little hit and miss  The AA gun is very fiddly to assemble while the mortar and AT gun are a snap.  I get the feeling that Mark did not put quite as much time and effort into the parts breakdown of this kit as he did with the stormtroopers or the Leviathan.   

The AA gun is where the most issues lie.  First, the assembly of the gun barrels, mount, and rear arm go together with posts and holes that are just a little too small.  If you try to force them your are liable to break something.  The better solution is to back scrape the posts with a hobby knife to slim down the diameter enough to loosen the fit.  Next, up are the drum magazines.  These have small tabs on both the magazine and the gun instead of a male/female tab and slot.  If you just glue them as is, the joint is not strong enough.  I ended up shaving off both the tabs and gluing the drum straight to the gun.  

Another issue is the mounting point for the gun shield to the bottom of the guns.  This is a but joint that again does not seem to be strong enough.   After I had glued the parts together with solvent model glue I added some gap filling super glue to the inside joint to try and strengthen the bond.   The last issue I had with the AA gun were the legs to the mount.  There are four legs that fit into slots on a center hub.  The legs are just a little too thick to fit into the hub and as with the guns I found the best method was to back scrape the legs until they fit into the slots.

Similar to the mechanical mule in the accessory set, the mortar has some thin and fragile parts that will require time and patience to gain the best results.  Also, you will need to be careful during painting.  I got a little too vigorous with dry brushing and broke off the support legs and had to repair them.

I strongly suggest leaving the weapons and cables separate for painting.  Otherwise there are some areas that will be nearly impossible to paint.  I also left the gun shields off for painting as well.

As I stated above, I still haven’t based the figures.    From what little information available on the game rules, the spotter figure(standing with binoculars) will be an option.  As I want to keep the figures as cannon as possible, I’m considering either magnetizing the spotter or just putting him on a separate 30mm base of its own.

One change I made was to magnetize the mount on the AA gun.  From earlier posts I’m working on a scout car conversion and I haven’t settled on the weapons.  To keep my options open, I drilled a set of 1/8” magnets between the quad gun and the mount.   The magnets fit width wise but there was not quite enough room vertically.  To solve that I put in a 1/8” spacer made of tube styrene.  The end result blends pretty well and gives me the option of mounting the gun in the back of the Warthog.

Conclusions

This is another good kit.  It does have some in built challenges with mold lines and part design, but I think they are outweighed by the end result.  Overall they go together well and result in some nice and convincing weapons systems.  With the AA gun, definitely take your time, read through the instructions and think happy thoughts.  Other than that I’d recommend these to anyone that likes great plastic figures.  While they are not quite as fantastic as the stormtroopers, they are still a great addition to expand the line.

Now on to the finished figures.  As mentioned above, I thought the bases were too crowded for all three crew and I put all of the forward observer figures onto a separate 30mm base.  As these are optional figures in game terms, I'm not too worried about them in terms of future rules.  I flocked the bases with the same combination of rocks and sand as my infantry figures, but felt they looked a little too sparse   I added some tufts of Silfor grass to break them up a little.  Lastly, when I as doing decals for the weapons systems I decided to add some home made rank and unit insignia for the troopers.  I put a rank on the backpack and right pauldron and a unit marking on the back of the helmet and left pauldron.  I like how it turned out and might go back and add them to my already completed troopers.


I didn't glue the hands close enough to the face so the binoculars are pointed down instead of out.  Dang.


I really need to weather the gun shield of the AT gun, but I just don't have the time right now.

As I mentioned above, I added a set of magnets between the AA gun mount and the head.  It sits about 1/8" higher than standard, but I can remove it and maybe use it on my warthog.


Sunday, March 17, 2013

Eisenkern Warthog Progress

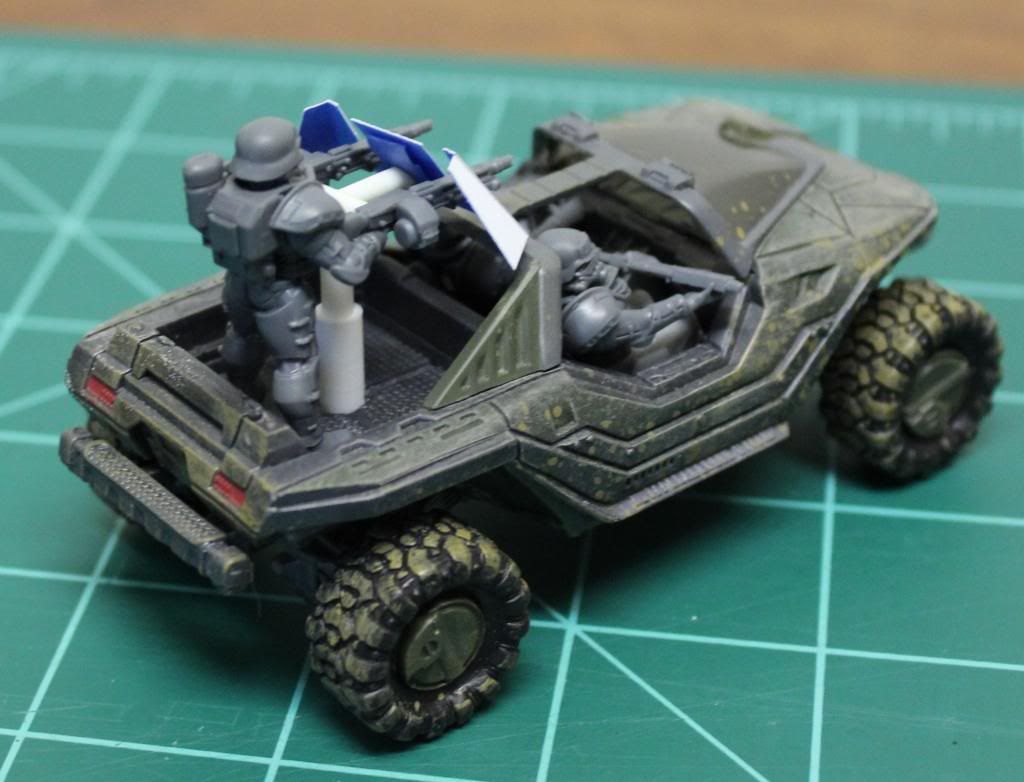
I've been working away at finishing up a review of the Eisenkern heavy weapon box set, but in the meantime I've worked up a little progress on my warthog conversion.

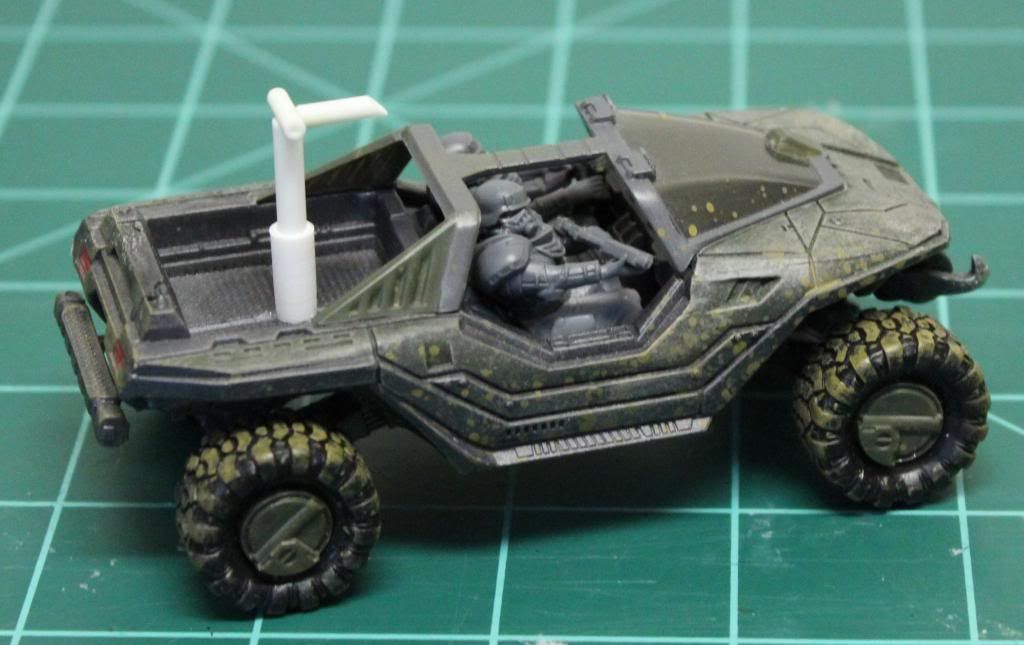
First up I worked up an A-Driver figure with an SMG.  It's a little bit of a cheat as he's holding it left handed, but it was the only way to make it fit without torquing the upper torso very far around which didn't look right.  This uses the upper body from the basic stormtooper box and another set of legs from a 40K Imperial Guard Sentinal Driver.


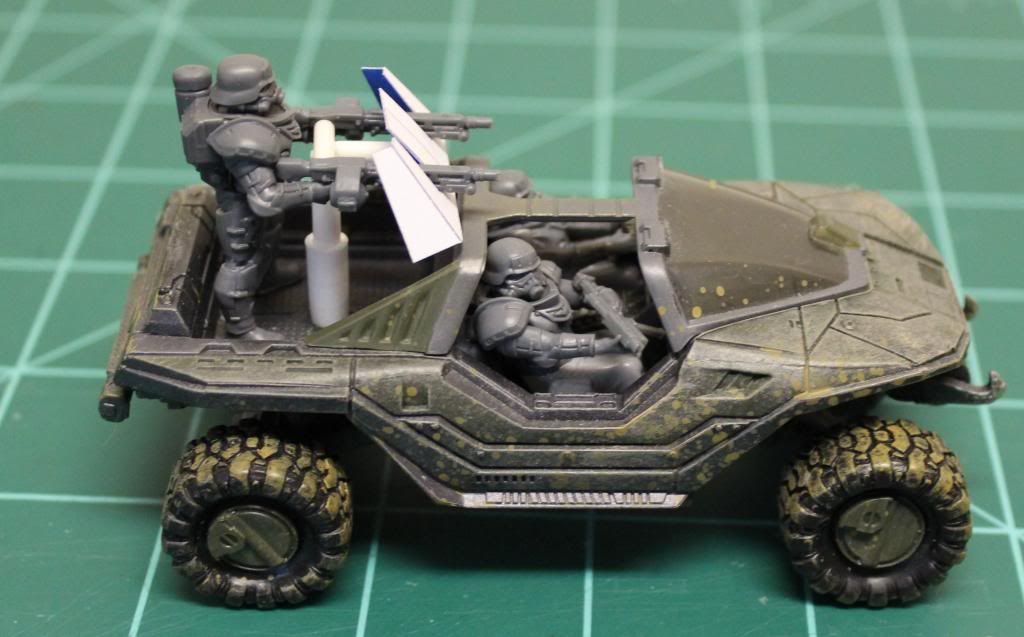
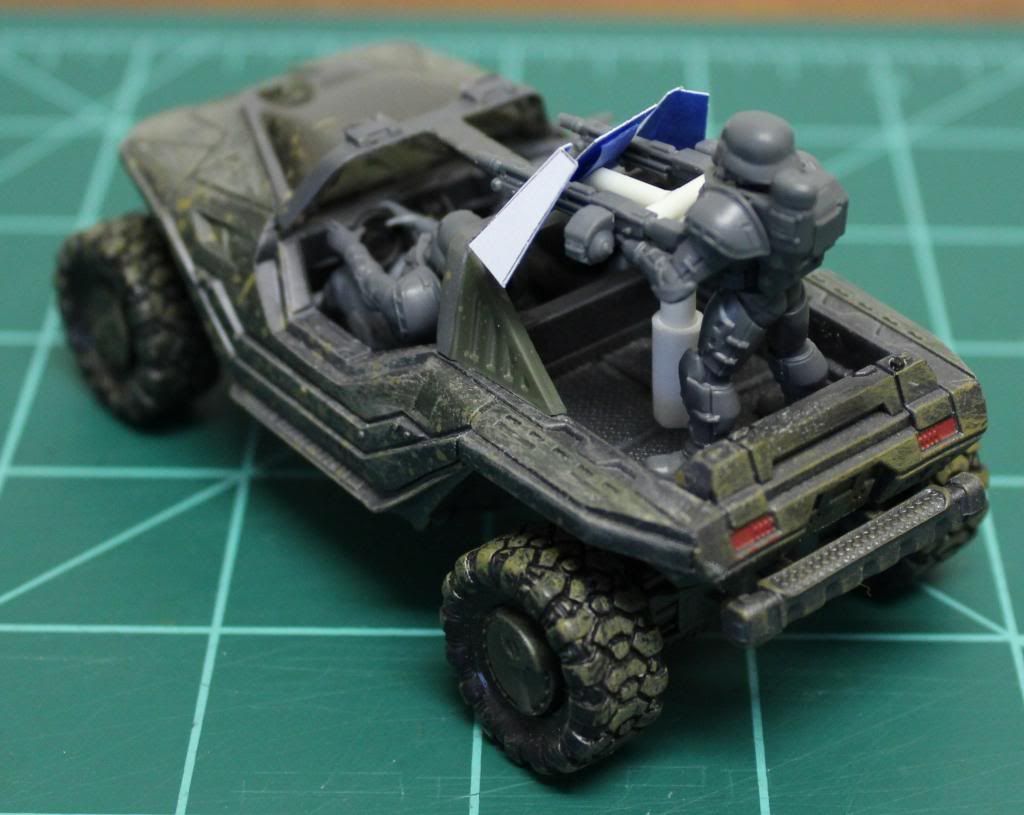
Next up I worked on a gunner with pintle mounted machine guns for the rear bed.  Again I started with a body out of the basic box.  Then I added arms and twin machine gungs from the accessory box.  With the shoulder pads I couldn't quite get them tucked into the shoulder sockets, so they are right about chest level.  I used spare drum magazines from AA gun in the heavy weapons set as they are a little bigger than the ones from the accessory set or the basic set.


I used various sizes of styrene tubes to work up a rough pintle mount and a gun shield.  The mount needs more clean up and detail work.  I'll see if I can fit a belly pad in there as well.  The gun shield is just a paper mock up to test out the dimensions.  Once I settle on a shape and size I'll make the final version out of .02" sheet styrene.


The leg position doesn't quite give you the ability to turn the gunner all directions, I can turn him left and right.  Tactically this thing is silly as all get out, but I think it still looks pretty cool.  Hopefully I'll have this ready for paint next week.  Here are some more pics.  As always comments welcome.